Quantcast
Channel: Camera Ergonomics
Viewing all 824 articles
Browse latest View live

3 Way Holiday Camera Shootout Part 1 Concept and Contestants

$
0
0

End of Day. Panasonic Lumix G6 with Lumix 14-140mm f3.5-5.6 (MkII) lens


Family Cameras    Many people these days rely on their smart phone for making a photographic record of family gatherings, events, children's milestones, holidays and trips away from home. But there comes a time when some of us realise we could be making better photos with a proper camera.  But which?  The market is awash with so many makes and models the task of choosing one can be difficult.

The Concept  of this 3 way shootout was for me to buy and use three kits, each representing a different approach to the family camera.   I chose cameras which, on their specifications and promotional material appeared to be suitable for beginner/snapshooters but also had a sufficiently comprehensive user interface to engage the interest of  enthusiast/expert photographers. I tested the three side by side over a two month period in a wide variety of conditions and  rated each on a list of characteristics including user experience, image quality, performance and ergonomics.


The contestants.
On the left Panasonic Lumix G6 with Lumix 14-140mm f3.5-5.6 OIS lens. In the middle Nikon D5200 with Nikkor 18-200mm f3.5-5.6 VR II lens. On the right Nikon 1 V2 with Nikon 1 10-100mm f4.5.6 VR lens. 

Questions  There are many questions and contestable assertions circulating in the world of cameras at the present time. Some of the questions, with sneak peek answers on which I will elaborate in later posts on this blog, are:

* Do Digital Single Lens Reflex (DSLR) cameras make better pictures than Mirrorless Interchangeable Lens Cameras (MILC) ? [No]

* Do larger cameras make better pictures than smaller cameras ? [Sometimes, depending on circumstances, sometimes not]

* Do larger sensors make better pictures than smaller sensors ? [Sometimes, depending on circumstances, sometimes not]

* Does Phase Detect AutoFocus (PDAF) as found on DSLR's in eye level viewing (mirror down) mode work faster or better in some way than Contrast Detect AutoFocus (CDAF) as found in many MILC's ? [No, but makes and models vary greatly]

* Do more expensive cameras give better results than less expensive ones ? [Cameras, generally yes, for the expert user. Lenses, usually yes, but not in proportion to the cost. You get more bang for your buck with the budget models]

Specification 

Zoom range: Most people hate changing lenses so much they never do it. So I selected camera/lens combinations  which offer  an "all-in-one-do-everything-with-one-lens" solution. Inevitably that meant a superzoom lens of some kind with 10-11x zoom range.

Picture Quality:  There are plenty of cameras with very small sensors (1/2.3", diagonal about 7.7mm) and fixed superzoom lenses offering 20x, 30x, 40x, 50x and even an amazing 60x zoom range. What's not to like about that ?  In two words:  Picture Quality.  That is a composite of sensor image quality, lens quality and camera operating capability, including things like focus accuracy and stabiliser effectiveness. So I opted for cameras with a larger sensor and interchangeable lenses.

Camera Types  I wanted one camera to represent the latest and best of the DSLR type, from the target "upper entry" model range. I chose one MILC from the well established M43 system and one recent MILC from the Nikon1 system,  a relatively new format which has some interesting features but is not yet firmly established in the market. In each case I chose a Proper Camera with a good quality built in eye level viewfinder, functional handle, built in flash, monitor and a set of controls suitable for entry level or experienced users.

Sensor sizes  I wanted one representative of each of the three sensor sizes which appear most suited to my design brief.

The Nikon D5200 has an APS-C sensor, diagonal 28mm.

The Panasonic Lumix G6 has a M43 sensor, diagonal 21.5mm.

The Nikon 1 V2 has a Nikon CX (1") sensor, diagonal 15.9mm.

The M43 sensor has approximately half the area of the APS-C sensor. The Nikon CX sensor has approximately half the area of the M43 sensor.

At the time of writing the DSLR type has been outselling MILC types in most countries, although it must be acknowleged they had an 8 year head start and when the Canon EOS D30 was introduced in 2000, the DSLR  had virtually no competition from any other camera type. MILC's were introduced in the middle of the global financial crisis, facing strong opposition from the established CanoNikon DSLR hegemony, with the added burden of a collapsing compact camera market, swept away by a tsunami of smart phones.

Aims of the exercise 

I wanted answers to the questions I posed above.

I hoped to discover which kit and more generally which camera type best fulfilled my functional design brief. [Sneak peek: it's the M43 MILC]

I wanted to gain a sense of direction for the future of the camera as a useful tool. [Sneak peek: it's MILC's for the next few years and after that maybe superzoom cameras with fixed big zoom lenses and much better picture quality than the ones currently available]

Author's statement of interest  I have no dog in this race at all. I have over the last 60 years used almost every make and type of camera ever invented. I have no affiliation with any maker or vendor of photographic equipment. I am comfortable using any kind of camera from large format through SLR, DSLR, to MILC and Compact.

My current personal choice of camera gear is a Panasonic Lumix GH3 with 12-35mm f2.8 and 35-100mm f2.8 zoom lenses. In the last three years I have owned, used and reviewed on this blog DSLRs from Canon and Nikon, MILCs from Panasonic, Olympus, Samsung and Nikon and advanced compacts from Canon, Panasonic and Fujifilm.  The equipment used in this 3 Way comparison was all purchased retail by me in Sydney at over the counter prices, GST paid.

Why do I do it ?  The exercise is expensive and time consuming. One day I will stop testing cameras and get on with life. But at the moment I am recovering from major surgery and my range of activity is restricted, so this 3 Way comparison test is something of interest to me which I can manage. I hope readers of this blog will find the material relevant to their own questions about camera equipment and use.


Next:  The weigh in: Dimensions, description and features.


3 Way Holiday Camera Shootout Part 2, The Weigh In

$
0
0

Nikon 1 V2 with 10-100mm f4-5.6 VR lens at 100mm. This lens is at it's worst at full zoom but still puts in a decent performance with a bit of softness on the right side and overall low contrast in the prevailing sea haze from the adjacent surf beach.

 
Body Description


The Nikon D5200 is a recent release, current model, upper entry/midrange DSLR.  It's characteristics, capabilities and user interface are typical of a modern  consumer level DSLR.  It is quite compact and light for a DSLR, but still substantially larger and heavier than the two MILC's. Like  other DSLR's the D5200 operates in a generally efficient fashion (with some exceptions as we shall discover) in eye level view with the flipping mirror down. But the segue to monitor [a.k.a. Live] view is not smooth and performance in Live View Mode is underwhelming.  


The Lumix G6 is Panasonic's latest mid range MILC. It is a compact, well integrated design, which offers good handling, viewing, operating and performance with either eye level view or monitor view. Picture quality is better than one might have expected given the DXO Mark scores (dxomark.com), see below.


The Nikon 1 V2 currently sits at the top of Nikon's strangely named "1" system MILC camera line. It shares with it's predecessor, the V1, some remarkable capabilities. It can shoot at 5 or 15 frames per second with VR, Auto Exposure and Predictive AutoFocus on every frame. At 5 fps the buffer can hold an amazing 72 RAW  (or 88 JPG Fine) shots before the shooting frame rate slows.  Through all this the EVF presents the viewer with the appearance of continuous streaming video even while shooting stills, with no blackout at all.


Body Dimensions


Camera

Width mm

Height mm

Depth mm

Box volume cc

Box Volume Ratios

Mass grams with Batt,card

Mass Ratios

D5200

128

99

80

1014

D5200:G6 = 1.38

550

D5200:G6 =1.41

G6

123

83

72

735

G6:V2

 = 1.5

390

G6:V2

=1.2

V2

109

79

57

491


335


On the left is the Nikon 1 V2 with 10-100mm lens in the unlocked, operating configuration. When locked for storage the lens is 20mm shorter. In the center is the Nikon D5200 with Nikon 18-200mm lens. On the right is the Lumix G6 with Lumix 14-140mm lens. Each lens is shown at the wide end of the zoom range. The photo tells you nothing about mass or balance. In use the D5200+18-200 feels bigger than you might perhaps imagine from this photo.


Body With Lens Dimensions


Camera/Lens

Width mm

Height mm

Depth mm

Box volume cc

Box Volume Ratios

Mass grams

Mass Ratios

D5200

18-200mm VR

128

99

182

2306

D5200:G6

=1.6

1155

D5200:G6

=1.65

G6

14-140mm OIS

123

83

141

1439

G6:V2

=1.38

700

G6:V2

=1.06

V2

10-100mm VR

109

79

121

1042


660

G6:V2


Comment on dimensions and Masses  You can see that in general each camera or camera/lens combination is about 1.4-1.6 times larger and heavier than the next smaller one.  The exception is that the G6 with lens is only slightly heavier than the V2 with lens.

Sensors


Camera

Aspect Ratio

Nominal Width mm

Nominal Height mm

Diagonal mm

Area Square mm

Effective M-pixel count

DXO Mark score total

DXO Mark Score Dynamic Range

D5200

3:2

23.5

15.6

28

367

24.1

84

13.9

G6

4:3

17.3

13

21.5

225

16.1

61

11.5

V2

3:2

13.2

8.8

15.9

116

14.2

50

10.8


Comment on Sensor Data  Compared to the G6, the D5200 has a larger sensor, more pixels, lower noise at high ISO settings and greater Dynamic Range. You might reasonably expect the D5200 to have clearly superior picture quality but in my tests using  photographs of a wide variety of everyday subjects that is not the case. Many times I preferred the appearance of photos from the G6. The inconsistent performance of the Nikon 18-200mm lens was one but not the only apparent reason for this. Images from the G6 and D5200 were in most but not all cases, clearly better than those from the V2.


Retail Price 

Camera prices are a moveable feast, varying with country of purchase, position in the product cycle and deals from time to time. For comparison purposes I have listed retail prices at the time of writing, GST paid, Manufacturer Australian 12 month warranty included,  from a Sydney vendor which sells both from a shop and online. Prices are in Australian Dollars


Kit

Body

Lens

Total

Nikon D5200+18-200mm

969

966

1935

Lumix G6 + 14-140mm

772

869

1641

Nikon 1 V2 + 10-100mm

816

599

1415


To this you would need to add add: Filter(s), Spare batteries, Lens hood (Supplied with Nikon 18-200mm and Lumix 14-140mm, not supplied with Nikon 1 10-100mm lens), Carry bag, puffer and microfiber cloth.


The process of choice   When I read published camera reviews I often encounter a long list of specifications and numbers by which the reviewer seeks to characterise the camera under review.  I suspect they use the numbers because they are, or at least appears to be,  hard data and therefore perhaps considered "safe", not requiring subjective evaluation by the tester which could more readily be challenged.

One could make a choice between the three camera/lens kits here with reference to the numbers.


If you want  the kit with the largest numbers, the choice is easy. The D5200 is the largest, heaviest and most expensive. It has the biggest sensor with the most pixels and the highest DXO Mark score.  

On the other hand if you want to shrink your camera kit and pick the one with the smallest numbers the V2 fits the bill.


In this big 3 Way comparison I have placed considerable emphasis on important qualities which are not readily described by numbers. These include picture quality, the user experience, real world performance and ergonomics, which devolves to holding, viewing and operating. I have come to realise over the years that technical image quality, (which is not the same as real world picture quality) and numerated specifications have their place in a comprehensive product evaluation but  the human-machine interface (which is a fancy way of saying "do I enjoy using this thing ?") determines whether we will take the camera with us when we venture forth and use it for making photos. The image quality of a camera sitting in the drawer is  zero.

3 Way Holiday Camera Shootout Part 3, Lenses

$
0
0

Nikon 1 V2 with 10-100mm lens


Introduction  Lens quality is a key determinant of overall picture quality. No camera can perform better than the lens mounted onto it.
Superzoom Lenses  These have the advantage of versatility and for most purposes, remove the need for changing lenses. But they have a complex design with many elements and at the consumer level as with the three lenses in this review, are built to a price. This means they do not deliver the same optical quality as less ambitious zooms and are more prone to sample variation and decentering.
Each lens extended to it's longest focal length. On the left the Lumix G6/14-140mm. In the center the Nikon D5200/18-200mm. On the right the Nikon 1 V2/10-100mm.  
 
Description
1. For the D5200 DSLR, we have the Nikon AF-S Nikkor 18-200mm f3.5-5.6 G II DX ED VR. Yikes, just the name of the thing takes almost a line of type. This is the MkII version of this lens, dating from 2009, although it has the same optical construction as the MkI version. This is a solid feeling, apparently well built lens with double extending barrel. It is the only one of the three to have  physical distance scale, located  beneath a transparent window in typical DSLR lens style. This means you can manually set a chosen focus distance by scale.
It zooms smoothly enough. The external barrel is bristling with switches for Zoom Lock, AF/MF, VR On/Off, VR Normal/Active. The zoom does creep without the lock. There is audible clicking and whirring from the lens as it focusses. Although by no means a large or heavy lens by DSLR standards it feels much more bulky and weighty  in the hands then either of the other two lenses.
It appears to be a parfocal design, which means it stays in focus while zooming.
2. For the G6 we have the Lumix G Vario 14-140mm f3.5-5.6  Asph Power OIS. This is a new for 2013 and completely different version of the Lumix 14-140mm lens. The original version dating from 2009 was larger, heavier, had a smaller aperture range of f4.5.8 and cost more on introduction. Early reports indicate the new version is also optically superior. Everything improved, Wow!  This is the lightest lens of the three and is only 4 mm longer than the Nikon 1 lens. It has a single extension inner barrel with the smoothest zoom action of the three lenses and no zoom creep. It has an OIS On/Off switch on the outer barrel. Despite it's light weight it feels well made with no detectable free play of the barrel, unlike the other two lenses which do exhibit a little movement.
It is a varifocal design which means it has to be refocussed after zooming.
3. On the Nikon 1 V2 we have the Nikon 1 Nikkor 10-100mm f4.0-5.6 VR. this is also a second version of the Nikon 1 superzoom theme. The original Nikon 1 10-100mm PD superzoom is a much larger and heavier lens with 72mm filter size, designed, I believe mainly for motion picture duties. Like the other two lenses this one feels very well made and operates smoothly although the double extension inner barrel zoom action does have a little hitch in it's progress about half way through the range. This lens is of semi collapsing type to reduce it's closed length. To extend the lens for use you press a button on the lens barrel then twist the outer barrel until it clicks. This action also switches the camera on, ready for action. This might sound a bit clumsy but in practice works well and soon becomes second nature. Unfortunately this lens does not have a manual focus ring just as all but one of the Nikon 1 lenses at the time of writing lack a manual focus ring. OOOps !! Did it not occur to the Nikon product development people that enthusiasts might be interested in a system camera which can do predictive AF at 15 frames per second ???
This is also a varifocal design.
Sizing Up
Lens

Min

Length

mm

Dia

mm

Box

Vol

cc

Filter

Dia

mm

Focal

Length

mm

Diag

Angle

View

Degrees

Mass

Min

Foc

Dist

Wide

mm

Min Foc Dist Long

mm

Nikon 18-200

97

77

575

72

18-200

76-8

565

250

460

Lumix

14-140

75

67

336

58

14-140

75-8.8

265

300

500

Nikon

10-100

71

61

258

55

10-100

77-9.2

298

350

650


Comment on DimensionsAs you would expect, the DSLR with the largest sensor needs the biggest lens and the Nikon 1 V2 with the smallest sensor has the smallest lens. However the two MILC lenses are quite close in dimensions, while the jump up in size and mass to the 18-200mm is more apparent in use.
The Minimum focus distance is measured from the subject to the sensor plane.
Mechanical function  Each lens has optical image stabilisation which appears to work well. My subjective impression is that VR in the Nikon lenses appears to stabilise the viewfinder image more effectively than OIS in the Lumix.
Mirror Slap and Shutter Shock  I ran numerous systematic tests for these unwelcome phenomena, using shutter speeds from 1/10-1/400 second. In this range I found no evidence of blur due to mirror slap with the D5200 (mirror down) and no evidence of blur due to shutter shock with the D5200 (Live View) or the V2 with mechanical shutter. Nikon's engineers appear to have tamed shutter shock quite effectively.
With the Lumix 14-140mm on the G6 I did find evidence of shutter shock in the shutter speed range 1/100 to 1/160 second with the mechanical shutter.   There was no problem with the E-Shutter in use.
Decentering  With so many lens elements it is not surprising that they are not always assembled with absolute precision. Each of the lenses in this test showed some evidence of decentering, particularly evident at the long end in each case but also apparent at the wide end of the 18-200mm.
Manual Focus  There are marked differences in manual focus operation between the three kits.
Worst is the V2 which can do MF but the procedure is so convoluted and the  determination of In/Out focus so difficult, that the whole exercise is hardly worth the bother. You have to press the Feature  button, scroll to the Focus icon, press OK, scroll to MF, press OK again, then rotate the Multi Selector to change focus. Press the OK button again  to zoom in and rotate the Command Dial to zoom some more.
With eye level viewing the D5200 allows FTM (Full Time Manual, enables manual focus while autofocus is active).  This works well at the long end of the zoom but at the wide end it is almost impossible to pick the in/out  focus transition and there is no focus assist (no peaking, no electronic zoom). That is just a characteristic of  typical APS-C optical viewfinders. You get what you get.  In Live View the D5200 also offers FTM with the option to zoom in using the Zoom In and Zoom Out buttons. However it is still very difficult to evaluate the In/Out focus transition at wide angle lens settings. In addition you have to be very dextrous or better, use a tripod, to juggle the Zoom In/Out buttons while pressing the shutter button and operating the manual focus ring while supporting the camera and lens.
By far the best manual focus arrangements are to be found in the G6/14-140mm. First you have FTM with eye level or monitor view and it works the same with both. Just acquire AF with the AF/AE Lock button or half press the shutter button and simply start turning the focus ring on the lens. The view zooms in automatically and can be zoomed further by turning the rear dial. Focus peaking springs into action and makes picking the in focus position easy.
Or you can go to the Q Menu while using eye level or monitor view and select MF. This is easily done by feel without having to look at any of the buttons. Either way the process is fast and accurate.
The only thing you don't  get with any M43 camera to date is the ability to preset a chosen distance by scale.
Optical Performance
 Note that these results are valid for the lens samples which I tested. Due to sample variation different results could be given by other copies of the lenses.
Resolution   I ran many tests for resolution using a test chart and many real world subjects of different types, photographing the same subject with each kit side by side. I won't bore you with the minutiae of my findings but here is a summary of the results:
The D5200/18-200mm was best or equal best in the center at all focal lengths [except for issues with focus variation, see below]. This kit delivered the worst edge/corner performance at all focal lengths.
The G6/14-140mm was equal best (or better when the 18-200mm did not focus correctly) with the 18-200mm in the center on several of my test runs and was best at the edges and corners at all focal lengths on all test runs.
The V2/10-100mm was equal to the 14-140mm in the center on some runs and second to the 14-140mm at the edges and corners on most runs.
Overall the Lumix 14-140mm had the best all round resolution taking into account center, edge and corner sharpness at all focal lengths.   Next was the V2/10-100mm and  last was the D5200/18-200mm, let down by poor edge/corner performance.
Flare  Each of these lenses is prone to flare with the sun in frame and at or near the frame edge. This is normal for this lens type. In use each should be protected from sun on the front element, if possible.
Chromatic Aberration (CA) and Purple Fringing (PF)  These issues are quite common with superzoom lenses. The G6/14-140mm utilises automatic, in camera CA correction which is very effective to the extent that CA in photos from the G6  is almost nil. There is some residual PF in some very high contrast scenes.
The D5200/18-200 is very prone to CA and PF.  For RAW files there is a Profile for this camera lens combination on Adobe Camera RAW (ACR) (or Lightroom) which rectifies the CA quite effectively.
The V2/10-100mm is also quite prone to CA and PF but there is no profile at the time of writing. CA can however be removed manually in ACR.
Distortion  The 18-200mm and 10-100mm lenses have plenty of barrel distortion at the wide end. This is corrected with the ACR profile for the 18-200mm. The 14-140mm probably also has substantial distortion but if so it is largely corrected automatically in a M43 camera.
Focus Variation All autofocus systems are prone to error with some subject types. These are described in the D5200 Reference Manual although I couldn't find much about this in the G6 or V2 Manuals.  In the many hundreds of photos which I made during the comparison testing process, I found some frames incorrectly focussed, as indicated by center of frame unsharpness. The proportion of these not-quite-in-focus frames was higher with the D5200/18-200mm in both eye level view (PDAF) and monitor view (CDAF).
Summary   By the time my lens tests were complete a clear ranking had become apparent.
Overall the Lumix 14-140mm is the best lens of this trio, followed by the Nikon 1 10-100mm, with  the 18-200mm bringing up the rear.
Comment on the rankings  The Lumix 14-140mm is the newest design of the three, the Nikon1 10-100mm not quite so new but recently released. The 18-200mm is by several years the oldest.  It does appear that the design and manufacture of consumer zooms has improved considerably in the last few years.
And to finish on a little aphorism: "Dont judge a lens by it's size or price".
Next: The user experience 


3 Way Holiday Camera Shootout Part 4, User Experience

$
0
0

Nikon 1 V2, 10-100mm lens at 100mm
 
Camera Reviews  Many camera reviews provide a long list of specifications and features. Several also provide a detailed description of all the various User Interface Modules (UIM, meaning buttons, dials levers, touchscreens etc), describing the location and function of each.  No doubt this "shopping list" approach to evaluation has it's uses but reviews like this leave the reader with very little insight as to whether the device is user friendly or not.
User Experience  In my family and I suspect many others, devices of all  kinds which do not work in harmony with the user get left in the drawer depreciating in value. If a camera is not user friendly it will not be used and so it's real world image quality and performance will be nil.
Notes on the single lens reflex camera  (SLR)     For 50 years SLR's  used film as the recording medium. There was no hint of digital capture, monitor viewing or motion picture capability.  With the advent of the digital era the SLR morphed into the DSLR but retained it's basic architecture and flipping mirror operation. Still  image and motion picture preview on the monitor require the mirror to be flipped up and locked. This blocks the optical viewfinder and exposure metering unit. It also disables the phase detect autofocus module beneath the mirror. So in monitor view the DSLR has to use a completely different system for exposure and autofocus, taking data from the imaging sensor itself, just like a MILC. In effect the modern DSLR is two cameras in one.
Notes on the MILC  Mirrorless interchangeable lens cameras were designed for all electronic operation from the start. Focussing, exposure and capture all use the imaging sensor. The camera works the same way with eye level or monitor viewing. This enables a seamless transition between these two viewing modes, either of which can be used for still and motion picture capture.
Monitor viewing and motion picture are fully integrated electronic functions of the MILC but are an afterthought to the SLR's basically mechanical operation.
In addition MILC's, having dispensed with the flipping mirror, mirror box and pentaprism  can be much more compact than DSLR's with the same sized sensor.
Price  Before  using a camera one has to buy it. The D5200/18-200mm  is sufficiently more expensive than the other two kits to give one pause about buying. If this camera had markedly better picture quality or performance than the other two kits this extra cost might feel justified.  The G6/14-140mm costs more than the V2/10-100mm but it does deliver better image quality.
Size, Mass   Although it is not terribly evident from the product comparison photographs, the D5200/18-200mm feels significantly more massive in use than the MILC's, which feel very similar.
Features  I have to confess being rather skeptical about many of the features which festoon modern cameras. This trio has some which could be useful and others the appeal of which eludes me. The G6 has touch screen operation, focus peaking and Wi-Fi connectivity to name just a few from the long list available. The V2 can shoot with predictive autofocus on every frame at 5 or 15 frames per second, a huge buffer and continuous streaming EVF view.  On the other hand the V2 has some faddish features which I suspect will be three day wonders for many users. These include Motion Snapshot Mode and Best Moment Capture Mode.
Holding, Handling  The D5200 feels unbalanced, with a relatively heavy lens on one side and a somewhat inadequate thumb support on the other side. I found it always necessary to apply substantial gripping force with my right hand and also fully support the lens with my left hand. There is enough space on the back of this camera to fit a more prominent thumb support which would allow the right thumb to lie diagonally across the back of the camera for easier holding  with less gripping force.  The G6 achieves this with a smaller body, showing that it can be done. The V2 has a prominent handle and gets away with the poor thumb rest by being so small and light.
Operating  Both the MILC's offer seamless integration of stills and video, eye level and monitor viewing. The G6 allows the monitor view and EVF view to be configured to the same layout so the transition from one to the other involves no cognitive disconnect. The MILCs allow an extensive and user selectable list of camera data to be displayed on or beneath the EVF/Monitor preview/review image. The G6 offers the most options.
Both the MILC's operate smoothly and quietly. The mechanical shutter of the V2 is particularly unobtrusive. Both can be set for silent operation using an electronic shutter. The D5200 operates with audible whirring and clunking as the AF motor, shutter  and flipping mirror do their thing.
Family appeal  Part of my testing process has been to give each of the cameras to various family members to hold and use. None of them selected the D5200 as the camera they would like to take on a family holiday. Of the two MILC's, my pick for user experience is the G6 as it has the best ergonomics. But others selected the V2 for various reasons. It is the smallest and (just) lightest, it is the most quietly unobtrusive in operation and (this is not a joke) the shiny white surface is not easily marked by ladies' makeup.
My ranking for user experience is
1. G6/14-140mm
2. V2/10-100mm
3. D5200/18-200mm


Next:  Picture Quality


3 Way Holiday Camera Shootout Part 5, Picture Quality

$
0
0
G6 with 14-140mm lens

D5200 with 18-200mm lens

 
Technical Image Quality vs Picture Quality   There are several internet sites which publish data about camera image quality using technical terminology. A well known one is DXO Mark (dxomark.com). DXO reports overall image quality, Color Depth, Dynamic Range and Low Light ISO. DXO also reports a range of other technical measurements such as signal to noise ratios at various ISO levels. These measurements are made in highly controlled conditions in a laboratory style environment using test targets designed to reveal specific imaging characteristics.  I have no doubt these results form a useful part of an overall evaluation of the capability of a camera.  For want of a better term, I refer to the figures produced by this type of testing as "Technical Image Quality".
But when we use a camera it is never in a highly controlled environment. Real world use introduces many variables which intervene between the technical capability of a sensor and the final picture. I call this final result "Picture Quality".
Factors Influencing Picture Quality   Some of the factors which might and in fact often do influence actual output picture quality include:
* Camera Movement. Some users can hold a camera steady, others don't do so well. Some camera/lens kits are easier to hold steady than others.
Some cameras have Auto ISO algorithms which keep shutter speeds in the acceptable range for hand held use, others allow shutter speed to fall to levels which can cause unsharpness.
Some users watch their shutter speed readout and increase ISO setting if the shutter speed falls too low.
Some cameras/lenses have some kind of image stabiliser which can help steady the camera/lens unit.
* Lens quality.
* Exposure. Some cameras have exposure metering systems which allow highlights to become overexposed (blown out), others protect highlights assiduously.
* Color rendition. Cameras differ in the way they render colors.
* Focus accuracy.
* Aperture and depth of field. A camera with a large sensor will have to use a smaller lens aperture to achieve the same depth of field as a camera with a smaller sensor. This in turn requires a higher ISO setting and/or slower shutter speed both of which could have a negative impact on picture quality.
Real World test procedure  I made hundreds of photos of a wide range of subjects, shooting the same subject in the same light at the same time with the three kits. I used both the Auto setting and one of the P,A,S,M settings, usually Aperture priority. I used Auto ISO most of the time as that is what I and I suspect most users do. I noticed that each camera typically used a different Auto ISO setting and therefore  a different shutter speed.
Subjects were in bright sun, front lit and back lit, shady bright light, outdoors, indoors, in medium and low level lighting, natural and artificial. I shot people, single and groups,  landscapes and  buildings inside and out. I shot JPG and RAW files. I uploaded selected shots to the computer and compared images side by side on screen. I looked at JPG's, unmodified RAW's and RAW's processed to "best result" in Adobe Camera RAW 8.1.

G6 with 14-140mm lens

D5200 with 18-200mm lens

 
Defining Picture Quality 
* Color rendition    Some people like saturated colors, others prefer a more natural rendition which may be less saturated.  Cameras often differ in the way they place output colors in the spectrum. For instance one camera might render blues slightly cyan, another might render blues slightly violet. The accuracy of each can be measured with suitable test materials but the individual photographer might not be overly concerned with accuracy. The cameras in this test do render colors differently but I had a hard time deciding if any one of those representations was better than another.
* Highlight and shadow detail  It is easy enough to evaluate the amount of highlight and shadow detail in a JPG or RAW file on screen or in print. This is not the same as technical Dynamic Range which is measured in a specific way, generally by photographing a transilluminated step wedge.  I found that although the D5200 has a higher technical Dynamic Range, this was not reflected in actual pictures.
* Resolution/sharpness  I looked at resolution and sharpness in the center, at the edges and corners of test shots. I found that lens quality, focus accuracy and auto selected shutter speed had a big influence on sharpness.
* Noise  I looked at noise levels in each of the comparison photos.
The cameras on test, real world results  If you review the technical image quality data in Part 2 of this comparison series you will see that the D5200 scores best, followed by the G6 with the V2 scoring lowest on DXO Mark ratings.
You might expect the D5200 would easily beat the G6 for picture quality but that is not the case in the many hundreds of photos which I made for this comparison test.  However both the G6 and D5200 made better pictures than the V2 in almost all comparisons.
* Color:  There are differences in color rendition between the three cameras but I could not say one is better than the other. Another observer might have a preference for one or the other. For instance the D5200 typically delivers more saturated colors than the other two.
* Highlight and shadow detail: the D5200 and G6 are both very good and very similar. Even in subjects with a high brightness range I could not proclaim one to be better than the other.  By comparison the V2 suffers from less highlight and shadow detail than the other two when subject brightness range is high.
* Resolution/sharpness:  In the  frame center there was not much difference between the three kits. One might have expected the D5200 with a lot more pixels to excel here but that was not often  the case when actual photos were examined.  At the edges and corners the 18-200mm lens let the D5200 down,  producing consistently softer peripheral resolution than the other two lenses. The V2 in lower light levels often selected a low Auto ISO level presumably to keep noise levels in check. But this also produced a low shutter speed which fairly often led to unsharpness due to camera shake.
 I don't understand why the D5200 did not deliver better sharpness/resolution in the frame center. The 18-200mm lens works well in the center and the camera has more pixels than the others so one might expect it to beat the others easily. I did not have the time, money or motivation to test the D5200 with a better lens.
* Noise: The D5200 produces less noise at high ISO levels than the G6 which in turn is less noisy than the V2, which exhibits noise even at base ISO.  In actual photos the D5200 would typically set the highest Auto ISO level, followed by the G6 then the V2.  As a result the noise superiority of the D5200 was often countered by the higher ISO setting. With the camera on a tripod and with matched ISO settings the D5200 was able to demonstrate it's superiority. V2 pictures were always more noisy than the other two.
Summary My overall ranking for picture quality taking into account all the real world factors is:
1. G6/14-140mm.
2. D5200/18-200mm. With a better lens the D5200 would be the winner.
3. V2/10-100mm


Next: Performance


3 Way Holiday Camera Shootout Part 6, Performance and Speed

$
0
0

D5200, 18-200mm lens. You cansee the orange in this photo is bolder than in the photo below. The one below is probably more accurate.
G6, 14-140mm lens. Different aspect ratio from the M43 camera. Apart from this and the different color rendition I see little substantial difference between these photos.

 
Published Camera Tests  Many published camera tests just regurgitate manufacturer specifications and present this as an evaluation of camera performance. For instance I was recently reading a comparison between two cameras, one of which could shoot continuously at 9 fps, the other at 5.3 fps. The faster one was declared "better". But the reviewer just got this information from the spec sheets without testing to discover if 9 fps actually delivered any benefit over 5.3 fps.  Delving further in to the specs, it appears that both cameras claim to be able to do continuous AF, Continuous Drive at 4.2 fps. But again we have no idea how effective either camera might be in terms of the data which really matters, namely the percentage of frames in sharp focus.


Real World Performance Testing  I subjected all three kits to a series of tests, evaluating the relevant ones by checking the resulting photos at 100% on screen.
General remarks  All three cameras (Except the D5200 in Live View Mode)  delivered very good performance. I think most users would be well pleased with any of them. They each switch on and operate in a brisk and responsive fashion. A missed shot will rarely be due to any deficiency in the equipment.
Autofocus Speed  For this test I focussed back and forth between a near object and a far object, acquiring focus with a half press of the shutter button and waiting for the beep plus green AF area. I used the central area in each case. I did not fire the shutter.
Camera

Outdoors, dull overcast

focus actions per second

Indoors low light

Focus actions per second

D5200, OVF View

1.5

1.1

D5200, Monitor (Live) View

0.3

0.2

G6

2.2

1.3

V2

2.5

1.0


Comment on Autofocus Speed   Outdoors the V2 is the AF speed champ, just beating the G6 by a small margin. The D5200 is by no means slow and will please most users but it can't keep up with the two MILC's.
Each camera slowed indoors but the V2 was slowed the most by low light. I believe this is because it switches from PDAF to CDAF in low light and Nikon CDAF is slower than Nikon PDAF.
Of the three the G6 was almost fastest outdoors and was the fastest indoors.
Turning to the D5200 in Monitor (Live) view mode we discover that the word "speed" does not apply in any sense at all. The camera switches from Phase Detect (PD) to Contrast Detect (CD) which does the "5 step dance" on every shot even when the subject distance has not altered. It goes eee...errr...eee...errr...beep (Yay! look at me, I did it !!) Presumably exhausted by this effort, the screen goes black for 2-4 seconds before the camera is finally ready to make the next shot. That might be just acceptable for landscape and similar work but the Monitor AF is error prone as well as slow. If this sounds bad it is better than the last DSLR which I owned which was a Canon EOS 60D. This thing did an eight step dance to achieve Live View focus and still made mistakes. I suspect that in most cases pre-setting focus distance by scale would be more satisfactory for Live View photography.
You may read opinions on the net by various photo sages that DSLR's focus faster than MILC's as if this were a statement of indisputable fact. My testing shows this is not so.
You may also read that CD autofocus is slower than PD autofocus. This is only true to the extent that CD AF in current model DSLR's  is slower than PDAF in those same cameras. CDAF in current model M43 cameras is very fast indeed, faster in fact than the PDAF in many DSLR's. It is also in my experience and testing, more consistently accurate.


D5200 with 18-200mm lens
G6 with 14-140mm lens
 
Shot to Shot Times  For this test I pointed the camera at a fixed target and in Single AF, Single Drive Mode, center AF Area, repeatedly pressed the shutter to make an exposure. The camera did not have to refocus between shots but it did have to confirm correct focus.
Camera

Shot to Shot time, seconds

D5200, OVF View

0.65

D5200, Live View

4.1

G6

0.5

V2

0.25


Comment on Shot to Shot Times  Like it's namesake in Peenemunde in 1944, the V2 goes like a rocket.  The G6 and D5200 in OVF Mode are by no means disgraced however and will suit most purposes just fine. The D5200 in Live View Mode is best suited to subjects firmly bolted down and immobile.
Continuous AF, Continuous Drive, Predictive Autofocus  For this round of tests I used cars driving along a suburban road and a person walking towards the camera at close range. The cars were in mixed light varying from sunny to shaded. The walker was in partly open shade  requiring a high ISO for adequate shutter speed.
The task for each camera/lens kit was to hold focus on the moving subject at 4 or 5 frames per second, and in the case of the V2, 15 frames per second.  The V2 has a huge buffer of 72 RAW frames at 5 fps. The G6 can manage 6 RAW frames before slowing, the D5200, 4 frames. So I used Fine JPG capture for all tests. With JPG files the G6 and D5200 could run off 50+ frames per run, more than enough for my purposes. I used single center AF Area, AF Continuous and a 95 MB/Sec card.  The D5200 and V2 were set at 5 fps, the G6 at M Burst which gave 4 fps. I ran the V2 at 15 fps in a separate test. The V2 is as far as I am aware the only camera at any price which can do predictive AF at 15 fps.
I set each lens at or near it's longest zoom position. I used the eye level viewfinder for all shots.
I used cars and the walker to be reasonably sure that each camera had the same task to perform in the same conditions, making the test fair. I did not test sports as this would introduce many uncontrolled variables.
I downloaded the resulting many hundreds of files and inspected each at 100% on the computer screen. I rated each as being Sharply in focus, Just out or Unsharp.
The User Experience  In reasonably bright light outdoors, the most pleasing camera to use in Continuous AF is the V2.  It has a muted shutter sound. The EVF appearance is that of continuous streaming video even though the camera is actually making stills. There is no perceptible EVF blackout. The image preview appears steady in the EVF.   The RAW buffer is huge. If you want, the camera can run silently at 5 or 15 fps with AF on every frame.
Next best to use is the D5200 which operates just like other DSLR's with a short blackout between each shot as the mirror flips up and down.
The G6 has the longest viewfinder blackout after each frame. It is usable and with practice the subject can be maintained in frame easily enough. It would be nice however if the Panasonic guys got the system in the V2.
Results 
Camera

Cars, Frames sharply in focus average over several runs

Walker, Frames sharply in focus. Average over several runs

D5200, 5fps

86%

95%

G6, 4fps

85%

93%

V2, 5fps

66%

76%

V2, 15 fps

65%

Not tested


Comment on Predictive AF Results  Each of these consumer level cameras performed surprisingly well at predictive AF. All three cameras got a majority of frames in sharp focus.
The V2 is the absolute speed king however when we look at the percentage of frames in focus the other two perform a little better.
I found no significant difference between the D5200 and the G6 both of which performed at a level which would have been considered excellent in an expensive professional DSLR just a few years ago, and maybe even today.
You may read in the online photographic commentariat that
a) DSLR's do predictive AF better  than MILC's
b) MILC's are useless for predictive AF
c) Phase Detect AF is better for predictive AF than Contrast Detect AF
Each of these assertions is incorrect as to fact.
I think what is correct is that
a) Contrast Detect AF in DSLR's with PDAF optimised lenses is unsatisfactory for predictive AF. These lenses have  helical focussing mechanisms which were once considered fast but are really very slow compared to the direct drive AF mechanisms in modern M43 lenses.
b) The latest MILC cameras and lenses, particularly those for the M43 system can do predictive AF very well indeed. However M43  EVF refresh technology needs to be upgraded  to match that of the Nikon 1 system.
Performance Ranking  This is a bit difficult to determine due to the mixed results achieved.
The V2 is the nicest to use and is capable of the fastest shot to shot times and frame rates in good light outdoors where most predictive AF work will be done. But the percentage of sharp frames is not up to the other two.  In addition its speed drops substantially in low light indoors.
The D5200 works well and delivers a good result in all the test conditions (with eye level viewing).
The G6 does predictive AF  much better than some commentators and testers would have you believe. Some of these testers may have set the Autofocus  Mode on M43 cameras to "AF Tracking" which does NOT produce effective predictive AF.  Continuous AF is available with the monitor swung out, a handy feature not available on the other two.
In the end I have decided not to call a winner of the Performance /Speed criterion. Each does a good job but each has a different spectrum of capabilities.
The very fact that I am not able to call a winner with any confidence is actually very significant. Two years ago any mid range DSLR from Canon or Nikon would have easily outperformed any MILC.  It is intriguing to see how the march of technology has altered the balance between DSLR's and MILC's, or at least the Nikon 1 and M43 systems.
I have little doubt that MILC technology and performance/speed will continue to advance. But the DSLR has just about come to the end of it's evolutionary journey.  The main arena for performance advances in DSLR's lies in the Live View side of their operation. But any advances in that direction will potentially be of even more use to MILC's. I am thinking of Canon's incorporation of PDAF on every pixel of the imaging sensor, being introduced in Australia as I write on the EOS 70D. Canon wants it to improve smooth continuous AF during motion picture recording. But if the idea really works well why bother with all the mechanical paraphenalia of a DSLR ?  It might be even more suitable for a MILC.  


Next: Ergonomics


3 Way Holiday Camera Shootout Part 7, Ergonomics

$
0
0

Lumix G6 with 14-140mm lens
 
Summary of ergonomic concepts applicable to cameras   Ergonomics is the study of designing equipment and devices that fit the human body, it's movements and it's cognitive abilities.
Camera operation can be considered in four Phases, Setup,  Prepare, Capture and Review. Ergonomics devolves to Holding, Viewing and Operating in each of these Phases but particularly Capture Phase in which there is the highest requirement to carry out specific actions in a limited time.
General Observations  Each of these cameras offers at least acceptable ergonomics and none is without fault.
Holding  The lighter cameras are easier to hold than the D5200.  They require less constant support under the lens by the left hand and less gripping force by the right hand.  The D5200 and V2 each have a reasonable handle but a poorly located and shaped thumb support. The G6 allows the right hand to adopt a holding posture which is closer to the ideal "half closed, relaxed" position which I described in the post on functional anatomy of the human hand. There is enough space on the D5200 for a better thumb support which could be like that typically seen on Canon DSLR's. This would mean re-arranging control modules but that would not be difficult. I have also designed and built a mockup with the same dimensions as the V2 but with a much more user friendly layout.
Overall the most comfortable and secure kit to hold is the G6 followed by the V2 then the D5200.
Viewing  The modern electronic camera has complex viewing requirements. The user has to preview/review the image in the eye level viewfinder and also on the Monitor. In addition a user selectable menu of camera data must be visible on or beneath the eye level and monitor image. It is desirable that the viewfinder and monitor be configured to look the same and present the same data in the same format. This makes for a seamless segue from one to the other. In this regard, the mirrorless cameras have an advantage.
In my experience a fully articulating monitor (as found on the G6 and D5200) can be very useful. But performance with D5200 monitor view is sluggish.
In bright sunny conditions the D5200 optical viewfinder (OVF) provides the most appealing subject preview with the best shadow detail but the camera data can be almost invisible. Image playback is not available on an OVF.
In bright sun the G6 EVF is rather contrasty with blocked up shadows but the camera data are always easy to read.
The V2 EVF presents a slightly soft blue tinted image which is adjustable for brightness but nothing else. The V2 eyecup is a bit small, allowing light to impinge on the viewing eye, making clear preview difficult.
In Low light levels  The D5200 OVF gets quite dark. The EVF's on the two MILC's gain up in low ambient light to present a steady bright view in all conditions. In extremely dark conditions the G6 EVF is subject to jitter when panning but that is uncommonly seen in regular photographic practice.
In any conditions the very functional and fully articulated monitor of the G6 is  useful and practical. I have found that having become accustomed to this type of monitor on several Lumix cameras over the last two years I do not want to go back to a camera with less functional monitor live view or a non articulated or just pivoting monitor.
So the D5200 and V2 each have their viewing strengths but overall the G6 provides the best viewing experience, followed by the V2 then the D5200.


On the left, Nikon 1 V2. On the right my wooden mockup with the same dimensions.  This has raised shoulders and a completely revised user interface with JOG lever, providing excellent ergonomics.
Operating  Modern electronic or hybrid mechanical/electronic cameras (like DSLR's) are very complex machines. This poses a challenge to designers. How can they pack into the device the multitude of functions and capabilities which are expected these days while maintaining a user interface which ordinary humans can understand and operate efficiently ?
I will just mention some of the highlights and problems with each camera as a full discussion of operating characteristics would be too complex for this blog post. I have posted detailed discussion about analysis of camera operation in early posts on this blog.
 D5200  In eye level view operates reasonably efficiently.
ISO can be adjustable via the Fn button if it is so tasked. But the Fn button is difficult to locate by feel. The D5200 implements ISO/Auto ISO in a fashion which I find strange and frustrating. In the Shooting Menu, or My Menu if so allocated, you can select to switch Auto ISO On or Off.  If  set  On then you cannot set a specific ISO via the Fn button or the menu.  You have to switch Auto ISO Off.
In the other two cameras the Auto ISO setting is contiguous with specific ISO settings which is a much more coherent arrangement.
Exposure Compensation is available via the +/- button behind the shutter button. With some practice this is easy enough to find by feel.
Direct Focus Area control is available on the Multi Selector. This is easily accessible to the right thumb and this function works well, except that the active AF area is confined to the central part of the frame. MILC's can use the whole frame.
AF start can be allocated to the AE-L/AF-L back button in proper DSLR fashion. But this capability is oddly implemented. If AF start is allocated to the back button, it is disabled from the shutter button. I can more or less see the logic of this but in practice I find it irritating and I don't like cameras which irritate me.
If you want to adjust Image Quality, AEB, WB, Focus Mode, AF Area Mode, Meter Pattern or Flash Mode you have to stop using the OVF, lower the camera, open the monitor (if it was closed) press the [i] button, press the [i] button again then scroll around to your desired setting with the Multi Selector, make the adjustment then return to eye level viewing. This workaround is partly a consequence of operational constraints built into the basic SLR design and partly a result of the "semi-beginner-style" user interface of the D5200.
 Compare this to the G6  which can be user configured to be able to make a comprehensive list of adjustments by feel, while continuously viewing through the EVF.


Nikon 1 "V3" mockup being held in the right hand. I needed my left hand to make the photo. I rate this as being the smallest camera size which can accommodate a fully ergonomic shape and control module layout.
V2  The designers of the V2 have deliberately restricted the number and range of features, functions and adjustments available. This is not such a bad approach as it makes the camera the easiest of the three to set up and learn to operate effectively. It can manage most of the requirements of most beginner to enthusiast users. The dials are well designed and turn with the right amount of  resistance and clicky feel. The V2 is a vast improvement over the incomprehensibly crippled V1. The F button could be implemented much better if it was configured like the Q Menu on current Lumix cameras.
I have designed and built a wooden mockup camera having the same dimensions as the V2. This is a proof of concept exercise which shows that within the dimensional envelope of the V2 it is possible to design a fully featured pro style camera with excellent ergonomic efficiency.
G6  My interest in ergonomics was provoked by Panasonic's first "G-Micro" camera, the G1, which superficially looks like and is aimed at the same user demographic as the G6.  But I found the G1 to be a really frustrating thing to operate with many ergonomic deficiencies. The G6 shows that the details of user interface implementation are of the utmost importance. The G1 was, in my view, an ergonomic kludge while the G6 is a pleasure to use for the snapshooter or expert alike. Press the [iA]  button for  a simple point-and-shoot user experience. Or switch to one of the user control modes, access the Fn button options and build a camera with a sophisticated user interface designed to individual requirements.
All the functions which need to be adjusted in Capture Phase can be made with the eye to the viewfinder, by feel, without breaking the flow of image capture activity.
The downside of this sophistication is that the G6 is more daunting for the novice at the Setup phase of use.
So the G6 is the most efficient camera to operate, followed by the V2 then the D5200.
Comment about ergonomics, DSLR-vs-MILC  A well designed and implemented MILC can provide a streamlined, integrated user interface which no DSLR can match due to the presence of the flipping mirror. This was one of the very best ideas of mid 20th century mechanical camera design but it is unable to seamlessly integrate the complex requirements of a modern, multi view, multi function electronic camera device.
Sony tried to deal with this problem with it's SLT (Single Lens Translucent) range of DSLR style cameras. These cameras have a fixed mirror which allows about 60% of the incoming light to reach the sensor and the remainder to reflect up to the PDAF module in the hump. This technology does provide operational and ergonomic benefits over the standard DSLR type. However these cameras are forever stuck with a mirror sitting between the lens and sensor, blocking a substantial part of the light, gathering dust and preventing reduction of the flangeback distance. It appears from rumor sites that Sony will probably move it's entire interchangeable lens camera lineup to MILC type quite soon.


Ergonomics, ranking


1. G6/14-140mm


2. V2/10-100mm


3. D5200/18-200mm


Next, Final comments and ranking


3 Way Holiday Camera Shootout Part 8, Video User Experience

$
0
0

D5200 with 18-200mm lens at 200mm
 
Brief Report    My interest is in still photos. I rarely make a video.  However each of the three cameras in this 3 Way shootout is capable of motion picture capture.  So I made some videos with the purpose of comparing the user experience provided by each. I make no comment about the technical details or output quality of the video. There are numerous websites which cover this aspect of camera function in great detail.
I was interested to discover how each kit managed inexpert hand held panning in varied light plus moving from near to far subjects to test the autofocus.
I made the video clips indoors, in reasonably bright light, with some parts of the room in sunlight, others in deep shade. I panned slowly from people to furniture in the room. I set each camera to it's fully auto mode then pressed the motion picture start button. Each camera has one of these located behind the shutter button.
Holding and Viewing  When the operator is standing,  a convenient camera height for video is about waist level. This usually allows the camera to be held level to prevent distortion.  This camera position is greatly facilitated by a fully articulated monitor, which the D5200 and G6 have but the V2 does not have.
Both the MILC's enable viewing with motion picture capture via either the EVF (useful in sunny conditions) or the monitor. The D5200 can only use the monitor.
Panning  My subjective impression is that the V2 was smoother but they each managed well enough.
Continuous Focussing  The D5200/18-200mm  exercised itself with much whirring and clicking but was slow to catch up when the camera was required to focus from near to far or vice versa.  The MILC's were smoother and quieter. They managed near-far-near-far focus transitions more quickly and smoothly.
As was the case with still photos in monitor view, I wondered if the D5200 might work better with manual focus set by scale for motion picture capture.  
Face Detect  Each has face detect. That on the G6 and V2 were more reliable. The D5200 picked up a plate (plate detect, anyone ?) near the edge of the frame then kept focus at that location for many seconds after the camera was panned to a different part of the room.
Summary The G6 has been designed for fully integrated stills and motion picture capture and it shows in the user experience.
Ranking
1. G6/14-140mm
2. V2/10-100mm
3. D5200/18-200mm
Next, and last: Summary and final ranking


3 Way Shootout Part 9, Final Comments and Predictions for the Future

$
0
0


On the left, Nikon 1, V2, Center, Nikon D5200, Right Panasonic Lumix G6
 
The questions At the beginning of this 9 part 3 Way shootout, I put several questions.  Let us come back to these, with the results of testing in hand.
Q.  Do DSLR's make better pictures than MILC's ?
A. No. Picture quality is determined by many things, the distinction between DSLR and MILC not being one of them.
Q. Do larger/more expensive cameras make better pictures than smaller cameras ? This question goes to the selling message long promoted by CanoNikon in particular.
A. Sometimes but it depends on many things. Some large cameras make great photos in certain circumstances but, for instance, long distance hiking would not be the best circumstance for a large heavy camera. Even with large and small cameras on location together, you cannot always expect the larger one to make better pictures.
Q. Do larger sensor make better pictures than smaller sensors ?
A. Sometimes, but again it depends on many other attributes of the imaging system.
Q. Does Phase Detect AF work faster or better in some way  than Contrast Detect AF ?
A. In some cases.  However not all PD or CD autofocus systems are made equal. In fact the performance of each varies markedly with manufacturer, system and model of camera and lens. Even with the demands of predictive autofocus on moving subjects, recent advances in CD autofocus have brought CDAF up to or even in some cases surpassing the performance of some PDAF systems.
Best kit of the three on test ?
Taking into account all the findings of the previous 8 posts, my pick for the one which best fulfilled the brief for a family/holiday/all-in-one/beginner to enthusiast camera kit is:
1. G6/14-140mm, followed by
2. V2/10-100mm, and
3. D5200/18-200mm
Best Camera type ?
When mirrorless interchangeable lens cameras were first introduced they were a distinctly underwhelming, overpriced, underperforming bunch which DSLR users generally ignored.
But in the last two years or so, the balance of capabilities between the two types has changed.
In the mid range, upper entry,  consumer level of the market which has been explored in this 3 Way shootout, MILC's now have the upper hand.
Future Prospects
DSLR    My considered view, with which others are free to differ, is that the DSLR as a camera type has no future at all. I am not alone in this view. Panasonic and  Fuji are no longer in the DSLR business. Olympus' latest, the EM-1 is likely to be a mirrorless offering with on chip PDAF which can effectively drive lenses originally designed for the 4/3 DSLR system. Sony is strongly rumored to be exiting DSLR and SLT technologies altogether.
While the makers of DSLR's were engaged in making small, incremental improvements with each "new" but actually not very new, model, the makers of MILC's were re-inventing the camera with a series of disruptive innovations.
Research and development in the MILC world is racing along at a great pace while that in the DSLR world has almost come to a halt. The main reason for this is that the DSLR as a type of device is nearly at the end of it's evolutionary journey.
MILC I believe that in a few years MILC's will be the dominant interchangeable lens camera type.
M43  If the makers of M43 camera can eliminate the problem of shutter shock, perhaps by developing a global shutter and speed up their EVF refresh rate, then I believe M43 is best placed to become  the dominant interchangeable lens system. M43 sits in the sweet spot between larger and smaller formats. The sensor is large enough to deliver excellent picture quality, but small enough to allow the design of very compact lenses.
Nikon 1 SystemWhen Nikon introduced it's oddly named "1" system it was greeted with derision by reviewers and commentators alike.
Nikon's engineers developed a photographic rocket, with the fastest still and continuous frame rates, fastest EVF refresh rate and biggest RAW buffer ever seen. The V1 and now the V2  have the guts of a product line capable of outperforming every other camera in existence and transforming the entire  industry.
In the event, Nikon's product development people slipped this potential industry hero  operating system  inside a series of small, point-and -shoot style compact ILC's with atrocious ergonomics and childish gimmicks like Motion Snapshot Mode. The critics were rightly critical.
BUT.  Watch this space. IF Nikon's execs wake from their current torpor and stop trying to make dumb cameras aimed at a possibly non existent target buyer group (one blogger has coined the phrase "teenage facebook girl"), give the 1 series a better sensor and improved ergonomics, then watch out camera world.   Of course Nikon and all the others will have to completely restructure their entire product line and I guess they don't want to do that. But I believe it is just a matter of time before they are pushed into doing so, ironically by the invention of their own engineers. The genie will not go back in the bottle.


M43 Practice, Diffraction, Unsharpness caused by reducing lens aperture

$
0
0


Why post about this ?  I am moved to write this by a post which is running currently on the DP Review M43 Forum, titled "Diffraction Limit". It has generated 142 responses thus far. Some contain such deep questions as ..."are you inebriated with the exuberance of your own verbosity ?"
I have to confess that I could not bring myself to read all the erudite contributions and further have to confess that I did not understand several of them. There is a lot of material about Airy disks and pixel dimensions and all kinds of technical and theoretical stuff.
Numerous contestable assertions are offered.  Much of the "discussion" would, I think be described by Australia's former Prime Minister Ms Julia Gillard as "Argy Bargy".
The Test  My own approach to the evaluation of contestable assertions is to test them. In this case a useful test can easily be designed and carried out in a few minutes.
I set up a simple test chart and photographed it at f2.8 - 22 in 1/3 stop increments. I made all the usual precautions to prevent camera shake: tripod, E-Shutter to 1 second then Shutter delay, 2 sec timer delay, manual focus, ISO 125. I used a Lumix GH3 with Lumix 35-100mm f2.8  lens at 42mm.


The Test Chart. This photo has been reduced and compressed for the net so it is difficult to appreciate the detail. Many Lumix zoom lenses, even some of the budget ones can resolve all the words all over the frame at their optimum aperture.


The Results  I enlarged a small part of the frame, near the center, 330x343 pixels [0.11 Mpx] from each exposure and viewed these on screen at 200%.


On this particular test with this particular lens I found sharpness/resolution was the same from f2.8 through to about f8, with the first sign of slight softening becoming evident from f9. The image gets progressively softer from there to f22.


F2.8

F4

F5.6

F8

F11

F16

F22
Comment on the test photos  These have suffered somewhat from their compression for publication. The originals appeared sharper. Despite this I think you can see things are definitely softer at f11.
Conclusion  On this test closing down the lens aperture smaller than f8 did have a deleterious effect on image sharpness. I estimate the effect would be apparent in ordinary photographs by f10. By the way, with this particular lens, image sharpness in a large central area (not the corners, which sharpened up by f4) was just as good at f2.8 as f4 or F5.6 or f8.


It has certainly been my experience when photographing out and about that image sharpness/resolution is adversely affected in M43 camera/lens systems when the aperture reaches the f9-f10 range.  

Note on close ups, 30 August  I made some flower photos this morning, trying various apertures. The ones at f11 were the best. The gain in depth of field achieved by stopping down outweighed the slight loss of sharpness from diffraction.
Lumix GH3, 12-35mm f2.8 lens at 35mm and f11, tripod.


Spring Has Sprung

$
0
0
On the northern outskirts of Sydney lies Muogamarra Nature Reserve. This is open to the public only 6 weekends per year. Today being a fine warm first day of spring there were masses of wildflowers and hordes of visitors.
All photos Panasonic Lumix GH3 with Lumix 12-35mm f2.8 lens, hand held.
 

Panasonic Lumix G6 Camera Review

$
0
0


Lumix G6 with Lumix 14-45mm lens. A versatile walk around combination. This scene with quite high subject brightness range required only a small amount of highlight and shadow adjustment in Adobe Camera Raw. I held the camera at waist level with the articulating monitor swung out for easy image preview.


More than a list of specifications


Stealth Marketing ?  Last year Canon  introduced it's first mirrorless interchangeable lens camera [MILC] the EOS M, with a high profile, all media campaign. Billboards on bus stops exhorted consumers to  ...Be aPlay-Fessional!!....whatever that might have been, nobody seemed to know. The EOS M proved to be one of the most underwhelming new product releases in camera history. Those consumers demonstrated that they understand cameras better than Canon's product development people and avoided the EOS-M in large numbers.  Maybe not many of them were Play-Fessionals. 


Lumix G6 without lens. I don't know why the sensor glows ruby red like this in some lighting conditions.
With the Lumix G6, Panasonic appears to have adopted the opposite strategy. They built an excellent, well designed product, then introduced it into the market almost by stealth, with no apparent marketing at all [in Australia anyway]. I almost felt that I had to belong to some kind of informal quasi secret society to track down a G6 and persuade someone to sell it to me. It is difficult to find any Lumix M43 camera on the shelves of most camera shops I have visited.


It seems to me that if Canon and Panasonic keep up their respective strategies both will fail, one for lack of a MILC that anybody would want to buy, the other for lack of  effective marketing of a very nice camera.


G6 with 14-45mm lens
So, What is the Lumix G6 anyway ?  Panasonic currently targets it's Lumix G Micro MILC's  at four levels. At the top is the GH series of professional still/video high performance cameras. Next down is the enthusiast category, the sole occupant of which is the just released GX7. Then we have the mid range G5/G6 and last the entry level GF series.


Most reviewers and camera commentators have billed the G6 as a slightly spiced and reheated Lumix G5. Which it is, if you just look at the specifications list and general appearance. I have summarised the differences between the G5 and G6 here.


But a camera is more than a specifications and features list. The many upgrades built into the G6 make it a very appealing and functional photographic tool.


G6 with Lumix 14-140mm f3.5-5.6 lens (the new one) A very compact one lens travel/holiday kit which is a pleasure to use and makes excellent pictures. No DSLR can offer a kit with body plus 10x zoom this compact.
User Experience  The M43 system in general and the G6 in particular are large enough to provide good ergonomics yet small enough to make a light, compact kit. The G6 is unobtrusive. It doesn't shout "look at me". It doesn't have the most pixels or highest technical image quality scores in it's market sector. But it integrates picture quality, performance, user interface, ergonomics, stills and video, eye level view and monitor view in a coherent fashion which few other cameras can match.   The G6 works very well for the beginner or snapshooter, just press the [iA] button and you have a high quality point and shoot camera.


For the user who is or wants to become an expert the G6 has a much to offer. The user interface is highly configurable. This means many of the control modules (buttons, dials etc) can be tasked to user preference by selection from an extensive options list.


G6 Twin lens kit with 14-45mm and 45-150mm. Another compact kit with excellent performance. The new 14-42mm lens is even more compact than the 14-45mm shown here. 
Picture Quality  Several online test sites publish data about camera image quality. These include dpreview.comand dxo.com.  Tests are carried out in controlled conditions using specially designed test targets. This provides useful information which I call, for want of a better terminology, Technical Image Quality.  Real world picture quality is influenced by lens quality, user skill, camera shake and many other factors.


I recently completed a 3 way test comparing a Nikon D5200, Nikon V2 and Lumix G6, each with a 10x superzoom lens. If real world picture quality was determined by technical image quality, the D5200 should have easily bested the other two cameras. But it did not. In fact over hundreds of matched test photos in a variety of conditions the G6 most often came up with the most appealing photos.


So, the G6 consistently produces very good picture quality in a wide variety of conditions.


This is a test of the G6's ability to cope with extreme subject brightness range. Direct bright sun was falling on the newspaper. The lady's dark garments are in shade. The upper photo is the unmodified result. The lower one is the outcome after a few minutes in Adobe Camera Raw. The only penalty for this is increased grain in the dark tones.
 
Performance  Autofocus speed and accuracy are excellent in bright or poor light. Shot to shot times are so brief they hardly ever impede the image capture process. With a suitable lens the G6 is very effective at predictive AF on moving subjects. Manual focus is well implemented.


Holding  The G6 has a well shaped handle and thumb support making it easy to hold and carry.


The G6 is large enough to be held comfortably but small enough to be compact. The user can look straight ahead and view the subject with either eye
Viewing  The EVF and monitor both provide a good image preview/review. The monitor is of the very useful fully articulating type. Both EVF and monitor can be configured to display the same information in the same way for a seamless segue form one to the other.


Operating  All the adjustments which the expert user might want to make during capture phase of use can be made by feel with the eye to the EVF, without  disrupting the image capture flow.


Features  Many cameras these days come burdened by a heavy weight of multifarious features, the purpose of which, I have to confess, often eludes me.  But the G6 has several which are actually useful for the task of making pictures, still or moving type. To mention just a few, there is  focus peaking, silent operation, touch screen control, Wi-Fi connection, auto exposure bracketing, multi exposure, time lapse shot, quick AF, pinpoint AF, easily variable position and size of active focus area, manual focus simultaneous with auto focus, back button AF, Custom Modes, user set tasking for Fn buttons, many EVF/monitor displays (same for each) such as histogram, highlight warning, electronic level, and many more, the list goes on.


G6 with 14-45mm. The M43 system can readily deliver extensive depth of field if required
Negatives and Faults  The G6 is distinguished by having very few serious faults or deal breaking negatives. Some things could be improved however. The rear dial is a little stiff to operate. It does free up with use but the rear dial on the GH3 is easier to operate because it has sharper teeth and protrudes from the body about 1mm more. The Fn4 button is a bit too easy to activate, as is the Disp button. When I started using the G6 I frequently hit the Fn4 button by mistake but with practice this happens much less often. The Function Lever (behind the shutter button) is a bit too easy to move. In a subsequent model, I would like to see this converted to a front dial as on the GH3 and enabled for a wider range of tasks than the present options.


The only other thing I would mention is that with it's long list of user selectable options and user interface, the G6 presents quite a learning curve for the novice user who wants to move off the [iA] button and explore the camera's full range of capabilities. The Owner's manual (all 355 pages of it) is a genuinely helpful guide for navigating this journey.


Conclusion  The G6 is Panasonic's 16th Lumix G series M43 camera and the 11th with built in EVF. Early models like the G1 were unable to make a convincing case for DSLR buyers to change camps. But in the last two years Lumix cameras have gained much improved picture quality, performance and ergonomics. Panasonic is learning to make really good cameras which are a pleasure to use. Us consumers are the beneficiaries. The G6 is a more engaging and competent camera than it's specifications might suggest, due to well integrated picture quality, performance and ergonomics in a compact, moderately priced product. Access to a wide selection of excellent compact prime and zoom lenses for the M43 system adds greatly to this camera's appeal.


If the M43 system was as well known and promoted as CanoNikon DSLR's, the G6 and other recent Lumix G cameras from Panasonic, would sell like hotcakes.


Setting Up the Lumix G6 Camera, Part 1, Menus

$
0
0


Part 1, Main Menus: Setup, Custom, Recording

 
Introduction  Current model Panasonic Lumix G Micro Four Thirds cameras, including the G6,  have a very sophisticated user interface.  With all menu and Fn buttons at default settings and the [iA] button active, they operate as high functioning point and shoot cameras, suitable for beginners or snapshooters. With one of the P,A,S,M modes engaged they become highly configurable. This means the user interface can be tailored to the preference of each individual user. This is a wonderful thing but the ability to allocate user preferred functions to camera control modules requires considerable understanding by the user as to how best to select from the many options available.
This two part article is an attempt to help G6 users grapple with the task.
Declaration about touch screen operation  I never use touch screen operation on a camera and have posted my reasons for this here. Many of the instructions in the Owners Manual refer to touch screen operation but all actions can be done with the hard controls. For this two part article on setting up the G6 I will assume direct control of all actions in all phases of use, using the buttons and  dials. If you prefer to use touch screen operation that's fine,  the Menu, Q Menu and Fn buttons all perform the same tasks. In fact you get two extra Fn (soft, on screen) buttons.
Likes and Preferences over time  On many cameras even today,  the function of all camera control modules is set by the manufacturer. Some offer user selectable tasking for one button.  On the G6, Panasonic offers  user tasking for 9 control modules. This requires a decision process as to  how best to exercise that choice. With experience it is highly likely that those choices will change over time.
Prescription-vs-Dialectic  Each individual will have a different idea about their preferred way of interacting with a camera's controls. So the content of this two part article will be dialectical in nature, designed to help the reader make his or her own choices.
Main Menus  I exhort the reader to download and print the entire 355 page Owners Manual from any Panasonic website. Panasonic's camera manuals have been improving over the last few years. The G6 Manual is very long and packed with information like a textbook. But it is reasonably well organised, well written and comprehensive.   I sometimes read reports by gung-ho camera reviewers that they managed to figure out how to use a new camera without reading the Manual, as if it were some kind of macho status symbol to do so. However I defy anybody to fully comprehend all the functions of the G6 without reading the Manual.
Page numbers in square brackets refer to the Owner's Manual.


Setup Menu[P 328-329]  Most of the items are well described in the Manual, but I make just a few comments about some.
Monitor/Viewfinder Display  If you look at the Monitor, that will be adjusted. To adjust the EVF, look through it while making adjustments. Monitor and EVF are adjustable for brightness, contrast/saturation and color balance. Increasing contrast also increases saturation. Each individual will have different color perception and preference for contrast/brightness. My own experience is that it takes me several weeks of experiment with these adjustments until they are to my satisfaction.
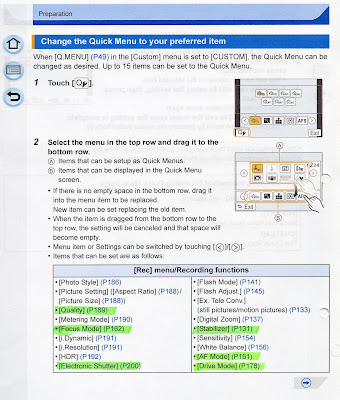
Menu Resume  I always set this On, so the highlighted item in each Menu will be the one I last used. This speeds up access to the most commonly used item. Unfortunately the G6 lacks a [My Menu] however the very good Q Menu largely supplants the function of a My Menu on other cameras.
Custom Menu [P 326-328]   I make no comment about items which I think are well described in the Manual. I state my own preference with reasons in several places. Your own practice may differ.
Cust.Set.Mem.  The procedure for allocating a Custom Setting to one of the C1,C2  positions on the Mode Dial is well described from page 129 in the Manual. If you move the dial to C2 a submenu can be displayed giving C2-1, C2-2, C2-3. Be aware that a Custom Mode locks in all the menu, button, lever and Mode Dial settings in place at the time the Custom Mode is set.
AF/AE Lock  You might want to experiment with this one. There are 4 options, AE Lock, AF Lock, AE+AF Lock and AF-ON. Your choice will depend on the way you expect a camera to operate. I set AF-ON. This enables back button focussing like a high end DSLR. In AFS  focus is acquired and locked separately from AE. In AFC pressing the button starts and continues AFC. You can set focus running with the back button then fire the shutter with the shutter release button when you are ready.
Shutter AF  The default and standard practice is to set this ON. You might conceivably set this OFF if the AEL/AFL button is set to AF-ON. Then you would have AF only on the AEL/AFL button. I like to have the option to activate AF with either button.
Quick AF and Eye Sensor AF  These are both settings designed to bring the image into focus before you press the shutter button. Some people may find this to their liking. Others might like to feel more in control of when and where the camera finds focus.
Pinpoint AF time  I suggest you experiment with this. The best time would depend on what type of subject you prefer. For instance "small bird in tree" would suggest a brief time so the photo can be made before said bird flies away.
AF Assist Lamp    Low light AF in the G6 and other recent Lumix G cameras is so good that the AF assist light is really not needed. In addition it is very distracting for live subjects. I leave it OFF.
Direct Focus Area  You need to exercise considerable thought about this feature and will possibly change the setting after gaining experience with the camera. Note that the G6 and some other Lumix cameras have a feature called "Touch Pad". This is a method of changing position of the AF Area by touch screen control while viewing through the EVF. You have to insert a thumb or finger between the face/nose and screen. I tried this and found it unworkable. Other reviewers have reported more positively about the feature. Give it a try.
Back to the hard controls, you can use the Cursor Buttons (a.k.a. 4 Way Controller) for either Direct Focus Area or the default functions (ISO, WB, Drive Mode, AF Mode) It is either/or, not both. I will discuss the implications of this in Part 2 of this article, allocating tasks to the Fn buttons.
This is the most important decision which needs to be made in configuring the camera to personal preference.
AF+MF  When set to ON this allows direct manual focus by rotating the focus ring on the lens while AF is active. It is a very useful pro style feature especially in situations where the AF system might have trouble reading your mind. I always set it ON.
MF Assist  This sets the method by which the preview image is enlarged during MF assist. The options are Focus Ring, Left key of the 4 Way controller or both or none. The natural option seems to me to be the focus ring which works well. The amount of zoom  is controlled with the rear dial. Managing  shutter half press, focus ring and rear dial together requires some dexterity and practice. If Direct Focus Area is ON the left key option is not available.
MF Guide  When ON, this displays an analogue bar with mountain symbol at one end and flower symbol at the other. It is useful for prompting the user which way to turn the focus ring. It would be a lot more useful if a focus distance could be preset manually by scale.
Peaking  The G6 is the first Lumix M43 camera with peaking. I rate it genuinely useful so have this set to ON.
Histogram Here you set the histogram on or off. Cycle through display options with the Disp button to make it appear on screen or not. I have found the G6 and other Lumix cameras are programmed to select an exposure which reliably protects highlights so I have Histogram OFF. However other users say they value the feature for fine exposure control.
Guideline You get a choice of none or three types of guideline/grid. I find the simplest single vertical/single horizontal line the best, with both lines running through the frame center. This is very useful for making sure vertical lines in the subject are vertical in the frame center.
Highlight  When ON, this activates the "blinkies" on overexposed highlights when seen in image review. It is definitely useful.
Expo.Meter  When ON, this clutters up image preview with a shutter speed/aperture relationship display. The idea seems to be to provide a graphical representation of the change in aperture which accompanies a change in shutter speed or vice versa. It might have some value as a learning tool.
LVF Disp.Style/Monitor Disp.Style  You can set both the EVF and Monitor to Viewfinder Style, with principal camera data displayed on a black strip below the image preview, or Monitor Style, with the data overlaid on the lower part of the image preview.  I have a strong preference for Viewfinder Style as the camera data are always easy to read in any conditions of subject or light. but others may prefer the Monitor Style. Either way you have the option to set both up to have the same appearance for a seamless transition from eye level viewing to monitor viewing.
Auto Review Beginners and snapshooters seem to like to review their images just after capture, thereby confirming, I suppose, that yes it is a camera and yes, it made a picture. But auto review slows down the shot to shot rate so more experienced photographers switch it off.
Fn Button Set  See Part 2 of this article.
Function Lever  This determines the function of the lever behind the shutter button. You have Auto, Zoom or Exp. The idea is that with a power zoom lens mounted you can zoom with this lever, so you don't have to find the zoom lever on the lens. With most lenses the Function Lever can be set to adjust exposure compensation directly. A bit too directly sometimes as the lever is fairly easy to bump accidentally.
Q Menu See Part 2.
iA Button Switch  Set to operate by short press or long press. The long press prevents it from being bumped accidentally.
Eye Sensor  Set this to Auto ON, sensitivity Low.
Self timer Auto Off  Some cameras auto cancel self timer after every shot, which can be really irritating. The G6  allows you to set self timer auto off at camera shutdown or retain self timer ON even when the camera is switched off.
Shoot W/O Lens  I always set this ON so I can check shutter operation without a lens mounted.
Recording [Rec] Menu [P 322-324]  Several of the options in the Rec. Menu are items which you will want to allocate to a Fn button or the Q Menu. If so, the items  remain available in the Rec. menu. If an item is changed in, say the Q Menu, that change will also appear in the Main Menu.
Photo Style  This applies to JPG images. So if you want to shoot JPGs and have them just as you like straight out of the camera, this is the place to experiment with the many options available.
Aspect Ratio  The G6 has the same basic sensor as the GH2 but without the multi aspect ratio capability. So any aspect ratio other than 4:3 is a crop, with less than 16 Mpx.
Picture Size  There may be occasion for using less than the full 16 Mpx, perhaps if if the image(s) are destined for the internet. But you can always dowsize a 16 Mpx image. The reverse is not possible.
Quality This is where you select RAW/JPG or RAW + JPG and the compression level for JPGs. This is one for the Q Menu.
Focus Mode  Here you select from AF single, AF continuous or an Auto style, AFF Mode, or Manual Focus. This is one for a Fn button or the Q Menu.


 Metering Mode  Select from Multiple, Center Weighted or Spot. Multiple is very reliable and recommended for all general photography. You would want a specific reason to use one of the other Modes. I select Multiple and leave it that way all the time.
Burst Rate  [P 179] Here you select which rate will be used when Burst is selected in the Drive Mode. There are 4 options. Note that the frames per second rates given by Panasonic are for guidance. The actual rate is dependent on the lens and subject/light level.
SH, super high (40fps) is JPG only, no live view (image preview in the EVF or monitor is only available for the first shot of the sequence) AF only on the first frame, focus is locked for the remainder of frames of the sequence.
H, High (7fps) RAW is enabled, AF and live view on each frame are not possible.
M, Medium (4fps) At this speed RAW, Live View and AFC are enabled on every frame. This is the most useful setting for photographing subjects moving towards or away from the camera.
L, Low (2fps) This works like M but slower. It is quite useful for slowly moving subjects.
Auto Bracket  Here you preset the auto bracketing sequence which will operate  when the Drive Mode is set to auto  bracketing. There are several options to navigate.
Single/Burst. Single means you have to press the shutter release button for each shot in the sequence separately. I can't think of a reason you would want to do this, but there it is.
Burst means the camera will quickly make all the shots in the pre set sequence with one long press of the shutter release button. Unfortunately the camera does not have the option to make the whole sequence with one short press of the shutter. Neither does it allow AEB to be linked with the Timer Delay. AEB and Timer are either/or options on the Drive Mode. I personally find this disappointing  because it means you have to find some means to drive the camera remotely or risk camera shake and/or misalignment of the frames when using AEB. The camera can be driven via smart phone and Wi-Fi or wired cable release.
Step allows 3, 5 or 7 shots with 1/3, 2/3 or 1 stop increments. Lots of choice here.
Sequence allows you to set under/normal/over or normal/under/over.
Self Timer  This is the place to pre set self timer options. Switching the self timer on or off is done via the Drive Mode. There are three options:
Single picture after 10 seconds delay.
Three pictures at 2 second interval after 10 seconds delay. This is the one for including yourself in the  family/work group annual photo.
One picture after 2 seconds delay. This is the usual choice with camera on tripod when you don't have or don't want to use remote control.
iDynamic/iResolution  These are options for JPG shooting. iDynamic tries to increase dynamic range by underexposing slightly then applying a tone correction curve to the dark and mid tones. On my tests it works and provides a small benefit. I also tested iResolution and could not convince myself it achieved anything that I could determine.
HDR  [P 192] Another JPG only function. If you want to use HDR it can be allocated to the Q Menu so you don't have to trawl through the Rec. Menu to find it. The camera should be on a tripod for this. HDR can be combined with Timer Delay for hands off shutter activation.
Set allows you to choose the number of exposure steps between each of the three exposures.
On/Off are self explanatory.
When the shutter button is pressed the camera makes three exposures in quick succession and combines them in camera  for greater highlight and shadow detail than would be possible with one exposure. It works.
Multi Exp.  [P 193-194] I have to confess that despite fiddling around with this option for a while I still don't quite grasp how it works. The idea is to combine several exposures into one composite image. The procedure appears to do this and maybe someone can discover a purpose in doing so.


Time Lapse Shot  [P 195] This does work and I can see how it could be useful in several situations. I got the function working if the first photo of the sequence is set for Now, but failed to work out how to set the first shot of the sequence to be made some time after setting the process into action. You might want to experiment with this.
Panorama Settings  I experimented with the in camera auto panorama function on this camera and found it wanting. In particular the final image often contained double imaging indicating inaccurate merging. I think Panasonic needs to do some more R&D on this feature. Other manufacturers manage to get it right.
Electronic Shutter  This is a very useful and important feature on recent Lumix M43 cameras. The E-Shutter eliminates Shutter Shock, about  which I have written in detail elsewhere on this blog. It also allows silent operation if beeps and E-Shutter sounds are switched off in the Setup Menu. E-Shutter is one to allocate to a Fn button for ready access.
Flash [P 139-148] (Not available with E-Shutter) The built in unit is very useful for filling shadows of backlit subjects or providing a small boost to low available light. The built in flash can also be used as a wireless commander for up to three off camera units (FL-360L) The Manual provides extensive detailed instructions for use.
ISO Limit Set  I generally just set 12,800 as the limit and let the camera do it's thing. The limit is 1600 with E-Shutter.
ISO increments  Apertures and shutter speeds are adjusted by 1/3 stop increments so it seems to me there is little point in making 1/3 stop increments for the ISO as well. Just having whole stop increments for ISO makes selection much faster.
Extended ISO  This allows ISO to be set up to 25,600, which could be useful for small output sizes in extreme low light.
Long Shutter Noise Reduction  This applies noise reduction to exposures of 2 seconds or more. It is probably worth setting ON although doing so doubles processing time for each exposure.
Shading Comp.  This reduces, but may not eliminate, corner shading with RAW or JPG files. It requires the camera to perform extra processing on every image so it might slow shot to shot times and continuous frame rates.
Ex.Tele.Conv and Digital Zoom   [P 134-137] These are JPG only Lumix features which provide two different approaches to digital zoom. They can be used with still photo or motion picture. It appears to me that perhaps Ex.Tele.Conv is better for still photo because it gives you full functional control of the AF area size and position.  You might imagine that Digital Zoom would provide better image quality as it produces 16 Mpx files while those from Ex.Tele.Conv are only 8 or 4 Mpx. I investigated this and found that at the same effective crop amount and  after bringing all three to the same output image size, I found no difference in quality between Ex.Tele.Conv, Digital Zoom and Cropped RAW files converted to JPG. So there is no free lunch. If you regularly shoot RAW, do that and crop later. If you want finished JPG files out of the camera try Ex.Tele.Conv for stills and Digital Zoom or Ex.Tele.Conv for motion picture.
Color Space  Set this to Adobe RGB always, as you need Adobe RGB for RAW capture. If you use JPG capture the camera will automatically revert to sRGB for the JPG shots. I assume there is some reason the choice is provided but I can't think what that might be.
Stabiliser Some lenses have an OIS  On/Off  control on the lens barrel. With one of those lenses mounted this portal selects from Normal or Panning type OIS.  With a kit type lens mounted,  an On/Off option appears in the menu selection. This menu item should be allocated to the Q Menu for ready access.
Face Recog  This is spook/spyware stuff.  Beyond face detection we have face recognition. I haven't tried it. I perhaps naïvely imagine I might do a better job than the camera at detecting a specific person's face.
Next: Q Menu and Fn Buttons in Part 2 of this guide to setting up the Lumix G6.


Setting Up the Lumix G6 Camera, Part 2, Q Menu and Fn Buttons

$
0
0


Lumix G6 with 14-140mm lens

 
Basic ergonomic concepts  For someone who has never encountered a recent model Lumix G camera, the task of allocating user selected functions to the Q Menu and Function Buttons might appear daunting.  There are 60 million possible combinations of Fn functions alone. The secret to managing this complexity is a good understanding of camera ergonomics.

Phases of camera operation  I find it useful to consider using a camera in four phases. These are:
Setup Phase  This covers the process of selecting preferences from the main menus, getting the camera ready to take out for photography. Setup is managed at leisure with no time constraints. Items for this phase can stay in a main menu. The user does not expect to require access to them while out and about.
Prepare Phase  This is the period of a few minutes or so prior to capture, in which the user configures the camera for the current photographic subject and task. Items which require adjustment in this phase are ideally located in the Q Menu.
Capture Phase   Now the user is in the process of making photos. Adjustments to be made in this phase must happen immediately without disrupting the user's grip on the camera or the flow of the capture process. Control modules ideal for this phase are the rear dial, front lever, Fn buttons and Cursor (4 way) buttons.
There is a hierarchy of control modules rated by their physical location on the camera. Those easily reached by the right index finger or thumb without disrupting grip have top place in the hierarchy. You would allocate tasks requiring maximum speed and efficiency in Capture Phase to those control modules.
Review Phase  This is self explanatory. Actions required in Review Phase are usually non urgent. Control modules can be positioned in relatively low access positions on the camera. I note  however that some photographers like to review every photo they make so for these users ready access to review controls is desirable. Note that Panasonic locates the Playback button in a high priority position on the G5/6 but in a low priority position (to the left of the EVF) on the GH3, indicating an expectation of a different (more experienced, less inclined to chimping) user profile for the GH3.


G6 Rear showing Fn buttons
 
Direct Focus Area  Your decision about this is the key to figuring what functions  need to be allocated to the Q menu and Fn Buttons.
Some preliminary explanation: One of the most useful features of a good mirrorless interchangeable lens camera [MILC] is the ability to position the active AF area anywhere in the frame and to control it's size. Lumix cameras allow anything from large size to pinpoint. On the G6 the active AF area is moved around the frame with the Cursor Keys (4 way controller). Size is controlled with the Rear Dial. Pinpoint is a separate Autofocus Mode. Active AF Area is returned to center by pressing the Disp Button when the AF Area square is yellow with bounding arrows.
Controlling position/size of the AF area is a Capture Phase action, which means it needs to be carried out quickly and efficiently without disruption to  holding, viewing or operating.
If you come from a SLR/DSLR background as many M43 users do, you might have become accustomed to using the "focus (with the central AF point) and  recompose" technique. This works but has several disadvantages. If  half press shutter is used to AF then exposure is usually also locked, which might not be desirable; the focussed distance may be slightly incorrect if a wide angle lens is used close up and if you are making many photos of, say, an off center subject and focussing on the face,  repeatedly focussing and recomposing is a nuisance.
The MILC solution to this is the ability to move the AF area to any position in the frame, retaining fast accurate AF in any position.
In the Custom Menu, Page 2/8 you will find an item labelled Direct Focus Area.  By default this is OFF.  In this case the process of starting to move the AF area is allocated to (any) one of the Fn buttons. Press the button, the AF square goes yellow with bounding arrows then you press the cursor keys to move the AF Area. Default functions for the Cursor Keys are retained (ISO,  WB, AF Mode, Drive Mode).
If you set Direct Focus Area ON,  the AF area goes yellow and moves immediately if you press any of the Cursor Keys. The advantage of this is that one button push is eliminated from the sequence. The disadvantage is that you lose the four default Cursor Key functions, which therefore  have to be allocated to the Q Menu and/or Fn button(s).
G6 Rear showing Q Menu active, Quality parameter displayed

Q Menu Customise screen


Q Menu  [Page 50-51]  You can easily customise this to personal preference. Go to the Custom Menu, Page 6/8. Find [Q Menu] and set to [Custom].  Q menu can store up to 15 items, but only 5 are visible at once. Therefore the optimum number of functions for the Q menu is 5. The Manual describes how to do this using the touch screen but I find the process easier using the Cursor Keys.
On pages 50 and 51 of the Manual you will find a list of 28 items which can be allocated to the Q menu. I suggest you read the list thoughtfully then highlight those items you think you might like to adjust in the Prepare Phase of camera work. Each individual will have a different idea about this and each person's list will almost certainly change with experience.
That's fine, the camera allows you to change your user interface at will.
Sample selections in Q Menu options list
 
Function Buttons  [Page 53]  Now look at the list on Page 53 and highlight which of the 38 items you think you might want to change in Capture Phase. Note the list includes [Q Menu] which means you can allocate activation of the Q Menu to any Fn Button and use [Fn1] for some function other than Q Menu. Why would you do that ?   Keep reading........
Sample selections in Fn button options list
 
The Reasoning Process  I will now describe the process of reasoning which led me to the settings which I use on my G6. This is based on setting the Cursor Keys to Direct Focus Area.
Your preferences and requirements will be different of course, but I have no idea what they may be. However if you follow the ergonomic reasoning process you should arrive at a configuration which suits your needs.
Actions required in Capture Phase  Capture Phase actions have the highest priority so they come first in the planning sequence. Individuals have their own ideas which could change over time.  The things I want to adjust in Capture Phase are the primary and secondary exposure and focussing parameters. These are:
Exposure: Primary;  Aperture, Shutter Speed, ISO.   Secondary;  Exposure Compensation. I  don't need to adjust white balance as I routinely use RAW capture and adjust WB as required in Adobe Camera Raw. But JPG shooters will most likely want to control WB, so will want this on the Q Menu or a Fn button.
Aperture and Shutter Speed are adjusted with the Rear Dial, depending on P,A,S,M Mode.  I have the Function Lever set to adjust Exposure Compensation.
Focus:  Primary; Start/Lock AF.  Secondary;  Change position/size of AF area, MF adjust.
I like to have the choice to start AF with half press shutter button or back button.   So I have the AEL/AFL button set to AF-ON.  Manual Focus touch up is always available by rotating the lens focus ring if AF+MF is set ON in the Custom Menu.
I prefer to change the position of the AF area instead of focus and recompose so I have Direct Focus  Area  set to ON in the Custom Menu. This means a place has to be found for ISO, Drive Mode and AF mode which are no longer on the Cursor Keys.
ISO is a primary exposure parameter used in Capture Phase so I send it to the Fn1 button, which is in a high priority location.   This means bumping the Q Menu elsewhere so it goes down to the Fn3 button. The logic of this is that Q Menu adjustments occur in Prepare Phase so can go to a low priority location on the camera.
Function Buttons  So now we see most of the Fn button tasks have been allocated. Here is the full list:
Fn1: ISO
Fn2: AF-ON
Fn3: Q Menu
Fn4: Level Gauge.    I often like to be able to access this quickly without having to scroll through the Disp screens.
Fn5: E-Shutter.   I use this most of the time in general photography but need to be able to quickly switch to the mechanical shutter when the situation requires, for instance:  ISO >1600, Shutter Speed<1 sec, Flash, Fluorescent light or sport/action.
Q Menu  On the Q menu I have just 5 items so I can see them all on one screen. They all lead to Prepare Phase adjustments:
Stabiliser, AF Mode, Quality, Focus Mode, Drive Mode.
Summary  That's it, all done. Your preferences will differ but I hope this exposition of a process of ergonomic reasoning will be helpful for any user wanting guidance in setting up a Lumix G6 camera. By the way, the G5 and GX7 work very much the same way and will benefit from the same reasoning process.


Advanced Compacts Sony RX100-vs-Canon G12

$
0
0

Sony RX100 on the left, Canon G12 on the right


Two very different approaches to the Advanced Compact concept


Why am I testing two superseded cameras ?   Over the last few weeks my daughter has been preparing for a 1500 kilometer hike, without support and carrying a full pack including tent. This will only be possible if she utilises ultra lightweight hiking strategies.  Part of the plan has always been for her to take a compact camera to record the journey.  She had a Canon Powershot G12 but the weigh in showed that at 750 grams, the G12 with carry pouch, 2 batteries, charger and power cord was too heavy.
So the search was on for a lighter option. She wanted a small camera with USB charging to eliminate the separate charger. She wanted sufficiently high picture quality to support  the production of a coffee table style large format book with full bleed  images of  places and people encountered on the journey. An impossible quest ?  Maybe not.


Canon G12 on the left, Sony RX100 on the right
Enter The Super Mini Camera: Sony RX100   Actually our research led us to the RX100 Mk 2, but we were unable to find one for sale in Sydney so had to settle for the original RX100 of which one was available at the time of our search. In fact the original RX100 is 2 mm thinner and 41 grams lighter than the Mk2, which for most users will not be an issue but for the ultralight hiker every gram and millimeter counts.
The RX100 with spare battery, carry pouch, charger and power cord, weighed in at 345 grams, less than half the weight of the G12 kit and saving 405 grams.
I had a chance to test the RX100  together with the G12 before the RX100 went on it's long walkabout.
Shop G12

Shop RX100. Apart from the different aspect ratio and color balance there is not much difference between the two renditions of this subject. Were we to go indoors however the balance would shift very strongly in favour of the Sony.

General description and market position  Each of these cameras is aimed at the user who wants high image quality in a compact package and is prepared to pay for it. Canon and Sony have approached the design brief in a very different way.
Sony has squeezed a large (by compact camera standards) sensor, good but not quite excellent quality zoom lens and workable user interface into a very small package. The Canon uses a much smaller sensor in a considerably larger body. The Canon lens has a greater zoom range and better optical quality. The Canon is easier to hold with a more comprehensive  interface suitable for the expert user.


Model

Width mm

Height mm

Depth mm

Box Vol cc**

Mass with batt

Lens DAV* degrees

Lens fstop

Zoom

Sensor size, diag mm,

area

squ mm

M-Pixels

total,

effec-tive

Sony RX100

102

58

36

213

240

75-24

1.8-4.9

3.6x

13.2x8.8  15.9

116

20.9

20

Canon G12

112

76

48

409

395

75-17

2.8-4.5

5x

5.6x7.5  9.4

42

10.4

10


** Box Volume = WxHxD, the volume of the box required to contain the powered down camera.

* DAV= Diagonal Angle of View
On the left, Sony RX100 with pouch. Center, Canon G12 with carry pouch. On the right Panasonic Lumix GH3 with Lumix 12-35mm f2.8 lens and shoulder bag.


Picture Quality 
Sharpness/resolution  With twice as many pixels you might expect this would be a walkover for the Sony.  But in my tests of real world subjects I found that the Canon sometimes  delivered slightly better resolution with better rendition of fine textural details. The Sony lens was a bit soft at the edges and in the corners, especially at the long end. The Canon lens delivered very good resolution into the corners at all focal lengths and apertures.
Exposure  The Sony consistently gave a little and sometimes a lot  less exposure to matched scenes. This enabled the Sony to protect highlights from blowing out although in some shots the mid tones were rather dark.
Dynamic Range  The Sony had the edge here, although not by a huge margin.
Color  Both camera reproduced colors well but with a typically different color balance.
Noise/Grain  The Sony was far ahead here. Canon photos at ISO 800 had about the same noise levels as those from the Sony at ISO 3200, a two stop advantage to the Sony.
Chromatic Aberration Both the RX100 and G12 produced liberal amounts of CA at high contrast margins. This often persisted in the JPG's.
DXO Mark scores  (dxomark.com)


Camera/DXO Score

Color depth

Dynamic Range

Low Light ISO

Sensor Overall

Lens **

P-Mpx

Lens* Overall

RX100

22.6

12.4

390

66

6

12

G12

20.4

11.2

161

47

N/T

N/T


* DXO Mark tested the RX100 Mark 2 lens, which I believe is the same one as used in the original RX100.
** Please go to dxomark.com for an explanation of their concept of Perceptual Megapixels.
No DXO Mark test is available for the G12 lens.
You can see the Sony sensor is well ahead of the Canon on DXO Mark points. Real world testing gives results generally consistent with the DXO Mark score.
Note the DXO Mark score of only 6 Perceptual Megapixels for the Sony lens. This indicates that although the sensor has 20 Mpx, the lens is only resolving 6 of them. This also is consistent with my real world findings.
Casuarina, Canon G12

Casuarina, Sony RX100

 
Performance Overall the Sony is the more responsive camera. It acquires autofocus faster. The procedure for moving position of the focus area is a little better implemented. Shot to shot times are faster.
Auto ISO is better implemented in the Sony, which in P Mode and Auto ISO  reliably selects an appropriate aperture, shutter speed and ISO for the conditions.    Auto ISO in the G12 is frustrating. The camera often sets ISO too high or low for the conditions. I found myself using manual ISO all the time with the Canon to prevent inappropriate settings such as ISO 800 in bright sun. 
Ergonomics
Holding  You can get a reasonable hold on the Canon. Not so the Sony which is so small that one clings a little precariously to the edges of the thing. The wrist strap is a must.
Viewing  The Canon has a fully articulating monitor which I find very useful and an optical viewfinder which I find very much less useful as it shows only 77% linear field of view, has no camera data readout and is affected by parallax error and intrusion of the lens into the field of view.
On the Sony all you get is a fixed monitor. Fortunately it's a good one, reasonably easy to see in sunlight which the Canon's is not. In addition camera data is located in a strip below the preview image in the Sony but the same data is overlaid on the preview image of the Canon and therefore frequently impossible to read. Overall the Sony provides the best viewing experience.
Operating  The Canon is festooned with dials and buttons just like the expert's tool which it is designed to be. The user interface generally works well with no major problems apart from the Auto ISO. The Sony has a more spartan interface, there not being sufficient real estate available for anything more. I would not describe the Sony as enjoyable to use, rather it is utilitarian. It was designed to meet certain objectives and it does. Its' control modules are small and cramped but carry out their duties efficiently.
Comparison with Panasonic Lumix G6  I happened to have a Lumix G6 available at the time of testing, fitted with a Lumix 14-45mm lens. I made quite a few matched shots of the same subject with the G12, RX100 and Lumix G6. The RX100 has a higher DXO Mark score (66) than the G6 (61). I wondered how the two would compare in real world conditions, outside a test laboratory. In brief, the G6 delivered better picture quality, performance, holding, viewing and operating in all conditions.  G6 high ISO noise levels were about one stop lower than the RX100. The G6 /14-45mm delivered clearly better resolution/sharpness with all subjects in all conditions.  I am just making the point that DXO Mark scores describe the performance of some aspects of a camera in prescribed and controlled conditions. Real world results may, and in my experience often do, reveal a different picture (pun intended).
Summary   With the RX100, Sony has shown the other camera makers what can be done and in the process may have revitalised consumer interest in the compact camera category which seemed in danger of vanishing under the onslaught of smart phone cams.
I would say the RX100 is both a category killer product and also creator of a new category; namely very small body, large(ish) sensor, general purpose zoom lens, high picture quality.  I suspect most people will find it a much more versatile photographic tool than some of the recent release compacts which have an even larger, 28mm diameter,  sensor but a single focal length, wide angle lens.
It needs a better lens to match the sensor's pixel count and I wonder if it might be possible to improve ergonomics within the existing envelope of dimensions. I will make some mockups and experiment with this.
I think Sony could expand the RX100 franchise to include a modestly larger version with a better lens having more reach and wider aperture at the long end, a small built in handle and an EVF.
The G12 is not disgraced even though it is now two generations old. It continues to make very nice photos in all but dim indoor conditions.
The just released G16 provides a partial answer to the RX100 challenge. It is smaller and lighter than the G12, with a wide aperture f1.8-2.8 lens. But it loses the articulated monitor and retains that horrible old optical viewfinder. If the Canon G cams are going to stay with a fixed monitor they desperately need an EVF, like the Nikon P7800, or even better,  like the swing up one on the Panasonic Lumix GX7.


Do Compact Cameras Have a Future ?

$
0
0

Ergonomics of Very Small Cameras


Mockup of a very small camera as proof of concept. A camera can be very small yet still have decent ergonomics and a well developed user interface.
 
Challenge of the Smart Phone    Not so many years ago, if you wanted to make a photograph, you needed a camera of some kind. These days most photographs made by most people utilise a smart phone. Image quality from these devices is improving every year. So who needs a camera ?  For many people the answer to this question is..... "Not me."
It comes as no surprise therefore that sales of compact cameras have fallen dramatically over the last few years.


Rear View of the mockup
 
Compact Camera Fightback  It seems to me that if compact cameras are to survive at all they need to offer a substantial improvement over smart phones in image quality, performance and the user experience. The camera has to be engaging and enjoyable to use. It has to provide a clear step up from the utilitarian convenience of a smart phone.
Image quality and performance are largely driven by technological development. The user experience is mainly defined by ergonomics.


Holding the mockup one handed. The right index finger can move easily from the shutter button to the scroll wheel, as shown here.  Grip on the camera is quite secure without strain. The relationship between the fingers and the camera is quite different from that which would be the case with a larger body.
 
Whence my interest ?  Sony has caused quite a stir with it's RX100 and RX100 Mk2 compact cameras with their  large (for a compact) sensor having a diagonal dimension of 15.9 mm and 20 million pixels. I recently had the opportunity to test a RX100 and can confirm that this camera's image quality is better than most compacts. But I found the experience  of using this camera was utilitarian and not particularly enjoyable. I found it difficult to hold securely. There is no EVF for eye level viewing. The controls while functional are so small their use is more a chore than a pleasure.


Rear view showing how the right thumb can move easily from rest position to the JOG lever without disrupting grip.
 
The ergonomic design challenge  I wondered  if  it would be possible to design a camera the same size as the RX100/2 but with more appealing ergonomics. I have made many mockup cameras to test out my ergonomic design ideas but had not previously tackled a mockup project on such a small scale.


Mockup design specification 

Size  I used the RX100 Mk2 as a starting point, then allowed an increase of 2mm in height and 3mm in depth  to accommodate the EVF and thumb support. The lens module is the same size as that on the RX100, but moved to the left (as viewed by the user) to make room for a handle.


Features  I wanted a built in EVF, a decent ergonomic handle, a built in flash, Mode dial, main scroll wheel, JOG lever,  swing out monitor and sufficient buttons to drive the camera while looking through the viewfinder  without disrupting grip on the unit.


Mockup Size  Comparison


Width mm

Height mm

Depth mm

Box Volume

EVF ?

Sensor Size diagonal mm

Sony RX100

102

58

36

213

No

15.9

Sony RX100/2

102

58

38

225

No

15.9

Lumix LX7

111

68

46

347

No

9.5

Lumix LF1

103

62

28

179

Yes

9.5

Canon G16

109

76

40

331

No, has OVF

9.5

Nikon P7800

119

78

50

464

Yes

9.5

Mockup

102

60

41

251

Yes

Up to 15.9


Mockup features, rear


Mockup Features Described


Holding  The handle at the front was developed in situ, by experimenting with different shapes, sizes and locations of the handle module until it was comfortable and located my fingers in the correct positions to operate the shutter and other  controls. You can see that the relationship between the hand, camera, handle and controls is completely different from the layout which works on a larger camera.
Viewing  The monitor could be fixed (giving the largest size), swing up/down type or fully articulated (giving the most versatility but smallest size). Each of these arrangements could work. As always with monitors, there is a tradeoff  between size and versatility.
The space allowed for the EVF is larger than that provided on the Lumix LF1 so should be adequate for a good viewing experience. A production model would have a soft rubber eyecup and sensor for auto switching the view from monitor to EVF.


Mockup features, front
Operating 


Rear of Camera   Many cameras this size have a circular 4 way controller module on the right side of the monitor, surrounded by very small buttons. I find these arrangements fiddly, difficult to operate yet  prone to accidental activation. So I replaced the 4 way controller with a JOG lever located immediately to the left of the right thumb where it is always easily accessible yet will not easily be accidentally bumped. A JOG lever can be moved up/down, left/right and /or pushed inwards. In Capture Phase it can directly move the active AF area. In other Phases of use it can scroll around menus and make selections.
There are 5 buttons on the back of the mockup. The function of each is user selectable from a comprehensive list of options. I would set one to open a Quick Menu for Prepare Phase actions. I would use two for primary exposure controls in Capture Phase (ISO and Exposure Compensation)  one for Playback and one to access the Main Menus. But other users will have different ideas about button tasking.
Note that the buttons are considerably larger then those usually found on a camera this size. Thus they are easy to find and operate by feel. But they are positioned so they will not easily be activated accidentally.
Top of Camera  From the left we have the EVF module, then the built in flash unit. Next comes the shutter button with surrounding control lever and behind this the main control dial, which works like that on a DSLR. On the far right is the Mode Dial with P,A,S,M and other positions.  The lever around the shutter button could be used as an on/off switch or power zoom actuator.
Holding the mockup. Not the world's best ergonomic experience as there is not much for the left hand to grip. But the right hand is stable and overall the camera is secure to hold and operate.


Front of Camera  On the top of the lens housing I have indicated three control modules. These could be used for Camera On/Off, OIS On/Off, AF/MF, Still/Movie, Power Zoom actuator or almost anything else as selected by the user.
Evaluation  The Mockup has a smaller box volume than the Nikon P7800, Canon G16 or Panasonic Lumix LX7 yet it provides a full suite of user controls for the expert photographer. The G16 and P7800 have their main control dial located in a very awkward place, beneath the middle finger of the right hand so the user has to release grip on the camera to operate the dial.  The LX7 control dial is on the back of the body where it is more accessible but it is taking up the place of the thumb support so is not ergonomically optimal. The control dial on the mockup is always easy to reach and operate with the right index finger.
The Lumix LF1 has an EVF but no handle but is smaller than the mockup and indeed smaller than the Sony RX100. But of course it has the smaller 9.5mm sensor and no main conrol dial.


The Compact Camera Dream....Wish....Fantasy......
Many of us have long wished for a very compact, take anywhere  camera with full sized  image quality and performance. The concept has much appeal and manufacturers have delivered many products catering to this wish. Sony's RX1, RX100 and RX100/2 cameras appear to push the  "small camera, big picture" theme further than any previous products from any maker. But I think the concept needs further development and refinement.
Summary  I think that if the compact camera is going to survive as a type of device,  it needs to move in the direction suggested by this mockup. It needs to offer the enthusiast/expert photographer the kind of engaging experience which is not available from a smart phone. It needs to be a proper camera which is enjoyable to use, not merely a utilitarian thing which happens to be able to make photographs.  It needs to pack all this functionality into a genuinely "take everywhere" package which will still make very good photographs.


Lumix GM1, Ergonomic Problems

$
0
0

 
New Camera, Old Mistakes

Photo Courtesy of Digital Photography Review, dpreview.com

This shows very clearly that you don't actually hold the GM1 and cameras of similar configuration. You get some fingertips onto it and hope for the best. 

 
Small Camera, Big picture....The Dream   Photographers are forever lusting after the elusive tiny, take everywhere camera which takes pictures just as good as you can get from a big DSLR.  Camera makers try to fulfil this dream with tiny camera bodies shrink wrapped around large sensors.
The Ergonomic Problem  Many of these cameras are so small you can't get a proper grip on them. Most don't have a viewfinder. Their user interface and control set is compromised by their small size.
Can it be Done ?I recently conducted a little ergonomic experiment with a compact camera mockup and wrote about it here. I think this showed that it is possible to have  decent ergonomics in a very small camera.
This mockup has a smaller box volume than the GM1 as it's lens module is smaller. But it provides a vastly better user experience. There is an EVF of decent size and a main control dial located where it is in easy reach of the right index finger. There is a built in handle of ergonomic design. The multi (4 way) controller has been replaced by the ergonomically more elegant JOG lever, shown here under the right thumb.
 
Recent small camera, large sensor compacts  Sony is leading the charge with the RX1 and RX100 cameras. Nikon, Ricoh, etc are all in the race. Now Panasonic wants to join the fray. 
The Lumix GM1  Unlike Sony's offerings which have fixed lenses, the GM1 is a Micro Four Thirds camera with interchangeable lenses. It's very small and kind of cute.
Pocketable ? Some people think they might want to carry it in a pocket.  I have never been a fan of this idea. Pockets  accumulate all kinds of detritus which could  be harmful to a camera. With a filter and lens cap on the kit 12-32mm lens,  the GM1 has a depth of about 55mm which is too deep for most pockets anyway. So it will end up in a pouch of some kind, just like a larger camera. And of course if you mount any other zoom lens the camera ends up being way too small for the lens.
Holding  The photograph at the top of this blog, courtesy of Digital Photography Review, shows very clearly that you can't actually hold  a camera shaped like the GM1. You apply the fingertips and hope it doesn't fall on the floor. The same comments hold for several recent very small compacts with no handle and with most of the rear of the camera being occupied by the monitor.
Viewing  You get a fixed, non articulated monitor only, and no EVF.
Operating  There is no main control (command) dial. All the buttons and the 4 way controller are very small and difficult to find by touch.
I Wish They Would:
* Forget about having interchangeable lenses on such a small body. A fixed lens can occupy less space when retracted as it can collapse right down till the rear element almost touches the sensor.  I doubt the GM1 is particularly attractive as an interchangeable lens body anyway. I would guess most buyers of the GM1 will leave the kit 12-32mm on the camera all the time. Maybe some will fit the 20mm f1.7 and tolerate the poor ergonomics of the body.
* With a fixed zoom lens the rest of the body can be reworked for much improved ergonomics, as shown in the photo above. This includes an EVF, a decent, functional handle (built in)  and a much improved user interface. The box volume of the mockup is actually smaller than that of the GM1 with 12-32mm kit lens fitted.


Camera

Width  mm

Height  mm

Depth  mm

Box Volume WxHxD  cc

GM1 with 12-32mm

99

55

52

283

mockup Compact with fixed zoom

102

60

42

257


Please Try again Panasonic  I have often read on M43 user forums that there is an ongoing interest from consumers in the idea of a compact camera with 4/3 [diagonal 21.5mm] sensor and a fixed zoom lens of moderate zoom range and aperture.
I believe this would be a more viable proposition than the GM1.

Sony RX10, Ergonomic Issues

$
0
0

Interesting New Camera, Old Ergonomic Problems
Photo courtesy of Digital Photograpy Review  dpreview.com
This photo is worth a thousand words. It shows how the user's right index finger has to be pulled back to reach the shutter button. Also the right thumb support is at the extreme right side of the camera. Together these ergonomic errors conspire to lift the palm of the right hand away from the camera leading to a weak grip. In use, you must fully support this camera with the left hand so the right hand can operate the main controls. It need not be so.


The Universal Camera   The Sony RX10 caused a fairly large wave of interest among enthusiast photographers when it was announced just a few days ago. On the specifications, it comes perhaps closer than any previous model from any maker to the universal, do everything wunderkamera so lusted after by those of us who really don't like changing lenses.  Check the star points:
* Constant f2.8 lens covering a diagonal angle of view of 84 degrees at the wide end to 12 degrees at the long end. This replicates the aperture and angle of view range of the classic professional photographer's 24-70 and 70-200mm f2.8 zooms for the full frame 43mm diagonal sensor. The extra good news is you never have to change lenses.
* Decent image quality. The RX10 apparently uses the same 15.9 mm diagonal sensor as the RX100Mk2, which has a DXO Mark score of 67. This puts it right in the middle of current Canon APS-C and M43 cameras on technical image quality, at least at the lower end of the ISO range.
* It has a largish handle so you can grip it firmly. It certainly needs one with a mass of 813 grams including battery.
* High resolution EVF.
* Swing up/down monitor of good quality.
* Sony is claiming very good performance for focussing and image throughput.
So has the ultimate wunderkamera  been delivered unto us ?
In a word, no.
The handle on this mockup camera is of the hybrid projecting/parallel type. That is, projecting at the bottom and parallel at the top. The shutter button is exactly where the index finger wants to find it. This is so because I put my fingers in place first, then designed the camera to fit them. This provides a very secure, comfortable hold and allows the provision of the quad control system on top of the handle with a control dial, shutter button and two buttons with user selectable function. Sony could easily fit this configuration to the RX11 or whatever it will be called.
 
The problem is ergonomics. The reason I continue to write this blog is that the world is awash with cameras, many of which feature good enough picture quality and performance but compromised ergonomics. The RX10 is just one of the latest.
There are two main ergonomic issues which I can see from the promotional photographs, particularly photos of someone holding the camera.
Location of the shutter button  I have thus far seen only one reference to this problem in early, hands on reviews of the RX10. This is from Dave Etchells of Imaging Resource who wrote  "......I found myself having to reach back a bit to get my index finger on the shutter button...." and   "...there wasn't much of a choice for any other way to do it...."
My comment about this is:
a) He is absolutely right in pointing out that the shutter button is not where his right index finger wanted to find it.
b) On my analysis he is altogether too pessimistic in thinking there is nothing to be done about it.
X marks where the shutter button needs to go


My interest in camera ergonomics was sparked several years ago by the Panasonic Lumix G1. This was the world's first mirrorless interchangeable lens camera. I found it's ergonomics distressingly poor. Fortunately Panasonic has lifted it's game since 2008 and current model Lumix M43 cameras are among the best on the market for ergonomics, and most other things as well.
One of the problems with the G1 was the location of it's shutter button on the tip of a thin projecting type handle. The RX10 repeats exactly the same problem. The shutter button needs to be located where the distal phalanx of the right index finger wants to find it, as indicated on the photographs. Sony has no excuse for putting the shutter button in such an awkward place. They could easily put in the optimal position. Doing so would free up more space on top of the camera and allow a more effective configuration of buttons plus the inclusion of a top/front control dial.
Rear view of the RX10 showing the preferred location of the shutter button and improved location of the right thumb and control dial. The grip is more secure if the thumb is angled across the camera in "ready to shoot" position. It is easier to maintain stable grip on the camera while turning the rear control dial if the thumb and scroll wheel positions are reversed as indicated in this photo. For those who disbelieve this, I suggest you make your own observations on some cameras with different rear control layouts. 
 
Thumb position and thumb support, relationship to rear control dial.
This ergonomic error is a little more subtle and is one made by several manufacturers. When holding a camera the right thumb wants to lie diagonally across the back of the camera, not cramped up at the extreme right hand side. The RX10 requires this cramped position which provides a less secure grip on a fairly weighty camera than would be provided if the thumb could angle across in a more natural position. Please refer to the attached photos for further description about this.
Panasonic Lumix GH3. A camera with mostly excellent ergonomics showing optimum relationship between the right thumb , thumb support and rear control dial. The hand in "ready to shoot" position, as here, is in relaxed half closed position, providing maximum hold on the camera for minimum effort.
 
Summary  The Sony RX10 is one of the most interesting cameras to hit the market in my 60 years experience with photography. Really. It's potentially a game changer for the entire camera industry. The evolution of cameras like this could turn interchangeable lens cameras into a niche product. I have been predicting the arrival of such a product  for some time.
But Sony's designers need to go to ergonomics school and learn some basic principles. Or they could read the first 20 or so posts in this blog. If they do that, and correct the ergonomic mistakes of the RX10 next time round, they will have a mighty strong product with wide appeal to many enthusiast/expert and amateur photographers, maybe even some professionals.


Sony Alpha 7/7R, New Cameras, New Ergonomic Problems

$
0
0

Photo courtesy of Digital Photography Review  dpreview.com 
You can see in this photo the camera user's index and middle fingers are spread apart. In this particular photo the middle and fourth fingers are not fully engaged with the parallel type handle. The hand needs to move up and rotate anticlockwise. But then the distal phalanx of the index finger will want to find a shutter button about 15mm to the left of it's actual position. If the shutter button were to be moved across to the left, the control dial would then be in the wrong place. I think Sony needs to redesign the entire upper handle and top deck of this camera.


Lure of the compact full frame camera  Over 30 years ago, my main camera was a Pentax ME Super SLR taking 35mm film. This gave a negative size of 24x36mm, diagonal 43mm. In the digital era this imager size is often known as "full frame" although in those days it was regarded as the miniature format. Cameras using 16mm film were designated "sub-miniature".
Over the years, cameras grew ever larger, adding electronic components, autofocus, batteries, handles etc.
Now we see Sony trying to re-invent the compact (full frame) camera with 43mm sensor, in the form of the Alpha7/7R.
Actually despite all of Sony's clever engineering, these cameras are still larger than the venerable ME Super.
Camera

Width  mm

Height  mm

Depth  mm

Box Volume  cc

Sony Alpha7/7R, 2013

127

95

65

784

Pentax ME Super, 1979

131

83

50

544


Technology stuff  No doubt there will be reams of material written and blogged about the technology in these new cameras. This blog is about ergonomics so I will concentrate on that.
Ergonomics  I continue to be surprised and disappointed that giant multinational corporations with immense resources, keep on producing cameras with clever technology but flawed ergonomics. The reason this surprises me is that good ergonomics costs no more than bad and the basic principles behind camera ergonomics are not technically complicated at all.
In one sentence, camera ergonomics involves putting body parts and control bits where the fingers want to find them. Why is that so difficult ??
Sony Alpha 7/7R  I have not yet had one of these in hand so my comments are based on photographs of the camera and photos of users holding the camera.
So, what's the problem ? 
An appreciation of ergonomics begins with awareness of the functional anatomy of the human hand. The relaxed human hand  takes a posture like that shown in the photograph below. In this position, the muscles and tendons are relaxed and the hand and fingers are ready for action. From this basic position the fingers can flex and extend, close up to each other or fan out further apart. The thumb can undertake greater or less opposition. (that is, movement of the thumb across to the opposite side of the palm).


This is the natural half closed position of a human right hand. A well designed camera will fit into this hand position because it has been designed to conform to the hand, not the other way around. 
 
I expect a camera to be designed such that the right hand will adopt this shape when it is holding the camera in "ready to operate" position. Some cameras achieve this quite well. As a result they provide the user with a comfortable, secure hold on the camera, with the fingers well placed to operate the controls, provided those controls are positioned where the fingers want to find them.
Notice that there is no appreciable horizontal or diagonal distance between the index and middle fingers. The index finger is somewhat higher than the middle finger, as you would expect.


Photo courtesy of  dpreview .com  
This shows the relationship between the index finger  (on the shutter button) and middle finger (tucked into the indent on the upper handle) as they grip the A7, shown in schematic cross section. The distance between them is about 26mm, an uncomfortable stretch for many people.
 
This is the position of a right hand as it would be if holding an A7, with the camera removed so you can see the relationships between the fingers. This position can be achieved, but is neither comfortable nor natural. There is no need for such awkwardness.
 
On the Sony Alpha 7 the design of the handle and right side of the camera forces the index and middle fingers apart. My measurements indicate a separation of about 26mm. Written on the page this might sound insignificant, but in the flesh it is quite an issue. 26mm is about as far apart as many people's partly flexed fingers can separate. This means the basic position is stretched and uncomfortable. Those lucky people with very flexible joints might wonder what I am talking about but for most people this will be a real issue. The attached photos illustrate the matter  in more graphic detail.
Photo courtesy of dpreview.com
Here is one possible alternative arrangement. The index finger is shown schematically on the red shutter button with a red control dial behind the shutter button. Separation between the index and middle fingers has greatly decreased.

Photo courtesy of dpreview.com
Here is another possible arrangement. This uses a parallel handle in the style of the Panasonic Lumix GX7. In this version the middle finger wraps over the top of and down the left side (as viewed by the user) of the handle. The shutter button stays where it is now. The control dial has to be relocated, either around the shutter button in Lumix GX7 (or Olympus EM1) style or in front of or behind it but at the same height. Again the two fingers are comfortably close together without the need for undue stretching.

 
The sad thing is that there is no functional need for the layout of arrangements seen on the top right and upper handle of  the Alpha 7.  There are several alternative layouts which would work much better. I have sketched just two of these in the attached photographs. And  look: there is a nice flat area on the left side (as viewed by the user) of the EVF hump for a handy set and see dial, but no module of any kind is there, go figure.
Summary I think the Alpha 7 cameras could form the basis of an attractive reprise of the compact full frame SLR style cameras of yesteryear. I think they will balance nicely with compact prime lenses, just as I used to use on the ME Super.
But Sony's designers need ergonomics lessons if their technologically interesting products  are to evolve into fully convincing cameras which enthusiast photographers will enjoy using.

Ergonomic Roundup November 2013, Canon

$
0
0

Art  Deco Building. Still standing but for how much longer ?


Market Leader  Canon is the current market leader. Given this I think it is reasonable to expect Canon to have more funds for research and development than other camera makers. I think it is also reasonable to expect that Canon would have spent some of that R&D budget on developing the best possible ergonomics for it's cameras.  Unfortunately there is little evidence of this.  
My History with Canon  I started using Canon cameras in 1990, in the early days of the autofocus era and soon after Canon switched from the FD mount to the new EOS mount for it's SLR cameras. Since then I have owned and used 5 film SLR's and 3 DSLR's. I have owned 4 G Series advanced compacts and one small compact. By the way, the main reason I stopped using Canon DSLR's was their erratic autofocus accuracy. But that is another story.
DSLR  Canon has been using the same basic shape and control layout for 20 years. If this were absolutely the best possible arrangement, incapable of further improvement, then no further ergonomic development would be required.
But that is not the case. Canon uses the same basic shape and style for all it's DSLR's, large and small. I understand they might want to project a uniform and therefore easily recognisable corporate style, but big cameras and small cameras need to be shaped differently as they are all used by the same sized hands.   The smaller DSLR's in particular have cramped holding arrangements which could easily be fixed with a different shape.  The mid sized DSLR's have  generally decent ergonomics but they could easily be improved. I wrote about this with reference to the EOS 60D here.
Advanced Compacts - G Series  I have shown herethat it is possible to design a camera which is very compact but still has decent ergonomics. In other words, it provides pleasing, efficient,  holding, viewing and operating. Canon's G series cameras have been dancing around these three ergonomic essentials for years without having produced a single model which puts it all together. Handles, thumb support, control layout, control modules (dials, buttons etc) monitor (fixed or articulated) viewfinder (currently and for years a low quality item which does  not accurately preview the picture) are all items with which Canon tinkers from one iteration to the next without ever bringing all the elements into a coherent and satisfying whole.
Mirrorless ILC's  Last year with great fanfare, Canon announced it's first ever MILC,   the EOS-M. You might have thought that being last player to enter the MILC game, Canon would have analysed all it's competitors' offerings, identified their strengths and weaknesses,  and presented the world with a category killer product. What actually emerged was arguably the least appealing new camera release in world history.  They took an entry level DSLR, removed the bits for holding (the handle and thumb support) chopped off the bits for viewing (the viewfinder and articulated monitor) and deleted many of the bits for operating (dials and buttons). They then presented this to the market at the same price as the original DSLR. ........
And then  wondered why consumers avoided the thing in droves.
Summary  Canon once had a dynamic, adventurous camera division not afraid to venture into new territory with regard to technology and design. Now  they appear to have gone to sleep. The disaster of the EOS-M indicates that Canon has lost touch with it's actual and more importantly, potential customers. Further, the EOS-M  suggests there is a lack of understanding about basic ergonomics in Canon's product development team.  They are able to iterate slight upgrades of an already established line, such as their DSLR's,  but when presented with the challenge of a completely new camera concept as with the MILC, they failed completely.
Crystal Ball  I think Canon is in serious trouble. If cameras are to survive the onslaught of smartphones and other phablets and gadgets which can take photos, they need to be engaging and enjoyable to use. They need excellent ergonomics.
The DSLR has no future and Canon has no credible MILC  with which to replace the DSLR.
I believe Canon's market dominance today is the result of brand  strength  built up in the years 1990 to about 2005. Recent years have not seen the same development in conceptual appeal, image quality, performance or ergonomics. I think consumers will eventually tire of Canon's lack of innovative development and look elsewhere.  I suspect the only thing which has, until recently,  been saving Canon from disaster in the marketplace has been weak and inconsistent competition from the camera making opposition.

Viewing all 824 articles
Browse latest View live


Latest Images