Quantcast
Channel: Camera Ergonomics
Viewing all 824 articles
Browse latest View live

MILC 4th Birthday Report Part 3 Panasonic

$
0
0

MILC FOURTH BIRTHDAY REPORT
Part 3, Panasonic Lumix G-with-EVF cameras
Author AndrewS November 2012
Introduction  I have allocated a separate section of this report to Panasonic for three reasons. First, the only camera gear I now own, with more to come,  is Panasonic Lumix bodies and lenses so I have given considerable thought to various questions about Panasonic M43 equipment. Second,  Pansonic has been in the MILC-with-EVF  business longer than other makers and has produced more models providing  substantial material for study.  Third, the G5 and GH3 models show clear signs of  improved ergonomic design.
Panasonic M43     Panasonic was first cab off the [EVF] MILC rank and has released the most new models which can use the greatest range and variety of lenses. There are four camera lines: the GF series for compact upgraders, GX series for enthusiasts who prefer a camera without EVF, G-with-EVF-but-without-a-letter series for GF and GX upgraders, superzoom upgraders and DSLR downsizers. The top of the range GH series are hybrid still/video cameras for expert/enthusiast and professional users. The forthcoming GH3 is aimed at the high end of the ILC market.
Concept: All the above may sound like the moves of a company with a vision to conquer the photographic world. But as I write this Panasonic appears to be in fairly deep financial trouble and making a loss on it's camera division. No doubt there are many reasons for this but I want to highlight just one, which has to do with the conceptual integrity of it's G/GH-with-EVF cams. I have been wondering for some time why MILC's and Panasonic M43 cams in particular have not made more inroads into CaNikon's DSLR hegemony. I believe there are  issues related to concept, implementation, performance and marketing.
The ill fated Lumix L1. I have never held one of these but you can see straight away there are many ergonomic problems with this camera. Like the On/Off switch where the thumb rest should be and the rows of identical buttons right and left of the monitor that the user would never locate by feel.
Panasonic's first [4/3 System] DSLR was the L1 of 2006. For reasons known only to themselves, Panasonic and Olympus with the same-inside E330, designers chose to use a sideways mounted focus screen and reflex mirror system.  This provided no functional or ergonomic advantage over the standard  DSLR shape. Were they trying to make a DSLR which looked like a rangefinder ?  I doubt many buyers would have realised it was a DSLR, or in fact understood what it was.  In the words of  Digital Photography Review's Simon Joinson,  the L1...."failed to translate into actual sales". There were various problems: it was too expensive, the EVF was "dismal" and the live view "clunky". But I think the other, more fundamental problem might have been that  the camera lacked conceptual integrity.
Panasonic's next offering  in the 4/3 DSLR system was the L10, about a year later. This looked like the standard layout DSLR which it was. Simon Joinson described the L10 as having "excellent handling and ergonomics"  and offered the view that the L10 "...is designed perfectly and fits your hand very well." High praise indeed.  But it was also "shockingly overpriced" which probably ensured buyers would go elsewhere.
At this point Panasonic made two major decisions, one I believe was  absolutely right, the other a mistake. I say this with the benefit of hindsight of course. It is always easier to evaluate the merit of some decision when one has had the opportunity to consider the outcome.
The really good decision was to drop the 4/3 DSLR format altogether and embrace the newly developed, mirrorless, Micro 4/3 format. Panasonic was never going to gain market share from CaNikon while it tried to play them at their own game. They needed to start a new game with a potentially disruptive innovation and had the corporate courage to do so.  In any event they no doubt saw the writing on the wall for the traditional DSLR camera type. This meant building an entire new system from nothing. Bravo Panasonic [and Olympus].
Photograph courtesy of Digital Photography Review
You can see the G1 is a scaled down L10. Not shown in this picture is a superzoom which is also the same shape but scaled down even further. This might have pleased the corporate stylists possibly keen to portray a unified image but was a backwards step ergonomically
The bad decision, in my view, was to make the first M4/3 camera, the G1, the same shape and style as the L10 but scaled down in size. I think this strategy erred in two ways.
First it lacked conceptual integrity. The G1 is not a DSLR. In fact the whole point to the very existence of the G1 is precisely that it is NOT a DSLR.  In any taxonomy of camera types Micro Four Thirds would occupy  a different genus with different characteristics and potentialities.  So, why did they make it look like a little DSLR ?  I don't know so here comes a bit of speculation.  I think that there might be a perception in the minds of some consumers that  a "proper camera" looks like a DSLR.  I imagine Pansonic identified this from surveys and so decided  to make the G1 this shape. But I think this was a  mistake even though it may have seemed prudent at the time. Why? Because CaNikon has successfully trained consumers to accept the perception that "Bigger is Better", and therefore, presumably "Smaller is less capable."  And Panasonic was selling smaller. My hypothesis is that many consumers simply could not accept the proposition that the smallest ever DSLR look-a-like camera was worth  their consideration. Especially  when it cost more than an entry level DSLR from one of the established makers and failed to provide better image quality.
So in two steps, Panasonic moved from the L1 which was a DSLR but did not look like one, to the G1 which was not, but looked like, a baby DSLR.  If they were trying to confuse their customers they could hardly have done a better job.
The second error was to scale down a larger camera. Engineers can scale down the size of a camera's components.  But the hands which use the device do not scale down at all. They remain obstinately the same size regardless of the device.  If you look at a photograph of the G1 beside an L10 you will see the two appear almost identical apart from their size. While the L10 received a good rating for ergonomics, the G1  was my wake up call to the ergonomic deficiencies of MILC's. This was Panasonic's version of the mistake Rollei made with the SL2000F, which I referred to in Part 2 of this MILC review.  Small cameras can be designed to have excellent ergonomics. But this requires a shape which is completely different from that of large cameras. The purpose of my camera mockups project has been to explore what exactly is that shape.
In Part 5 of my camera ergonomics series on this blog titled "Introduction to some basic concepts" I introduced the idea that some challenges are conceptually easy but technically difficult to solve. Others are the reverse, technically easy but conceptually difficult. Camera Ergonomics falls into the latter category. My perception of camera makers is that they are good at solving technical problems but very much less effective and often appear to flounder rudderless in the face of conceptual challenges.  Panasonic is not alone in this. I rate all current MILC's as having ergonomic deficiencies, some more glaring than others.   It costs no more to produce a camera with good ergonomics than one with bad ergonomics so cost is not the issue.
Implementation:  I won't bore you with every detail of  the history of Panasonic's implentation of MILC's but some key issues may be of interest.
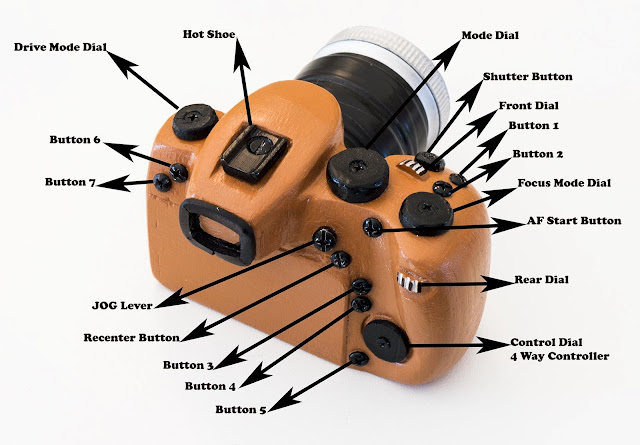
Let's start with handles. The handle on the G1 was such an egregious mismatch with my hand it set me on a path of research into camera handles and holding. I discuss these matters and others including functional anatomy at length in previous articles on  this blog. Briefly the G1 uses a  projecting handle when it needs a parallel handle.  This could  be realised by shifting the lens axis across to the left and redesigning the layout of the right side of the body. Panasonic kept the same handle design with the G2, G10, GH1 and GH2. There were small but worthwhile detail improvements on the GH2 which improved the handling qualities of that model, but the basic structural problem remained.  With the G3 the handle was reduced to a vestigial bump which proved to be an ergonomic step backwards. The G5 saw the lens axis moved left and the handle redesigned to be wider with the shutter release button inset further from the right side. There is also more shaping for the fingers and a more angled thumbrest. This is a hybrid projecting/parallel handle which is an improvement over that on the GH2 and a sign that Panasonic is starting to get the message about ergonomics. The GH3 would appear from the published photographs and early reviews to be a further step forward in handle design.
Next,  let us investigate mode dependent scroll wheels. I regard these as of such importance to the operation of a modern electronic camera that I gave them a whole article on this blog in June 2012.   Panasonic's adventures with scroll wheels remind me of the 1955 Hitchcock movie "The Trouble with Harry".  Harry was dead, you see, and nobody could work out where to put him. Just like Panasonic has been unable to work out where to put their scroll wheels, some of which might as well have been dead as they were well nigh inaccessible. The G1, 2 and GH1 have the scroll wheel upper front on the handle where it is blocked by the middle finger in normal hold position. So to operate the scroll wheel the user has to support the camera completely with the left hand, shift grip with the right hand so the right index finger can access the scroll wheel, make the adjustment then return all hands and fingers to normal positions. With the G10, G3, GH2 and G5  the scroll wheel was sent to the back, upper right. On the G3 the wheel is almost completely buried in the thumb rest so to operate the wheel the user has to flex the thumb metacarpo phalangeal and interphalangeal joints, release thumb opposition, support the camera with the left hand and press on the wheel with the very tip of the thumb, just beneath the nail bed. This is awkward, inefficient and  painful on repeated use. The wheel on the GH2 and G5 is a little more exposed so is easier to operate. However the serrations on the wheel are too broad and smooth. This means the wheel is dificult to operate reliably with the interphalangeal joint of the thumb held straight. Bending the joint leads to more reliable operation of the wheel with the pad of the distal phalanx of the thumb, but this produces more disruption to the grip. With the G5 there is a little control lever just behind the shutter release button indicating that they figured out this is a good place for a  UIM.   With the GH3 they finally, at last,  on their eighth try at a MILC-with-EVF,   put a scroll wheel behind the shutter button which is where it should have been all along. Better late than never, I guess.
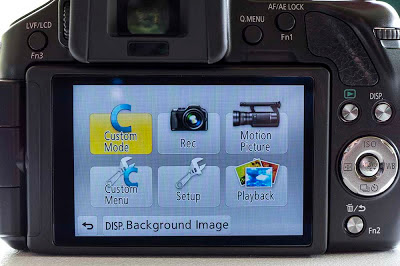
A few observations about Four way controllers [Cursor Buttons in Panasonic Operating Instructions] are in order.  From the G1 to the GH2  Panasonic used the "Five Buttons" type of module.  Samsung's first MILC  the NX10,  used the "Rocking Saucer" style module.  I used the G1 and NX10 together for a time and discovered the rocking saucer type to be very  much easier to locate and operate with the thumb by feel.  The difference is like night and day. The thumb can easily find the clearly delineated edge of a rocking saucer if it is correctly shaped. But even after six months of diligent practice with the GH2, I cannot reliably find and operate the five buttons on that camera without looking at them.  The G5 has a modified rocking saucer module which is much easier to use. It could be further improved if the edges of the saucer were slightly more prominent.  Of course if these cameras had properly located and designed JOG levers they wouldn't need four way controllers at all.
Camera design and political policy  In Part 2 of this review I alluded to a similarity between camera design and policy development in politics. Both camera designers and political policy makers refer in their promotional material to the use of consumer surveys in the process of developing their way forward.  The problem with this type of discovery is that it reveals respondents' current likes, wants, anxieties and preferences.  As I discussed in Part 2 of my initial series of articles on this blog, these are transient, idiosyncratic and often unformulated. They can be useful in evaluating consumer's responses to a policy or product and this can inform a marketing strategy. However they are an unreliable basis for the design itself.
So What is my prescription for Panasonic and the other MILC makers ?
I think they need to do four things
1. Establish a consumer directed culture in head office and all the branches.
2. Make  products which have conceptual integrity.
3. Ensure excellent ergonomic implementation.
4. Commit to vigorous effective marketing reaching out to potential buyers.
Maybe the camera makers think they are already doing those things but from my perspective as a consumer that does not appear to be the case.
If  I  were the Great Panjandrum at Panasonic and perhaps they are fortunate I am not, I would structure their camera lineup as listed below, with no cameras above basic compacts lacking an EVF .  I know that the GF and GX series M43 cams are big sellers for Panasonic so they probably have to keep M43 cams without EVF in the lineup. But I find them to be irritating little things, hard to get ahold of and almost unusable in sunlight or with a long lens fitted.  Still, some people love them........
From the bottom:
Cameras without EVF, small sensor
* Standard compacts without EVF while there is still a market for them.
Cameras with EVF
 * Small sensor:  
* Travel Zooms, SuperZooms.
* Advanced Compacts, like LX7 but with EVF.
* Four Thirds Sensor  [13.0 x 17.3mm] Each of  these cams uses the latest and best sensor available. They differ in size, features and operational capabilities.
 *  High performance fixed zoom lens compact with EVF. The camera which the Canon G1X failed to be.
*  Small Micro Four Thirds interchangeable lens camera with EVF.
*  Larger, but still compact, pro style Micro Four Thirds interchangeable lens camera with EVF.
Rationale  Maybe the people at Panasonic believe their battle is with CaNikon and I guess that would be true at one level. But I think their real test is to reach out to and engage with photographers who use cameras for the purpose of making photographs. They need to make and market products which are enjoyable to use, which handle well and operate in harmony with the user's intentions. This means they need to concentrate on the photographic fundamentals of image quality, performance and ergonomics, which devolves to holding, viewing and operating.
Cameras these days are festooned with  announceable gimmicks, many of which add little or nothing to the process of making photographs. But the design elements which I am proposing all enhance the photographic experience. These include a straightforward menu system, built in EVF,  built in pop up flash for backlit subjects, proper ergonomic handle, ergonomically designed, located and configured UIM's, good swing out monitor, good lenses, and all this in a compact package. The marketing speil might be "Real Cameras for Real Photographers" or something like that.
I very much doubt many camera users would care if their camera contained mirrors and prisms or electronic imaging modules, just as many car buyers neither know nor care whether their vehicle drives the front wheels or the rear. These things exercise engineers, not consumers.
Some "non core" features may well be important for buyers who find them useful and so the makers need to include them. These could include things like Wi-Fi, GPS etc.
Shape and Style  My vision of the shape and style which provides conceptual integrity and ergonomic excellence is realised by the mockups which appear in the attached photographs.
Panasonic G cams-vs-Mockups, Dimensions and Volumes
Body

Width  mm

Height mm

Depth  mm

Box Volume   c.c

G5

120

86

70

722

Small Mockup

123

82

61

615

GH2

124

90

74

826

GH3

133

93

82

1014

Large Mockup

141

90

71

901


On the left is the G5 with Lumix 14-45mm zoom lens. You might not realise it from the photo because they are a different shape and one is silver which makes it appear larger,  but the mockup on the right actually has smaller dimensions and box size than the G5, but better ergonomics.


Small EVF camera  The photo shows a Panasonic G5 next to my small mockup. The mockup is a little wider and lower than the faux DSLR shape of the G5. It is not as deep because the EVF eyepiece does not have to protrude so far back for comfortable viewing with the right eye. Left eye viewers are not well catered for by either design style but at least the "EVF left" setup is no worse for lefties than "EVF on lens axis".  It's  box volume is smaller yet the mockup provides significantly better ergonomics. The handle is taller, wider and more shaped to fit the right hand. There is much more space on the top deck for control modules. The thumb rest and control panel on the back are larger and better shaped for holding and operating. All the buttons can be larger. There is space for a JOG lever which I regard as a "must have" for an ergonomic camera as it is by far the best UIM which I have yet encountered for rapidly moving active AF area and it can be used to speed up item selection in menus and playback.
On the left is a GH2 with Lumix 12-35mm f2.8 pro grade zoom. The mockup on the right is the same height as the GH2 but has less depth and 16mm more width. It fits easily into the same space in my camera bags. Their handling qualities are like night and day. For a small increase in size over the GH2  the mockup [which is still smaller than the GH3] has dramatically improved handling and operating characteristics. [well, it would if it were a real camera]. The genuine, non patented, non optical peanut butter jar lens appears to be large enough for an f2 version of the 12-35mm lens should anyone ever choose to make one. 
Pro Style EVF camera  I don't yet have a GH3 to photograph so the GH2 which is not really "pro grade" will have to suffice for the moment. My large mockup is aimed at the market position occupied by the GH3. The mockup is a little wider and lower than the GH3 with less depth. This gives a layout with the advantages described above for the small mockup with significantly less box volume than the GH3. When developing the shape of the mockups I was very careful to ensure that large, medium or small hands could hold and operate the camera easily by moving up or down the handle.
Mockup evolution  The mockups were developed "in the hand". The only measurements approximately preset by measured dimension were the body depth,  lens mount diameter, allowance for the monitor and control panel.  The rest I grew in somewhat organic fashion to fit my average sized adult male hands, adding and removing pieces of wood until everything felt right.
Mockup styling  The resulting shape of the mockups was not predetermined but arose naturally from the design process.   This gives the mockups their unique shape which has conceptual integrity. I have no idea whether people will find their shape pleasing on first sight but I bet they will find the  handling qualities of a real camera designed this way very pleasing indeed.  I liken the process of designing these mockups to that which resulted in the early SLR's of the 1960's. They had the shape which resulted inevitably from their mechanical function. People have gotten accustomed to that shape but they can just as readily come to favour a different shape if it provides significant handling and operating benefits, which it can do if implemented properly.


Lens Test Panasonic Lumix GX 12-35mm f2.8 OIS

$
0
0

Lens Test Report
Panasonic Lumix GX Vario 12-35mm f2.8 Asph Power OIS
Premium standard zoom for the Micro Four Thirds System
Author AndrewS November 2012
Lumix GX Vario 12-35mm f2.8 Lens mounted on Panasonic Lumix G5 body
Introduction This is Panasonic's fourth standard zoom for the M4/3 system. First came the 14-45mm f3.5-5.6  OIS, which is still in production and offers excellent performance at a moderate price. Then came the budget 14-42mm f3.5-5.6 OIS often bundled with new bodies in a kit. Next came the 14-42mm f3.5-5.6 Power Zoom collapsing OIS lens designed,  I suspect mainly for video use. Now we have the 12-35mm constant f2.8 OIS lens which is a big jump up in specification and price from the other lenses. The 12-35 f2.8 is available separately or bundled with the GH3 body in some kits.
Although the G5 is a very compact M43 camera it matches well with the 12-35mm f2.8 lens 
Place in the M43 system  The 12-35mm is the second Panasonic zoom aimed at the professional or serious amateur user at a premium price. The first pro quality zoom was the 7-14mm f4  ultrawide, the third is the 35-100mm f2.8 mid range tele zoom. 


Specification and features  Length is 73mm bare, 91 mm with 58mm filter, front and rear caps. Diameter is 66mm without the supplied petal type lens hood, 73mm with the hood reverse mounted over the barrel.  Mass is 300g bare, 355g with filter, front and rear caps and lens hood.  The lens is of varifocal type which has to be refocussed after zooming. This precludes the fitting of a focus distance scale. There is an OIS On/Off switch on the left side of the barrel but no AF On/Off switch, which I find disappointing on a lens at this price/performance level. There is a thin rubber O ring around the metal lens mount for weather sealing.  The aspheric rear glass element is fixed and located as far to the rear of the optical pathway as physically possible. It has a diameter of 22mm which is slightly greater than the 21.5mm diagonal of the imaging part of the sensor. The inner barrel of the lens extends 24mm while zooming from 12mm to 35mm. Focus is internal. The front element does not rotate with zoom or focus.
The fixed rear element is close to the outer world, requiring care when the lens is removed from the camera.
Price, Primes and zoom range  Some M43 user forum members have expressed a view that this lens is "Too expensive". I thought it worth  putting some perspective on this idea with a list of the single focal length lenses for M43 which are covered by the 12-35, for which  I paid AU$1371 over the counter retail at a Sydney CBD camera shop. Prices from the same shop are:
Olympus 12mm f2,  $949
Panasonic 14mm f2.5, $539
Olympus 17mm f2.8, $339
Olympus 17mm f1.8, ?$600 ($499 at B&H New York)
Sigma 19mm f2.8, $225
Panasonic 20mm f1.7, $449
PanaLeica 25mm f1.4, $717
Sigma 30mm f2.8, $225
Obviously you wouldn't buy all of these lenses, for a total cost of $4043.  I have no wish to engage in the  "Zooms-vs-Primes" argument or even canvas the merits of one or the other in this review. However  I think the 12-35 does make a  stronger case than any previous M43 zoom to be a genuinely viable replacement for many primes.
Photo Courtesy of camerasize.com
This photo shows, on the left a full frame (43mm) sensor camera with 24-70mm f2.8 lens, In the middle An APS-C (27mm) sensor camera with 17-55m f2.8 lens and on the right a M43 (21.5mm sensor) Panasonic Lumix GH3 with 12-35mm f2.8 lens. You can easily see that the APS-C kit is closer in size to full frame than to  the largest M43 camera with lens of equal angle of view, zoom range and aperture. [The EFS 17-55mm is not a perfect match, having a slightly narrower angle of view than the other two lenses]
Comparison with premium zooms from full frame and APS-C  This is one of those situations where a photo is worth a thousand words. Courtesy of the Camera Size website you can immediately see the difference between the classic 24-70mm f2.8 lens for 24x36mm sensors compared with lenses of the same field of view, zoom range and aperture for APS-C and M43. A price comparison may be of some interest to readers. Prices in Australian dollars, over the counter retail, GST paid.
Panasonic M43 12-35mm f2.8 OIS, $1371. New lens just released.
Canon EFS 17-55mm f2.8 IS,  $1399.  Lens has been in production for 7 years.
Canon EF 24-70mm f2.8 L Mk2 USM, $2389. New release Mk 2 version No IS.
Performance, Mechanical
Focusand zoom   The zoom action is smooth but not quite as smooth as that on the 45-150mm. The focus ring turns smoothly. In Focus Mode [AFS] and AF Mode [Single Area], autofocus on the Lumix G5 is so fast with most subjects one is hardly aware of it. All of my several hundred test frames taken in a wide variety of conditions  are sharply in focus.  Manual focus and AF+MF work well, with no problems. In a quiet room with one's ear on the lens, it can be heard making several little noises while operating.  These come from the OIS unit, the AF drive motor and the aperture diaphragm motor.  As usual with Panasonic OIS lenses this one rattles if shaken side to side when unpowered.
Optical Image Stabiliser   On my tests, OIS allows sharp results at 1-1.5 steps slower shutter speed than is possible without OIS. For instance a typical test run saw sharp frames from 1/13 sec  with OIS  at 35mm focal length, and from 1/30sec without OIS.   So, OIS works but the benefit on my testing is modest.
Shutter Shock   I found no evidence of blur, doubling or any other kind of image degradation which might have been attributable to shutter shock, at any shutter speed or camera support condition, tripod or handheld.

Aperture Diaphragm Actuation  On Page 10 of the (English Version) of the Operating Instructions for the lens the following slightly cryptic notice appears: "A sound is heard from the lens when taking a picture of a bright subject such as when outdoors.   This is the sound of lens or aperture movement and is not a malfunction."  In normal use the lens aperture remains fully open when the shutter button is half  pressed for acquisition of autofocus and auto exposure, closing to the set aperture only for the actual exposure. But in very bright conditions such as when a bright sky is included in the frame, the lens aperture will close down without user input. When I first encountered this behaviour I thought it was some kind of intermittent fault, but it appears to be a design feature the purpose of which is unknown to me. I have read on user forums that it may be to protect the sensor from excess light levels.
Tree trunk, detail, Lumix 12-35mm
Tree trunk detail, Lumix 45-150mm This is a good lens, which I happened to be testing at the same time,  but the 12-35mm just picks up more texture and detail
Performance, Optical
Sharpness/resolution  My benchmarks for testing were the Panasonic 14-45mm and 7-14mm  zooms. I did not have access to any single focal length lenses for comparison. I carried out my usual test protocol, photographing a test chart at 40x  focal length and a stand of casuarina trees with uniformly fine foliage at 1000x focal length. Then I made a few hundred photos of a range of subjects in different conditions. When viewing the resulting files on screen I make notes and frequently open pairs of files in ACR>Photoshop for direct side by side comparison. This method of lens evaluation is rather time consuming but does give me a broad based set of data for evaluation.
My experience is that test charts give me about half of the information I want about the performance of a lens. I have encountered many  which did quite well with evenly lit, high acutance chart targets but fell apart when subjected to more demanding conditions such as  backlighting, strong contrast, very low contrast or foliage against a hot sky.  What follows is a summary of the combined results of all the  tests.
The 12-35mm showed very high sharpness and rendition of fine details, right from f2.8 at all focal lengths.  The effect of stopping down was to increase the diameter of the circle of maximum resolution from about 80% of the frame at f2.8 to 100% at f4. Stopping down further increased the depth of field but not resolution which started to suffer from diffraction, which causes overall softness of the image, from about f8 and was really obvious by f11. There were no signs of optical weakness at any focal length and my copy is well centered.
Compared to the 14-45mm zoom the 12-35 at matching focal lengths gave slightly better sharpness, resolution and local contrast at f2.8 than the 14-45 could manage at any aperture. I should make it  clear, however that the 14-45 is a very good lens and I had to do a lot of pixel peeping at 100% with matched files to discover the 12-35 actually is the better performer by a small margin. On the test chart runs I could not separate them. It was only on  matched pairs of photos of many different real subjects that the superiority of the 12-35 became clear.  The main advantage of the 12-35 over the 14-45 is the extra 2/3 stop at the wide end and 2 stops at the long end.
Compared to the 7-14, the 12-35 files at f2.8 were indistinguishable from the 7-14 files at f4.
I was also testing the Panasonic 45-150mm lens at the same time and while this is a very nice budget  performer it is a step down from the 14-45 and two steps down from the 12-25 and 7-14. You would hope this might be the case, since the 12-35 costs 4.5x as much as the 45-150.
The most striking feature of the 12-35's optical performance is it's ability to render surface textures and fine details with great clarity. With apologies to some breakfast cereals, words like "pop" and "snap" spring to mind.    This characteristic might not translate fully to formal resolution measures expressed in line pairs per image height or similar, but  is evident when actual photographs are inspected.  For instance I photographed my wife and discovered from the photographs but not from my own eyes [which are not too bad, I can read a newspaper without spectacles]  that she had a very small lesion on the face for which a trip to the dermatologist was indicated.
Note that all my testing is done with RAW files. Due to the propensity for Panasonic JPG's [up to and including the G5 anyway] to soften fine details you will not get the most from this lens with Panasonic JPG capture.  The GH3 may have better JPG's,  we shall see.
Quick closeup. Lumix 12-35mm at 35mm and f8. This was handheld, viewing on the monitor, AF on the center of the left flower. I didn't notice the little insect until the image was on screen.
Chromatic Aberration and purple fringing  Olympus camera users have reported clearly evident CA with this lens. This is corrected in Panasonic cameras even with RAW images so is not evident in the output files. Slight purple fringing can be seen towards the corners with some high contrast subject types [foliage against cloudy bright background]. This is controlled by slight reduction of the lens aperture.
Corner shading  is quite apparent at all focal lengths at f2.8, becoming less evident as the lens is stopped down 1-1.5 stops.
Drawing  There is moderate barrel distortion at the wide end, slight barrel at 25mm and mild pincushion at 35mm. This is the result after  in camera autocorrection, see comments below from the Photozone test report.
Bokeh  Rendition of out of focus subject elements is generally soft and smooth but  there is a slight tendency to tramlining and double imaging with some subject types, for instance small twigs in foliage or other straight sharp edged objects.
Contrast/microcontrast  This is the lens' forte. Files come straight out of the camera with a level of local contrast which would require a Contrast/Clarity boost in Adobe Camera Raw with some other lenses.
Flares  In general use the lens does not exhibit a problem with flare. Deliberate attempts to induce flare can  produce green blobs, magenta flares or veiling flare with the sun near the frame edge.
Close up  At 35mm the lens will focus down to 240mm from subject to sensor plane. This enables occasional close ups of  small subjects like flowers to be made hand held without the need for special macro equipment. The results are very acceptable.
Waterfront scene, crop, right lower segment of the frame. Lumix 14-45mm at 35mm f5.5
Same waterfront scene and crop, one minute later. Lumix 12-35mm at 35mm f2.8
Comment on published reviews  Evaluating and comparing published reviews can be difficult as each uses a different format for presenting results.
photozone.de  presented very good findings for resolution but was critical of the high level of uncorrected barrel distortion [5.8% as revealed in RawTherapee] at 12mm, describing this as "excessive"  They went on to describe Panasonic's  automatic in camera correction as "lossy" and "highly disappointing". They were also critical of the level of corner shading at f2.8. I think these comments form part of an ongoing debate about the best location for correction of chromatic aberration, possibly other aberrations, corner shading and distortion which are inherent lens characeristics. Should they be corrected in the lens, in the camera or  in the post capture software [such as ACR]  or all three ?  My own very careful observation has been that the [Panasonic] in camera correction of distortion with this lens produces very sharp, clear photos which do not appear to be "lossy" at all and are not in the least bit disappointing. Manufacturers  can presumably make lenses with very low inherent levels of CA, distortion and shading but I expect they would be much larger and more expensive.
slrgear.com   made a more positive report, essentially in line with my own findings. They reported the out of camera levels of CA, shading and distortion without much comment as to the source of corrections.
ephotozine.com  also produced a good report, again with high ratings for resolution, with little in the way of negative commentary.
Lumix 12-35mm bokeh. The out of focus rendition with this lens is generally smooth, but sometimes a slightly nervous appearance creeps in, as here.
Compatibility with Olympus cameras  When it was introduced, my understanding of the M4/3 format was that any M4/3 lens would work properly on any M4/3 body.  But in practice, this has only been partly true. All of them in my experience give correct exposure and mostly correct autofocus operation although I have found some Panasonic lenses focus more reliably on Panasonic cameras. Panasonic and Olympus zooms rotate in the opposite direction. Pansonic has in lens IS, Olympus has in body IS,  Panasonic autocorrects in camera a different set of lens faults than Olympus.  In consequence, I think it is fair to say that in several cases, Panasonic lenses work better on Panasonic cameras and likewise for Olympus.  So, what about the 12-35mm?  I have read several reports of clearly apparent chromatic aberration from this lens on Olympus cameras. So the 12-35 is a better match with Panasonic than Olympus cameras. However Olympus does not yet have a Pro level M4/3 standard zoom, leading some Olympus M4/3 users to mount the Olympus 14-54mm 4/3 lens on an adapter. But that combination is larger, heavier and slower to focus than the 12-35mm. I suspect that some Olympus users might  like to see a M4/3 version of the Olympus 12-60mm f2.8-4 [4/3 system] lens, although it would have to be larger and heavier than the 12-35.
Summary  Since the advent of the Micro Four Thirds format in 2008, there has been some uncertainty,  dare I say confusion, about the place of M43 in the camera world.  Some thought  it would be a platform for compact camera upgraders, some saw it as a "gap filler" between compacts and DSLR's.  I have always seen it as the format best positioned to supplant the APS-C  DSLR  as the most popular interchangeable lens system. Until now this prospect has not been realised due to a lack of sufficiently convincing M43 products. That has started to change. The Panasonic 7-14mm f4 has always been a pro standard ultrawide  zoom but has been a bit of an orphan with no pro system to back it up. Now we have the 12-35mm f2.8, the 35-100mm f2.8 and the GH3 body forming the core of a pro standard product set within the M43 system.
The 12-35mm f2.8 which is the subject of this review is fully capable of taking on a professional photographic role. It is a highly capable and versatile lens with excellent image quality, excellent mechanical operation and no deal breaker deficits.
It is not "perfect". The edges are not absolutely sharp until f4. Bokeh is good  but not perfect.  There is no distance scale. It is a varifocal not a parfocal.  [But a parfocal version would probably be larger] There is no AF On/Off switch on the lens barrel. Oh, yes, and mine has a bit of dust inside the rear element, on the periphery, thank goodness.  But the overwhelming impression is of a highly competent lens  capable of handling any photographic task, in a remarkably compact and reasonably priced package.  With this lens and it's pro grade companions,  the Micro Four Thirds system is coming of age.
Is it worth the money?  Should I buy it ?   Micro 4/3 system users are spoilt for choice with standard zoom lenses. From Panasonic there are the 14-42mm OIS, 14-42mm Power Zoom (collapsing), 14-45mm OIS, 12-35mm OIS and 14-140mm superzoom. From Olympus we have the 14-42mm Mk2 R (collapsing), 12-50mm with selectable macro and power zoom and the 14-150mm superzoom.
On the basis of my own testing of several of these lenses plus aggregated results from published test report sites, I rate the optical performance of these lenses on two levels. This is a bit aribtrary of course, but it helps me to get a sense of  where various lenses fit in the scheme of things.  Note that some of the lenses may be preferred for atttributes other than optical performance such as focal length range, image stabiliser, power zoom, collapsing barrel or macro capability.
I rank the  Panasonic 12-35mm near the top of  Level 1 and the Panasonic 14-45mm near the bottom of Level 1. The rest go to Level 2.  That does not mean they are bad lenses but the other two  are better optically.
So this is what I would suggest:
If you want the best and don't mind paying the price, forget the rest, get the Panasonic 12-35mm. And, to follow the logic, also get a Panasonic GH3 body and Panasonic 35-100mm f2.8 lens to round out a pro standard twin lens kit. At this level total cost is a very substantial consideration so the gear had better be good.  The 12-35 is good, I will report on the other two items when I can get my hands on them.

However if you are more budget conscious the question is more difficult to answer. The Panasonic 14-45mm probably delivers the most optical performance for the dollar.  If you are more concerned about compact size then one of the collapsing zooms would appear to be an obvious choice. The Olympus 12-50mm is very versatile without breaking the bank and the Panasonic 14-140mm has a solid reputation as a superzoom with very decent optical quality.
You pays your money and makes your choice. Good  luck.


Setting Up the Panasonic Lumix G5 Camera, An Ergonomic approach

$
0
0

How to set up The Panasonic Lumix G5 Camera
An ergonomic approach
Like the movie --- It's Complicated
Author AndrewS  December 2012
Introduction  My apologies for the length and complexity of  this article. It's not exactly a light read. But complexity comes with the territory of  configurable  electronic cameras so us camera users must learn to manage that complexity or use a smart phone to make photos.
Operating Instructions  Before tackling this article I strongly recommend you  print out the entire 232 page text of the  Panasonic G5 Operating Instructions.  Due to the complexity of the camera and the poor design of the Instructions, one is constantly jumping back and forth from one section to another. This is much easier with the printed document than the unprinted PDF.  Page numbers and other  references in square brackets in this article refer to the Operating Instructions. Unfortunately there is no index in the instructions so the task of finding any particular item can be tedious.
Dolce Vita Palm Beach Sydney. Lumix G5, Lumix 45-150mm lens
Camera use  This article refers to use of the camera in P,A,S,M,C1, C2 positions on the Mode Dial. I have nothing useful to say about use of the camera in [Scene Guide Mode, Page 121] or [Creative Control Mode, Page 130] or [iAMode, Page 42] or [iA+Mode, Page 46]. Motion Picture I never use video and know nothing about it, so you won't read about it here.  However there is just one little thing.  If you want to use the Extra Tele Conversion [Ex.Tele Conv.] function for still photography, go into the Motion Picture Menu and set [Ex.Tele Conv ON] [Page 161].
Historical background     Once upon a time, way back in the good [?] old days, cameras were really basic.  My favourite camera of the 1970's, the Pentax Spotmatic,  had a very simple user interface. You could control shutter speed, aperture, and set the film speed. You could focus manually. You advanced the film after each exposure with a thumb operated lever. And that was yer lot. There was no question of the user deciding what function would be allocated to each of the UIM's.
Fast forward to the subject of this report and we find the Panasonic G5 offers a very high level of user configurability.  For instance there are 33 user selectable choices for each of the 5 [3 hard, 2 soft] Fn buttons, making a total of 28,480,320 possible combinations for Function Buttons alone. [33x32x31x30x29].  Compared to the Pentax Spotmatic, modern cameras including the G5 are incredibly complex, confronting the user with millions of potential operating combinations. Hence this article, which is an attempt to help the reader through the  labrynth of choices.


The Four Phases of Camera Use  I have written extensively about these phases elsewhere on this blog but for the present a short summary may suffice.
Setup  Phaseis the subject of this article. It consists of the many settings you make at home, at leisure, preferably with the Operating Instructions to hand.  However in order to negotiate the considerable demands of Setup Phase successfully you need to have a very clear understanding of the UI requirements for the other stages. Setup Phase adjustments are best alocated to the Main Menu system.
Prepare Phase  takes place in the minutes before starting to make photos. It is used for changing settings to adapt the camera to a new set of photo tasks, for instance, indoor/outdoor, flash/no flash, static/action etc. Prepare Phase adjustments can usefully be made with a variety of User Interface Modules [UIM]. Typically these would include the Custom Mode Settings on the Main Mode Dial, the Q Menu, and selected Buttons. Each photographer will have a different idea as to which parameters need adjusting in this Phase. The one thing you most definitely do not want is Prepare Phase adjustments buried in the Main Menu ststem.
CapturePhase is the most critical as it requires a large amount of information processing and specific camera control actions in a very short time span.  I strongly recommend you set up the camera to prioritise Capture Phase capability.
The principal Capture Phase tasks are to adjust primary and if possible secondary exposure and focussing parameters then make the exposure.
Exposure Parameters
 Primary:  Time Value [shutter speed], Aperture Value [f stop], Speed Value [ISO setting].
Secondary:  Exposure Compensation, Flash Exposure Compensation, White Balance.
Focus Parameters
Primary:  Start/Lock AF, Adjust MF.
Secondary:  Shift position and size of active AF area.
Capture Phase adjustments are generally made with buttons, scroll wheels or levers, preferably those accessible to the right index finger and right thumb without shifting grip or the left hand, for zoom and manual focus, again preferably without having to shift grip. In fact the ideal ergonomic solution is not available with the the G5 as you have to shift grip to operate the 4 way controller [Cursor Buttons in Panasonic language]. You do not want Capture Phase adjustments in the Menu system, either Main or Q.
Review Phase  This is basically self explanatory and I won't have much to say about it in this article. However individual camera users have very different ways of using a camera's review capability, requiring quite different groups of review settings.  For instance I hardly ever use in camera review so I have Auto Review switched off and other settings left at default positions. Others like to review every exposure on the monitor and make image adjustments in camera. In any event, function of the Playback button is not user assignable.
A note about touch screen controls  The G5 is an EVF camera so this article is written for the user who views through the EVF most or much of the time. In that case touch screen controls are not useful. I have read on user forums that some people use their EVF camera in Monitor View all or most of the time and may find touch screen operation useful. That's fine but to prevent this article from getting even longer I will say only two things about touch screen controls. One is that the Instructions decribe a method of configuring the Q Menu using touch screen. However a more satisfactory  method is to use the cursor buttons, see the Q Menu section below.  The other is a feature called [Touch Pad AF, Page 171]. The idea of this is to allow the active AF position to be moved by pressing on the monitor while viewing through the  EVF. You can set [Touch Pad AF] independently of other touch functions. I tried this and found it an impediment to the smooth flow of camera operation so I switched it off rather quickly.
The Main Menu System   I will go through the Setup, Rec and Custom menus making comment and suggestions along the way. This is not prescriptive but intended to help the reader translate his or her photographic preferences to the camera's operating system. For the proud owner of a new camera I would suggest initially leaving all button functions to default settings. Start with the [Setup Menu].
Setup Menu [Page 70]
* [Clock set], [World Time] and [Travel Date]: Set to preference.
* [Beep] and [Volume]: Set to preference. If you want silent operation with the E-Shutter set [Beep Volume] and [E-Shutter Volume] to OFF.
* [LCD Display]/[Viewfinder]. [Page 72] If you look through the EVF this adjustment will be applied to the EVF display. With Monitor view the Monitor [LCD Monitor] will be adjusted. You have lots to play with here. I have found the default settings to be quite satisfactory.
* [LCD Mode]. [Page 72]  Again lots to adjust here.  I just left this setting on [Auto] which appears to be satisfactory. 
* [Economy] Set [Sleep Mode] and [Auto LCD Off]  to preference. You need to balance the economy of short times against the convenience of long times.  It's not a big deal however as the camera wakes in 4 seconds from sleep with a half press shutter button.
* [USB Mode], [Output], [Viera Link], [3D Playback]. Sorry, I can't help you with any of these.
* [Menu Resume, Page 75]   Setting this to [ON] allows automatic recall of the last used item in each of the sub menus. I find this very handy particularly for [Format] which I use frequently. It is useful for quickly accessing your most frequently used Menu item.
* [Rotate Disp]  Set this [ON] to playback vertical format pictures oriented as you shot them.
* The items on [pages 76-77] are all pretty much self explanatory. [Reset] can be useful if you get in a Menu muddle, which is easy to do,  and want to start over.
Rec Menu[Page 147]  Yes, the Menu lists are all over the place in the G5 Operating Instructions which could be more coherently designed. The GH3 Operating Instructions feature a more logical layout indicating Panasonic is on a learning curve.
Note that Photo Style, Focus mode, Metering Mode, iDynamic, iResolution and Digital Zoom are common to both the Rec (still photo) and Motion Picture Menus. Changing a setting in one Menu is reflected in the other menu. For some reason [Ex Tele Conv] only appears in the Motion Picture Menu although it does apply to still photos.
Also note that many settings can be made in the [Rec Menu], [Q Menu] or a button. Any change made via one of these access points will be reflected in the others.
Now let us get on with the [Rec Menu, Page 147]
* [Photo Styles]  These apply to JPG files. Note that if you are using RAW capture, Photo Style effects are present on the preview and review images (which are jpgs)  but not in the RAW file itself.
* [Aspect Ratio, Page 149]  (AR)  The GH1 and GH2 cameras have a unique multi aspect ratio sensor, which the G5  lacks. So any aspect ratio other than 4:3 is just a crop of the full frame with the G5. If you like to do your processing in camera there could be benefit in setting an aspect ratio other than 4:3 but for RAW capture cropping is easily done in Adobe Camera RAW.  If you do want to alter AR  in the Prepare Phase or Capture Phase of use you will want to get it out of the Main Menu. There is no option for AR  in the Q Menu, which is a disappointing omission, so you will have to allocate it to a Fn Button, thereby preventing that button from being used for something else. My solution is to shoot 4:3 and crop after capture as desired, but other camera users may have different ideas about this.
* [Picture Size] The camera has 16 Mpx so you might as well use them all by setting  [L = 16Mpx] for almost everything. The exception is that if you want to use [Ex Tele Conv] you must set [M=8Mpx] for 1.4x or [S=4Mpx] for 2x tele converter simulation. This is a Prepare Phase setting. To avoid delving into the Menu you can use one of the Fn buttons for [Picture Size] but that would most likely be a waste of the button. You can allocate it to [Q Menu] or a [Custom Mode] setting on the Mode Dial for those occasions when you might want to use [Ex Tele Conv].
* [Quality, Page 150] Unless you invariably use either RAW or JPG this will be a Prepare Phase selection.  You can allocate [Quality] to the Q Menu or a Fn Button. If you mostly use RAW but sometimes need JPG for shooting, say, sport/action where fast frame rates are required you can create a Cusom Mode  which includes JPG capture.
Note that Photo Style, iDynamic, Red Eye Removal, iResolution, Color Space selection and HDR are not available in RAW capture.
* [Focus Mode]    This allows selection between [AFS], [AFF], [AFC], and [MF]. You can find details on [Page 36], in the [Rec Menu] on [Page 150] and in the [Q Menu] instructions on [Page 69]. You can set [Focus Mode] via the [RecMenu] or [Q Menu].
This is an adjustment you are likely to require frequently in Prepare Phase or even Capture Phase, as most M43 lenses lack a MF/AF switch on the barrel,  so it needs to be readily accessible without delving into the Main Menu. You can allocate it to the [Q Menu] or a [Fn Button].  You can also set up a [Custom Mode]. For instance if you usually use AF Single, set that in the [Rec Menu]. Then you can set up a [Custom Mode] for, say, sport/action  with a group of appropriate settings including AF Continuous.
Note about [AF Mode, aka Autofocus Mode] Strange as it may seem, you will not find this Mode in the [Rec Menu].  [AF Mode] Allows selection between 23 Point, 9 Point, Single, Pinpoint, Tracking and Face detect. [Page 9]   You can access it in two places. The first, by default,  is the < cursor button on the 4 way controller. However if you select [Direct Focus Area] in the [Custom Menu, Page 167], then if you want access to AF Mode it must be from the second place which is the [Q Menu, Page 69].
* [Metering Mode]  This selects between Multiple, Center Weighted and Spot. My experience is that the G5 reliably makes good exposure decisions in Multiple method. Panasonic recommends using this method  and so do I.  If you have a special photographic purpose requiring Spot Metering, consider including it on a Custom Mode setting on the Main Shooting Mode Dial. You can allocate it to the Q Menu or a Fn Button, but I would think twice about using up a Fn button on this function.
* [HDR]  This belongs in the Prepare Phase of use and is a JPG only function. If you think you would like to use this, at least include it in the list of available Q Menu functions. If you usually shoot RAW you will have to switch to JPG in addition to setting HDR so consider a Custom Mode setting on the Main Mode dial.
* [iDynamic], [iResolution] and [Red Eye Removal] If you regularly shoot JPG there may be some merit in exploring these options. I have not done so.
* [Flash, Pages 84-87], [Flash synchro, Page 153] and [Flash Adjust, Page 153]  are all well described, with no need for further comment by me.
* [ISO Limit Set, Page 154]  This operates when Auto ISO is set and limits the highest available ISO setting.  Unless there  is some pressing reason to avoid high ISO levels set this to 3200.
* [ISO Increments]  Set this to [1 EV]  You will have access to exposure increments of 1/3 EV level via the standard 1/3 step  increments for Shutter Speed and Aperture. There is no need for 1/3 step increments on ISO as well.
* [Long Shtr NR]  If set to ON this operates at shutter speeds of 1 second or longer. It does apply to RAW files and does appear to apply a detectable amount of noise reduction on my tests. I leave it set to ON.
* [Shading Comp]  This evens the imbalance between center and corner brightness, often evident at the wide end of a zoom lens at the widest aperture. It works on RAW and JPG files by adjusting the brightness of both center and corner parts of the frame. On my tests the actual amount of shading correction is partial so some corner darkening is allowed to remain. I set this to ON.
* [Digital Zoom, Pages 156, 80] Note about digital zoom functions  The G5 has two types of digital zoom, [Ex Tele Conv] and [Digital Zoom]. Both are available for still photos, JPG only.  Digital zoom uses 16 Mpx capture, Ex Tele Conv uses 8 or 4 Mpx capture. My tests show that when output files are adjusted to the same image size, (8 or 4 Mpx)  there is no advantage in image quality of one over the other. In fact I found that shooting RAW and  cropping the file in Adobe Camera Raw to the same size also gave the same image quality when output as JPG. The advantage of  Ex Tele Conv is that the image is cropped in the viewfinder with full control of active AF Area position and size.   If you do want to experiment with digital zoom, I would suggest allocating selection to the Q Menu so you don't have to trawl around in the Rec Menu to get it.
* [Electronic Shutter]  The G5 is the first M43 camera to have this feature. It can be silent, (if desired) and  prevents shutter shock. Limitations are: Slowest shutter speed 1 second, highest ISO 1600 and the process takes 0.1 seconds to scan the frame, compared to 0.006 seconds for the mechanical shutter. This means it is incompatible with electronic flash and moving objects in the frame may show shape distortion. It is still handy however especially with the camera on a tripod or with some lenses at certain shutter speeds.  So I recommend giving E-Shutter a Fn button. I use the Fn3 button as selecting E-Shutter will usually be a Prepare Phase action and the Fn 3 button is not suitably located for Capture Phase actions.
* [Burst Rate, Page 89]  The fastest burst rate which provides Live View and CAF on every frame is [M, Middle Speed, nominally 3.7 frames per second].  [SH] might be useful for checking a golf swing or similar.  For sport/action photography I recommend the [M] setting and JPG capture. If you select M in the [Rec] Menu,  M setting will appear when you access the Drive Mode (Down cursor on the 4 way controller).
* [Auto Bracket, Page 91]  This is the place to set up Auto Exposure bracketing Single/Burst, Step and Sequence. You can also change the number of steps after pressing the Down cursor button. If set to [Single] you must press the shutter button for every exposure in the sequence. With [Burst] set you must press and hold the shutter button down to make the sequence. To prevent camera shake, a tripod and wired remote control are desirable. There is no facility to set both timer delay and AEB, it is either/or. Your settings made here will appear in the Drive Mode options.
* [Self Timer, Page 93]  The Instructions require no further elaboration.
* [Color Space] You can select sRGB or Adobe RGB. Always set this to Adobe RGB which is best for RAW capture. If you do use JPG doing so will automatically set sRGB  for the JPG photos as this is the JPG color space.
* [Stabiliser, Page 78] Some Lumix lenses have a Stabiliser On/Off  switch on the barrel some do not.  Setting the stabiliser is a Prepare Phase action, so it needs to be readily accessible. One suggested way to manage this would be to set stabiliser ON in the Rec Menu then make subsequent changes in the Q Menu. The Menu options which appear depend on the lens fitted. Lenses with a switch show no OFF position in the Menu.
* [Face Recog, Page 142-145] This looks like one of those functions which they included because they could. I have never used it on the basis that I think I can probably recognise someone better than the camera.
Custom Menu, Page 163
[Cust Set Mem, Page 139-141]  The process for setting a Custom Mode is well described and straightforward in practice.
[AF/AE Lock/Fn1, Page 104, 105, 113]  At this point of the setup you have to decide, using the [AF/AE Lock/Fn1] field on Page 1 of the Custom Menu,  if you want this button for
(a) One of the lock functions, [AE], [AF] or [AE+AF]  OR
(b) Fn1 with 33 options from which to choose, AND
(c) If you chose AF/AE Lock, then go to [AF/AE Lock], mysteriously located on Page 3 of the Custom Menu instead of  Page 1 right after the [AF/AE Lock/Fn1] field where it should be and choose [AE,AF or AF/AE].  There is no option on this camera to use this button to start and continue AF with CAF. If CAF is set and the button is set to start AF it also locks AF and disables CAF. I personally find this a nuisance as I like to use a camera DSLR style with back button  [Start-and- continue-CAF] separate from AE and capture on the shutter button. The GH3 does allow this, by the way, at least it appears so from the Instruction Manual.
The default setting is [AF/AE Lock].  My thinking is that you get AF/AE lock with half press on the shutter button so why use up another button to do essentially the same thing ? One reason might be that you want to lock AF or AE without having to half hold the shutter button.  If your camera use is mainly deliberative, perhaps on tripod, for landscape or architecture for instance, this button might well be used for AF/AE/L but for more spontaneous hand held work you might get more value from one of the Fn settings. In my time with the camera I have changed my use of this button several times because none of the 36 functions it can perform is the one I actually want.  It is currently set to Fn1>Focus Mode.
[LVF/LCD/Fn3, Page 34]  This is on Page 1 of the 8 page Custom Menu. Just to confuse you [Eye Sensor AF, Page 35] is on Page 3 and [Eye Sensor] is on Page 6 of the same menu when logic would indicate they should be adjacent to each other and arranged in reverse order to that provided.   Anyway you have to decide:
(a) Using the [Eye Sensor] options, whether or not you want auto switching between Monitor and EVF view using the proximity sensor just below the eyepiece, and if so what sensitivity to set.   Following a chorus of complaints about the lack of auto switching on the G3, I suspect most people would opt for Auto switching [Eye Sensor>LVF/LCD Auto>ON]. I find [Sensitivity>Low]  is actually a little more sensitive than I would prefer. Some people tape over half the sensor window to make it less sensitive for waist level viewing with the Monitor.
(b) If you go for Auto switching, you still have to decide, using [LVF/LCD/Fn3] whether to use the button for manual switching which can over ride the auto function OR to allocate the button to Fn3, and if you do, THEN decide which of the 33 options to allocate to Fn3.  I did say at the start of this article that it is complicated !!
If it is any help I set the Eye Sensor to Auto>On, the button to Fn3, and the Fn3 function to E-Shutter.
[Eye Sensor AF, Page 35] Some people might find this useful. If set to ON the camera focusses as you bring the EVF up to the eye. It works as a prefocus feature with  no beep. I found it also sets the camera focus hunting at unexpected moments. I don't like cameras to  do unexpected things so I switched this feature off.  But, give it a try, you might like it.
[Fn Button Set] The method of allocating a function to each button is simple. Deciding which function to select is difficult. More on this below.
[Function Lever, Page 15] The G5 is the first Lumix Camera with this UIM.  If you are using the Lumix 14-42mm collapsing power zoom lens, set this to [Zoom].  Otherwise set the lever to [EXP]. This gives direct access to Exposure Compensation in P,A,S Modes and Aperture in M Mode. If you are setting up a Custom Menu group with Ex Tele Conv allocate [Zoom] to the lever to operate the Ex Tele Conv.
[Q Menu]  The default is [Preset] but to optimise your personal camera use, set this to [Custom, Page 69].
[Histogram]  The live view histogram is one of those features which looks better in the brochure than it actually turns out to be in practice. I have now switched it off for three reasons. (1) It clutters up the screen/EVF and distracts attention away from the subject, (2) The camera has a reliable auto exposure system which makes good AE decisions most of the time, (3) If I am photographing a white-on-white high key subject or dark-on-dark low key subject I can usually more easily judge any Exposure Compensation required by looking at the whole preview on the Monitor or EVF.
[Guide Line]  You get three options for types of guide line plus OFF. As with most on screen data options you need to choose between information and clutter. I use the simplest guideline option which provides one vertical and one horizontal line both of which can be positioned anywhere. I run them both through the frame center. I find this particularly useful when I am photographing a subject with architectural elements which I need to have vertical in the final output.
[Auto Review] Some people like to auto review every shot. I find that as one gains confidence in one's own ability and that of the camera this becomes redundant and just slows down the photographic process. So beginners will probably like auto Review ON and more experienced users will want it OFF.
[Highlight]  Set this to ON so with Auto Review or manual review using the Playback button you see the "blinkies" on blown out highlights and can reshoot with exposure compensation if the opportunity arises.
[Expo Meter, Page 166]   This is a prominent display of shutter speed and aperture options overlaid on the Monitor/EVF screen when applying Exposure Compensation or adjusting Aperture or Shutter Speed. As  usual the information-vs-clutter decision has to be made. I got rid of it.
[AF/AE Lock] We have already dealt with this.
[Quick AF]  This feature is different from [Eye Sensor AF]   Whereas eye sensor AF focusses once when you place the eye to the EVF, quick AF has the camera focus hunting all the time, with Monitor or EVF view.
[Direct Focus Area, Page 100, 102]  If this option is set to ON,  the 4 way controller cursor button functions are disabled, so think carefully about this one.  You press any one of the cursor buttons to activate the [Change active AF area position and size] function, then move the AF area position with the Up/Down/Left/Right cursor buttons.  ISO, WB, AF Mode and Drive Mode have to be allocated to the Q Menu or a Fn button. There are two  problems with [Direct Focus Area]  The first is that it's not really direct, you must activate the function with a button pre press. The second is that you lose access to the default cursor button functions.  I have fiddled about with this over several months. My current setup uses Fn2 to activate [Focus Area Set]. This is not optimal as the right hand has to be removed completely from the normal hold position to get the thumb onto Fn2. I don't really see the possibility of an ergonomically optimal setup with this camera.
The ideal solution to the [Focus Area Set] problem would be a JOG type lever located  approximately where the Fn1 button now sits.
[Focus Priority]  If set to ON, this tries, not always successfully,  to ensure the subject is in focus prior to allowing capture to proceed. I have it set to ON which appears to work well most of the time.
[Shutter AF]  Set this to ON.
[Pinpoint AF Time] In pinpoint AF the subject frame is automatically enlarged for a preset time when focus is achieved. This is where you decide that time.
[AF Assist Lamp]  I have never met a person who appreciated the AF Assist Lamp beaming out at them and you can forget about being inconspicuous with it on. Anyway Lumix cameras have just about the best single AF performance in the business even in low light. So I leave it OFF  all the time.
[AF+MF] This allows you to touch up focus manually even with AF on. Set this to ON.
[MF Assist, Page 101] Set this to ON.
[MF Guide, Page 101]  This has two hills at one end of the analogue scale and a flower at the other end. If it had actual distances it might be useful.
[Power Zoom Lens] This feature refers to the PZ 14-42 mm lens and possibly the PZ 45-175mm lens.
[LVF(EVF)  Disp Style, Page 40, 170]  and [LCD (Monitor) Style]  As usual with these data/viewing options the task is to find a balance between information and clutter. I strongly recommend the [Viewfinder Style] for both the EVF and the Monitor. By the way in case you were wondering the camera will adjust the EVF if you look through it. Viewfinder style places essential primary exposure data beneath the preview image where it is always easy to see.
[Eye Sensor] Discussed above.
[iA Button Switch]  For those who use the iA function set this to [Single Press] for quick access. For those who don't use iA set to [Press and Hold] to make it less easy to activate by accident.
[Video Button] For those who use video, enable this by setting to ON. For those who do not use video set this to OFF and wonder why the option was not provided to use this button for something else like ISO.
[Rec Area]  I  have to confess I don't quite understand the purpose of this one. If set to Still photo a 4:3 preview is displayed, but changes to 16:9 if video recording begins.  If set to Video a 16:9 preview is displayed.
[Remaining Disp] Self explanatory.
[Touch Settings]  Already discussed.
[Dial Guide]  Set this OFF.
[Menu Guide]  Refers to Scene or Creative Control Modes.
[Shoot w/o Lens]  Set this ON.
Fn Button Setttings  The underlying principle is to allocate your highest priority Capture Phase task to the Fn1 button which is easy to reach with the right thumb during Capture  and a lower priority task to the Fn2 button which is not easy but possible to reach with the right thumb although that does mean shifting grip with the right hand.  The Fn3 button is the least easy to reach, requiring the left hand to be completely removed from the lens, so is best for Prepare Phase tasks.  I will go through the list of available options for the Fn buttons with comments. Bear in mind there are only 3 Hard Fn buttons and 33 options.
* [One Push AE, Page 116]. This works as advertised but a much better way of managing exposure is to learn how Aperture, ISO and Shutter speed interact to produce the "firing solution" for correct exposure.
* [Preview, Page 115.] This is of more theoretical than practical use.
* [Level gauge, Page 41]. Don't waste a Fn button on this. The tilt sensor display a.k.a. Level Gauge will appear with repeated presses of the [Disp] button.
* [Focus Area Set]  This is a Capture Phase action and a strong contender for the Fn1 or Fn2 spot. 
* [Photo Style, Page 147]  This is one to leave in the Main Menu unless you use this feature a lot when it could usefully go in the Q Menu.
* [Aspect Ratio, Page 149] This is another one to leave in the Main Menu as the G5 does not have a Multi Aspect Ratio Sensor.
* [Picture Size, Page 149] Another one for the Main Menu.
* [Quality, Page 150]  Best allocated to the Q Menu or a Custom Mode.
* [Focus Mode, Page 36]  This is one for Capture Phase and rates highly for inclusion on Fn1.
* [Metering Mode, Page 151]  Unless your photography calls for frequent switching from Multi to Spot Mode I would leave this in the Main Menu. Otherwise it might rate consideration for the Q menu.
* [HDR, Page 151]  If you want to experiment with this fairly specialised function I recommend including it in a Custom Mode.
* [Flash, Page 84] and [Flash Adjust, Page 153] Unless you have specific requirements for accessory and/or off camera flash just make flash settings in the Rec Menu then pop the flash up with the sliding switch as required.
* [i.Resolution], [i.Dynamic], [Digital Zoom]. If you want to experiment with these try a Custom Mode setting.
* [Electronic Shutter, Page 156]  This is useful and a strong contender for the Fn3 spot.
* [Stabiliser, Page 78]  This is a Prepare Phase Adjustment for lenses without an IS switch. Best allocated to the Q Menu.
* [Sensitivity] (=ISO) This is a Capture Phase adjustment and best left on the default location at the Up Cursor button, unless you have set [Direct Focus Area] in the Custom Menu, in which case ISO will have to go somewhere else, possibly on Fn2.
* [White Balance] Best left at the default location on the Right Cursor button  or if you selected [Rec Mode, Direct Focus Area] it could go on the Q Menu.
* [AF Mode, Page 95] Another one best left in the default location, in this case on the Left Cursor button.
* [Drive Mode, Pages 38, 89] Another one best left at default position which is the Down Cursor button.
* [Playback]  There is a non assignable playback button so I don't understand why you would create another one.
* There are 3 [Motion Picture] Menu and 6 [Custom] Menu items in the list on [Page 113] of the Instructions.  Most are Setup Phase items which I don't really see a place for on an Fn button.
Q Menu screen on Lumix G5
Q Menu, Page 69   This is an ideal place for Prepare Phase adjustments, those you might want to make in the minutes before Capture. Implementation of the Q Menu on the G5 is a huge improvement over that on the GH2. The G5 system uses a "Samsung Style" interactive screen with up to three tiers of information visible together. There are 27 functions from which to choose, up to 15 of which can be placed in the Q Menu. However only 5 items are visible at any time. You have to scroll left/right if there are more than 5. So I think the optimum number of functions to allocate to the Q Menu is 5.  [Page 69] describes the procedure for placing items in the Q Menu using the touch screen. This works but the drag-and-drop action gets the wobbles. You can do it better with the cursor buttons although the Instructions have little to say about this. Press the Q Menu button on the back of the camera to bring up the Q Menu screen. Press the Down Cursor to activate the Q+Wrench icon bottom left on the screen. Press Menu/Set to bring up the configuration screen. Then navigate with the Cursor buttons, select with the Menu/Set button,  move the selected item with the cursor buttons, Set the item in place with the Menu/Set button.
The 27 Options available for the Q Menu are very similar to those available for the Fn buttons. Many are the same. Think about which ones you might want in Prepare Phase. If you set [Direct Focus Area] on Page 4 of the Custom Menu then [Sensitivity], [White Balance], [AF Mode] and [Drive Mode] would be prime candidates for the Q Menu as they are no longer accessible from the 4 Way Controller.

Note about [Picture Setting, Page 69]  This function is exclusive to the Q Menu. It is a combination of image size and aspect ratio. With JPG capture [Picture Setting] brings up 12 options. With RAW capture [Picture Setting] brings up 4 options. 
Custom Mode Navigation Screen Lumix G5
Mode Dial Custom Mode Settings, [Pages 139-141].  There are 4 Custom Mode settings available. These are C1, C2.1, C2.2, C2.3.     C1 is accessible directly. If you turn the Mode Dial to C2 then press the Menu/Set button, a special [Custom Mode] icon appears on the navigation screen. Select that then navigate to and select the SubMode required. It would have been nice to have all four Custom Mode settings directly available on the Mode Dial but they are not so a few extra button presses are required. Custom Mode settings are among the most useful features you will find on an electronic camera because they allow you to memorise many setting as a group.  The Panasonic system is easy to configure and use, much more user friendly than the Olympus "Mysets" system found on the EM5.
Step 1: Configure the camera as you want for a specific photographic task.
Step 2: Go to the Custom Menu, Page 1, Item1. Follow the prompts. Setting a Custom mode is easy.
But before doing so, understand what you are about to lock into memory. Each Custom Mode memorises everything  except the items listed at the bottom of [Page 141] and the dependent variables. ( For instance Shutter Speed in Aperture Priority, Aperture in Shutter priority, actual ISO in Auto ISO). Everything else is saved.  This includes the Shooting Mode, independent variables, such as aperture in Aperture Priority, Screen Display, All Main and Q Menu items, all Fn button functions. So before committing a feature set to a Custom Mode trawl through all the Menus, Q Menu and all settings to make sure you end up with exactly what you want. Just be careful if you make a Custom Mode setting then sometime later change a Menu item. If you want this change incorporated in the Custom Mode you have to reset the Custom Mode to incorporate the new Menu setting.
 You can of course alter any settings while in a Custom Mode. These changes will not be memorised if you switch the camera off or turn the dial to another Mode position. You can easily register a new set of camera settings to any Custom position.
By way of example I currently have three Custom Mode settings:
C1 is my "tripod/landscape" group.  Quality RAW, E-Shutter ON, Timer 2 Sec, Aperture Priority f5.6, Electronic level ON, Screen Data display ON, Lever to +/- Exposure Compensation, ISO 160, AF Single.
C2.1 is "Sport/Action, large JPG". Image Size L, JPG fine, Auto ISO, Shutter Priority, Shutter Speed 1/640 sec, Lever to +/-, AF Continuous.
C2.2 is "Sport/Action with Ex Tele Conv". Image Size M, Quality JPG Fine, Auto ISO, Lever to Zoom, Shutter Priority, 1/640 sec, AF Continuous.
Each user will have their own ideas about making best use of the Custom Mode settings.


Most Promising and Puzzling Cameras of 2012

$
0
0

MOST PROMISING AND PUZZLING CAMERAS OF 2012
One opinionated review of the year that was
Author AndrewS   December 2012
The blogger's Imperative  The process of creating and maintaining a blog like this one involves considerable labour. Most of the articles I publish consist of  a carefully worded summary of detailed observations. But just occasionally one has to loosen the shackles of self imposed restraint and express personal opinions more freely. I did this with "MILC, Gap Filler or Distruptive Innovation" published in November and  the three part part "MILC 4th Birthday Progress Report" in December. Most camera website and blog proprietors have a shot at "Year's Best Camera" evaluation, so here is mine, albeit in a different format from most.
Manly Beach Long View Lumix G5 Lumix 100-300mm lens
Introduction  The reported number of cameras sold in 2012 declined in favour of smart phones. Some of the big name makers are in serious financial trouble. Despite or maybe because of this there were many new and  interesting products  released during the year.  It appears manufacturers are trying to come up with something special to revitalise consumer's interest in cameras.
Best ?  I decided that any attempt to declare a "Best" camera was an enterprise doomed to fail as each individual has a different set of requirements. So here is a slightly different idea, namely my personal take on the Most Promising CameraSystem of the year. This is obviously as much a bet on the future as it is a comment on the present. I think that is fair enough. Anytime one buys a camera or a car or smart phone, whatever, one wants to be part of a successful enterprise with future prospects.
Manly Beach Wide View  Lumix G5, Lumix 12-35mm lens
Camera Systems  The two big systems are the well established DSLR (Digital Single Lens Reflex) and the newcomer, the MILC (Mirrorless Interchangeable Lens Camera).

DSLR   My view is that the DSLR, and it's variant the Sony SLT(R) will gradually decline in favour of the MILC.  The reasons ?
First the DSLR has reached the end (apart from the side trip to Sony SLT) of it's evolutionary voyage. The DSLR cannot evolve into anything else. It is stuck with inherent separation of optical view from live view. It is stuck with the flipping mirror and it's attendant complications. The Sony SLT does have continuous live view in the EVF and Monitor and the mirror does not flip. But there is always a mirror sitting between the lens and the imaging sensor, collecting dust,  and the flangeback distance is the same as a DSLR.
Second there is a lot of  optical/mechanical stuff  in a DSLR which is expensive to make and assemble and is not required for a MILC.  So the MILC should be cheaper to make.
The demise of the DSLR will not be sudden for several reasons.
First CaNikon make most of them and these two have a strong hold on camera selling outlets and brand recognition.
Second millions of people are holding millions of DSLR lenses and would probably be disinclined to give them up in a hurry.
Third there are still a few performance realms where MILC's are not quite up to DSLR's yet, in particular follow focus on moving subjects with continuous AF. On the other hand the latest MILC's are at least as fast, probably faster and certainly more accurate with single shot single AF.  
MILC  I think over time the MILC will prevail to become the dominant interchangeable lens system camera type. The question then becomes, which size, variant or brand  will become most popular ?
Sensor Size I discussed this in more detail in Part 1 of my "MILC 4th Birthday Report" on this blog.  In summary Micro Four Thirds is the smallest which gives me "good enough" image quality for a wide range of photographic assignments.
Body Size  This is determined by a range of design parameters, sensor size not being one of them.
Lens Size  This is basically determined by sensor size. In a multi lens kit, lens size will be the main determinant of total size, weight and carrying requirements.
Lowe Pro Rezo 160 AW bag containing G5, 7-14mm, 12-35mm, 100-300mm, plus 4 spare batteries, many memory cards, lens cleaning equipment. This M43 kit covers a Diagonal Angle of View range from ultra wide (114 degrees) to super telephoto (4.1 degrees) in a compact kit weighing 2360 grams including the carry bag. At this time, it is not possible to assemble a kit with comparable range, quality and versatility in such a compact package, with any system other than M43.
The Happy Medium  My assessment is that Micro Four Thirds delivers the most convincing balance between  image quality and compact lens size.
APS-C  Sony NEX,  Canon EOS-M,  Samsung NX,  Fuji X-Pro/EX  (why all the X's ??) and Pentax K-01 have all gone with the larger 27mm (Canon) or 28mm (The rest) APS-C sensor.  There is nothing "bad" or "wrong" with the APS-C sensor size. But these makers are stuck forever with  lenses which will always be appreciably larger than those for M43. When M43 is delivering really excellent image quality and even Nikon CX has "good enough" image quality for most people, what is the point of the larger sensor ? I think that future prospects for the 27-28 mm sensor are not wonderful.
"Full Frame"  Leica uses the 43 mm diagonal sensor which is the same as a standard  35 mm film frame. Many DSLR's use this sensor size. I think professional photographers who want/need the very best image quality will skip the 27-28mm sensor and go straight to full frame. At present they can only do this in Mirrorless with Leica, but the potential is there for a maker brave enough to launch a full frame MILC.
Nikon CX   (a.k.a. "One Inch")  Nikon's entry into the MILC contest has been with the 15.86 mm diagonal, 2.7x crop factor CX sensor. They made an awful lot of ergonomic mistakes with the first iteration of cameras at this size. However I suspect this format has more prospects for the future than APS-C. Why ? Because it's image quality will be good enough for most people most of the time and the lenses, and therefore kit size, can be much more compact. The Sony Cybershot RX100 which uses the same sensor size, has a DXO Mark IQ rating of 66 which is the same as the Canon EOS 60D.  I don't hear too many people complaining about the IQ of the 60D.
This is the Rezo 160 AW bag in carry position.
So my award for Most Promising Camera System of the Year 2012 goes to the Micro Four Thirds System.  M43 has been rolling out some excellent products over the last year with more rumored to be in the pipeline. Image quality has taken a jump, courtesy of Sony with the new sensor in the Olympus EM5, EPL5 and EPM2. The Panasonic GH3 is rumored to have the same or very similar sensor. Panasonic and Olympus have a selection of very high quality single focal length lenses and Panasonic has released some high quality pro style zooms which are still very compact.
I am backing my own judgement by investing in M43 and nothing else. I have a GH2 and G5 with GH3 on order. My lenses are all zooms, mainly (Panasonic) Lumix, 7-14mm, 12-35mm, 35-100mm on order, 14-45mm, 45-150mm, 100-300mm. There is a Lumix 150mm f2.8 rumored for 2013 which sounds very appealing.
Now for the puzzles  Advancements in the technology of image capture and manufacture have provided camera product developers with options never before seen in the history of photography. The result has been a rush of new camera styles, sizes and shapes. In all the excitement it will come as no surprise that some of these new products appear to be suffering from a lack of clear direction and purpose. Others have apparently been released to market before full product development was completed.  
Samsung produced a few decent NX cameras then appeared to lose interest in favour of  Galaxy cams, which actually might be a better fit with Samsung's overall product lineup. Sony made some amazingly small NEX cameras, gave them a dreadful menu system then forgot about good  lenses. Fuji made some technically innovative sensor designs but struggled to get their  lenses to focus with reasonable speed or accuracy. Then they neglected  to collaborate with the independent RAW converters. Nikon had an interesting idea with the strangely named 1 Series but then gave the cameras truly dreadful ergonomics. Pentax, with 60 years experience in cameras,  got a furniture and jewellery guy (who cheerfully admitted no camera experience at all) to design them a camera. What on earth were they thinking ?  So there are candidates for the  Bad Camera prize on all sides. I have chosen three as they seem to me to represent the gap which can develop between marketing hype and reality when, in my view,  generally competent camera makers lose touch with customers who wish to use a camera for the purpose of making photographs. That is, making photos as opposed to showing off  how small it is or how many pixels it might have or that it comes in cool colors or tells you where you are right now or any of a host of other things peripheral to or totally unrelated to making photos.  
Sony Cybershot DSC RX-1  Right now camera reviewers are lining up to shower praise on this thing so what's the problem ?  In two words, conceptual integrity. If you buy the Camera, Electronic Viewfinder, Thumb Grip and Lenshood the outlay will be about $3600.  For that you get a moderately but not very compact camera with no built in viewfinder, no secure handle and no flip out monitor. Sony's game plan here appears to have been to put the Biggest  sensor into the Smallest camera body.  If that is so, they appear to have succeeded.  If good camera design was determined by numbers this one would be a winner. But numbers, of pixels or DXO Mark scores or dimensions are only a part of the story. A good camera, Especially  one this expensive has to have good ergonomics. This means good holding, viewing and operating. The RX-1 lens axis is almost centered in the body. As a result there is no room on the right side (as viewed by the operator) for a handle. There is room on the back for a decent thumb rest, but none is provided. Instead you are offered an expensive accessory thumb rest. If they moved the lens axis over to the left there would be room on the right for a handle. Don't believe me ? Entry level Sony NEX cams are 117mm wide and have a decent handle.  The  RX-1 is 113mm wide, just 4 mm less. There is plenty of room for a small but ergonomically useful handle. The lack of an inbuilt viewfinder at this price is inexplicable to me, the viewing problem being compounded by the monitor being of fixed type.
So we have a camera which doesn't seem to know what it wants to be. Is it a compact camera ? If so it's not all that compact and is ridiculously expensive. Put the thumb grip and one of the viewfinders on, and it's as high as a small DSLR.  Is it a tool for professional photographers ? With poor holding and viewing characeristics I doubt it.  So the puzzle is- Why did they make it ?  I have no inside knowlege about this at all  but I would  be surprised if the answer was very far from "Because They Could".
Just by way of historical comparison, I mention that ten years ago I owned a film compact camera called the Contax T3. This had very similar design specifications to the Sony RX-1. Compact size, 43mm sensor (in the form of 35mm film in the case of the T3), 35mm focal length lens. The Sony, without a viewfinder,  has 2.5 times the box volume of the Contax  and 1.5 times the mass of the Contax. Yet the Contax had a built in optical viewfinder of good quality. The Sony has an f2 lens while the Contax was f2.8. A lens of  f2 aperture doesn't make better photos than one of f2.8 aperture but it sure is bigger. The Contax, in it's day, was overpriced for the boutique market but still less than half the price of the Sony.  My point is that progress in camera design is sometimes real, sometimes illusory, and that bigger numbers do not necessarily make a better camera.
On the left is a Lumix G5 with Lumix 12-35mm f2.8 lens mounted, in a Lowe Pro Apex 110 AW bag. This bag is large enough to take the Lumix GH3 (which is 10mm higher) with the same lens. On the right is a Canon G1-X in a Lowe Pro Apex 100 AW bag. The 110 bag is only one size up from the 100 bag and is just as easy to carry. For this small increase in bag size one can gain a  huge increase in photographic capability by moving to M43.
Next we have the Canon Powershot G1X    My wife, who is an occasional snapshooter, came home with one of these several months ago. She bought it because it had a better grip than her previous camera, a Canon IXUS 220HS.   Canon's promotional material at the camera's release included the following   "Created for professional and serious photographers......the Powershot G1X creates a prestigious new category at the top of Canon's legendary G Series lineup and redefines the performance achievable from a compact camera"  It would appear that Canon with the G1X and Sony with the RX-1 are both trying to appeal to the market's desire for big camera image quality in a compact camera size.  So does the G1X deliver on it's maker's claims ? In a word, no. The DXO Mark score is 60 which puts it in line with mid range M43 cameras. Not bad but hardly a prestigious new category. Holding is reasonable with a decent handle but inexplicably a video button where the user should find a thumb rest. There is no EVF. The optical viewfinder does not do the camera justice at all. On a recent trip my wife complained that the picture which the camera made was different from the view she saw in the viewfinder.  Indeed. Operation is slow. Slow at everything. Slow to start up, slow to focus, slow shot to shot times. The lens is of good quality but people like me who had previously used a G12 were disappointed at the lack of close focussing ability.
Apparently the G1X sold quite well, suggesting that many photographers are indeed looking for big image quality in a small package. However I suspect that quite a few of them will be disappopinted by the G1X. The two puzzles with this camera are (a) Why did Canon make a camera which falls so far short of it's own promotional claims ?  Again I have no inside knowlege but I would not be surprised if the answer was "Price Point". (b) Why did  lots of people buy it ? I have no idea what people's camera buying motives might be but I would not be surprised if the answer was the prospect of getting something really special at  a very attractive, you guessed it.........Price Point.  All of which suggests Canon knows how to market cameras. But I wonder what effect  in the long run this kind of half baked product will have on  Canon's reputation.
Talking of disappointment brings me to the third camera on my "most puzzling" list, the Canon EOS-M.    Canon was the last player to arrive at  the MILC party. They waited 4 years from the first MILC which was the Pansonic G1. They had all the time in the world to evaluate their competitor's products, analyse their strengths and weaknesses, develop  a strategy then produce a category killer product line.  Instead they presented the EOS-M, in my view the most derivative, uninspiring, under achieving new camera release in recent photographic history. To create the EOS-M,  Canon took an EOS 650D then hacked off  most of  the useful holding, viewing and operating parts.    Canon's image quality is going backwards. My EOS 40D of 2007 had a DXO Mark score of 64. The EOS 650D which apparently uses the same sensor as the M, scores 62. The slow autofocus performance of the M has been widely reported. The 650D's handle and thumbrest along with the eye level viewfinder and most of the buttons and dials, have all gone, along with the swing out monitor. If this thing were really inexpensive it might make sense, but they are asking you to pay the Same price as a 650D.  While I am complaining about Canon I can't resist a comment about naming. Canon has gotten itself in a complete mess with confusing and inconsistent naming for it's DSLR's.  They appear to be doing it all over again with the EOS-M. Is it the first of a line and if so why not call it the M1 ? Or M something. Will they introduce a more upmarket version with EVF and if so what will that be called ?
The puzzle is - What is Canon trying to achieve with the EOS-M ?  I really can't figure it out at all. I can understand  that maybe they are trying to make something that puts them in the MILC tent but won't steal sales from their own DSLR line. The problem, it seems to me, is that it is unlikely to steal sales from anywhere. Of course, it might turn out to be a smash hit contrary to my prediction.  In that event the second puzzle will be--why did they buy it ??
But that question, if it arises, will be for another day and another blog post.

Lumix GH3 Review Part 1 Introduction

$
0
0

LUMIX GH3 CAMERA USER REPORT
Part 1, Introduction and Overview
The Multimodal Hybrid
Author  AndrewS     March  2013
GH3 with Lumix 12-35mm f2.8 lens in use. The camera is comfortable to hold and responsive in use.
Brief History of Lumix G M43 Cameras   The Lumix  G1 was announced in September 2008. This was the first G Micro camera and the first ever camera built to the Micro Four Thirds standard. Since then the G camera system had evolved into four lines. The GF series without built in EVF is aimed at beginners and compact camera/smartphone upgraders. The GX1 appeals to enthusiasts who prefer a camera without EVF.  The original G with EVF series represents a compact, mirrorless alternative to the traditional DSLR.  The GH series is Panasonic's interpretation of the Hybrid Still/Motion Picture camera and sits at the top of the Lumix range. The GH3 is the latest and most comprehensively specified iteration of the GH series. It is the 13th lumix G camera model to date.
GH3 rollout has been slow. It was announced on 17 September 2012. I ordered mine in December 2012 and picked it up from Digi Direct in Sydney on 26 February 2013.  It is intermittently listed as "in stock" with some sellers but more often "out of stock" or "pre-order" whatever that means.  I note that some vendors are still listing the G3, GH2 and older GF models suggesting a past inventory buildup which has still not cleared. Perhaps Panasonic is trying to avoid a repeat of this problem with the GH3.  
Sydney Easter Show 2013 Lunchtime Scene.  Landscape and location photography requires plenty of dynamic range especially with a scene like this on a bright sunny day. You can see white roofing material in direct sun and black hair in shade. With a little help from Adobe Camera Raw the GH3 has managed to render detail in both from a single exposure.


The place of M43 in the camera world  I think it is fair to say that there has been some uncertainty about this from makers and buyers. Is  M43 to a replacement for the rapidly vanishing compact camera ? Is it a "Gap Filler" between compact and DSLR ? A upgrade from a compact perhaps ? I have long believed that the destiny of the M43 system is to become the dominant interchangeable lens camera type. But early models lacked the image quality, performance and ergonomics to entice buyers away from their DSLR's.  This started to change with the Olympus EM-5 which solved the image quality problem thanks to a Sony sourced imaging sensor. Now we have the Lumix GH3 with the same image quality [and probably the same sensor] plus improved performance and ergonomics. In addition,  two new high performance constant f2.8 zoom lenses have appeared.  I think the combination of the GH3 with the extensive M43 system of lenses including high quality primes and zooms makes the best case yet for enthusiast/expert photographers to switch from their DSLRs  to M43.  
The GH3 makes a handy sport/action camera for many types of subject in reasonably bright light. Lumix 45-150mm lens.
GH3 Main Selling Proposition  Makers of cameras, cars, vacuum cleaners, ice cream and just about everything else in a competitive market place are forever seeking the elusive "Unique Selling Point" which will provide a marketing advantage. Some cameras advertise the Biggest Sensor in the Smallest Body as if such a combination of characteristics had some kind of intrinsic merit. Some advertise the greatest number of  pixels on a given size sensor. Some resort to unique but ergonomically nonsensical features such as an iFunction button on the lens.  Some have Art Filters.
The GH3 has little in the way of unique features. I think it's main selling proposition is it's combination of characteristics and capabilities which together make a camera which I call a "Multimodal Hybrid".  Panasonic uses the term "Hybrid" in reference to the GH series camera's high level of still and motion picture performance. But I think there is more to it.
User   A complete novice to photography could pick up this camera, set it to iA mode and use it as a point and shoot model.  With more experience the same user might move up to the Scene guide Mode or Creative Control Mode. The expert/professional user can ignore these beginner settings and enjoy a high level of control over all camera functions enabled by the comprehensive set of direct user interface modules. [Dials, levers and buttons]
Interface  Some cameras rely on a "soft" interface, using touch screen controls, others present a "hard" or "direct" interface with lots of modules directly operated by the fingers. Some allow you to operate the device remotely, with or without wires from a master device off camera.  The GH3 allows you to drive the camera by each of these means or all three at once should your brain be able to manage the required cognitive complexity. Any way you prefer to use a camera, the GH3 can do it.  In addition the user interface is highly Configurable.  The Main Menus, Q Menu, Custom Modes and Function Buttons are all amenable to extensive user input resulting in each user being able to set up the camera to suit personal requirements.
Operation  The GH3 can function perfectly as a contemplative capture device for landscape or architecture, requiring tripod mount,  100% view in EVF or Monitor, vibration reduction, accurate control of exposure and dynamic range. Change a few settings and it becomes a rapid shooting machine for street or photo journalism with fast,  responsive performance. Change a few more settings and the GH3 morphs into a sport/action camera with more capability than some reviewers have discovered.
Output  The most widely advertised feature of the GH series cameras is their ability to produce high quality still or motion picture output, with instant switching from one to the other. The GH3 outputs both at a high quality level. 
Documentary work in most conditions is easily handled by the GH3 with one of the wide aperture zoom or prime lenses. This photo has been reduced for the net but in the original you can read the lathe operator's name tag. Lumix 12-35mm f2.8, hand held viewing on the swung out monitor.
Environment  The GH3 can be completely at home in a studio. It can be remotely driven. The camera with it's built in flash can drive and control a full set of external flash units. [FL360L]  It can operate in near complete silence making it suitable for concerts and other places where audible operation would be unacceptable. It is weather protected as are the two constant f2.8 zoom lenses, making it suitable for location work in adverse environments. The compact kit size also enhances its suitability for  work in remote places.
System  In four years M43 has grown from nothing to the most comprehensive of all mirrorless camera systems. There is an extensive lineup of prime and zoom lenses at all levels from budget consumer to high performance professional.  There are dedicated flash units, motion picture accessories, battery grips and much more. In addition third party makers have contributed lenses, adapters and other equipment to the mix. Camera bodies now range in size from diminutive to substantial with intermediates. There is something here to suit almost everybody.  The GH3 sits at the top of the Lumix section of the M43 system at the present time.
Who's it for ?     Although it would be quite suitable for a beginner, the GH3 will I suspect, mainly appeal to the experienced/expert/professional photographer who likes to take direct, hands on control of the imaging process. The camera has some "under the hood" features which could enhance this appeal. It has a much larger battery than any other M43 camera. I recently spent a day at the Sydney Easter Show, where I made 650 exposures with a lot of image review on the monitor between bursts of activity. At the end of the day the battery indicator was reading 2/3 bars full. The imaging processor is fast, allowing many RAW shots to be taken in Burst Mode. The buffer is large. In Burst Mode M [which provides CAF, AE and Live View on each frame] with a 95MB/sec card the camera will shoot 28 RAW frames in 6 seconds [4.6 frames /sec] before the frame rate slows. The buffer then takes 7 seconds to clear. The camera will shoot higher frame rates but you lose AF and Live Preview on each frame.
The camera, made in China, by the way, showing the base with tripod socket centered on the lens axis and sufficiently well back from the front edge of the body to allow it to support a long lens. You could change a battery with most tripod heads attached. Memory card slot is in the handle, separate from the large battery.
The User Report Process   Until now, each of my camera reviews has been presented as a single publication on this blog.  That is about to change. I regard the GH3 as the most important M43 camera since the original G1.  Why ?   To explain I must digress a little. Here is another question. Why do amateur photographers buy entry level CaNikon DSLRs ?  Because CaNikon make the best entry level cameras ?  Maybe they do, maybe they don't, who knows ?  I believe the real reason is that CaNikon have established brand name recognition in the marketplace.  They have achieved this by
1. Making mostly decent cameras continuously for 60 years or thereabouts.
2. Establishing a line of pro level "hero" cameras and lenses, the performance of which establishes CaNikon's reputation.
Panasonic can't do anything about the 60 year heritage but they do need some hero cameras and lenses together with a few pro photographers visibly using and promoting them. The GH3 is the closest thing to a hero camera to come from the Lumix stable and the most likely to attract a professional user cadre for still and  motion picture use.
So it will be the subject of a rolling, multipart user review process over many weeks.  I refrained from posting anything on this blog until I had owned and used  the camera for a month and have attained a  shutter count of  5000. I have used the camera in a variety of different conditions to better understand it's capabilities.  My analysis and report will concentrate on:
Still Photo. I have no useful understanding of motion picture use. There are many blogs and websites which describe and analyse the video function of the GH3 in great detail.
Expert Use.  The GH3 is primarily a photographer's camera for the expert user so I will concentrate on that aspect of it's operation.
Direct Control I drive the camera with the physical user interface modules.  I have used the touch screen interface and it works just fine in the technical sense. But after diligently trialling and testing over a long period, using the GH2, G5 and GH3, I find the touch screen process awkward to use when viewing with the Monitor and impossible with eye level view. So I have it permanently disabled.
Report Chapter Headings  My user reports are usually presented under the headings  Introduction and Overview, Image Quality, Performance, Ergonomics and System.  I will continue to use these headings as a guide but will devote several blog posts to specific issues within each heading.


Lumix GH3 Review Part 2 Viewfinder Problems ?

$
0
0

LUMIX GH3 CAMERA USER REPORT
Part 2,  Viewfinder Problems ?
Author AndrewS  March  2013
GH3 Eyepiece with plastic/rubber eyecup removed  
GH2 Eyepiece
The ergonomics of camera use   I like to consider camera ergonomics under the general headings  Holding, Viewing and Operating. This post describes one aspect of Viewing, namely the Lumix GH3 Electronic Viewfinder.  Specifically it is a user report about my personal experience with the particular GH3 which I bought and have been using frequently for a month.
Reports of EVF problems  The GH3 has been in the market place long enough for there to be many reviews, blog commentaries and user reports available. Most of these are strongly favourable but some reviewers have expressed adverse comment about the EVF. The strange thing is that while some reviewers are strongly critical of the EVF to the point they feel the camera is unusable, the majority find no fault with it at all. So what is going on ?  Is there some kind of drastic sample variation ? Is there a batch of bad copies ? Are some user's viewing practices different from others ?  Having only one sample to test and just myself to do the testing I have no answer to these questions.  The best I can do is describe my own experience over the last month of use.
What problems have been reported ?   The most frequent  one is a visual perception usually described as "smearing" of some part of the preview image in the EVF particularly when the viewing eye is moved slightly from side to side. Other reports describe a lack of perceived sharpness compared with other EVFs in M43 and other mirrorless cameras.

Viewfinders Compared, GH3 vs GH2  The EVF in the GH2 [that in the G5 appears to be similar but has a lower resolution as specified by Panasonic] has a 4:3 aspect ratio.   The eyepiece lens is flat and angled down presumably to reduce the likelihood of reflections into the viewing eye. The rubber eyecup is fixed in place and  the eye sensor for monitor/EVF switching is on the right side of the eyepiece. The GH3  EVF is clearly different. It has a 16:9 aspect ratio, presumably to optimise motion picture viewing. The eyepiece lens has a strongly convex curvature. The plastic/rubber eyecup is removable. The eye sensor is below the eyepiece.  When set up for still photos at 4:3 aspect ratio and  the EVF [which Panasonic calls LVF, Live View Finder] is set to display camera data beneath, not overlaid on the preview image, the GH3 preview image occupies, at a guesstimate,  approximately 60% of the total EVF frame. The GH2 image preview set up the same way occupies about 80% of the total EVF frame. The GH3  EVF resolution is stated by Panasonic to be 1744000 dots equivalent, the GH2  EVF  1533600 dots equivalent and the G5  EVF 1440000 dots equivalent.   So on my rough calculations the actual 4:3 preview image will have: GH3  1046400 dots,  GH2  1226880 dots, G5  1152000 dots.  If these calculations are  approximately correct you would expect the GH2 to have the best resolution, followed by the G5 then the GH3.  In fact that is exactly what I find when looking through the viewfinders of each camera using matched lenses.
Sydney Easter Show. The GH3 can do a decent job as sport/action camera. A faster EVF refresh rate would make it even better. Usually the way to shoot horse jumps like this is to pre focus manually on the bar, but this time I used CAF which kept up with the action.
My own experience  The arrival of a new camera is always an anticipated event especially when the wait to acquire that particular model has been many months as was the case with my GH3.  I had, of course, read several negative comments on user forums about the GH3 EVF  so I was feeling a little anxious when I looked through the viwfinder for the very first time. And what did I see ?  Really bad smearing !! One was not amused, to put it mildly. I was very agitated indeed.  I use the EVF for about 90% of my photos which meant that the whole GH3 enterprise was under threat from the start.  Anyway I calmed down after a while and adjusted the eyepiece diopter to suit my right eye. I found this more difficult than has been the case with other cameras as, for some reason, still not entirely clear to me, the optimum setting was hard to find.  Some eyepieces snap in and out of sharpness when the diopter wheel is turned so finding the best position is easy. But the GH3  EVF showed  a more gradual transition from unsharp to "best possible". It took  me several days of adjusting and re-adjusting the diopter wheel until I was confident I had gotten the optimum position. That improved the overall EVF appearance greatly and markedly reduced the smearing.
The next thing I did was to adjust the LVF Display Style and the Monitor Display Style to match. These are found in the Custom Menu, Page 5/8.  Then I adjusted the Viewfinder Display. This adjustment should logically be grouped with the LVF/Monitor Display Style, but just to keep you guessing it's down  in the Setup Menu, Page 2/6,  and to keep you guessing even  more it is labelled [Monitor Display].  When you look through the EVF the label on the field changes to [Viewfinder] and you can adjust the settings with the Control Dial.    The settings which I use are given below. It is highly likely that your personal eye/brain/visual perception physiology will prefer different settings.  Many  people differ in their  color balance perception. It took me two weeks of repeatedly making small changes to the settings in different conditions till I was satisfied I had found the best match for my right eye [the left eye has different color balance].
Brightness +1.  Brightness and Contrast interact with each other. When one is altered it will probably be necessary to change the other.
Contrast/Saturation +3.  I found colors, particularly reds, very desaturated in the mid position. Even with the +3 setting I found some inaccurate color in the reds, which tend to orange.
Green/Red [Red Tint]  Neutral.  
Yellow/Blue [Blue Tint] --3.
While this adjustment process was ongoing I was using the camera to make thousands of photos over several weeks. Somewhere along the way I realised that I no longer noticed any problem with smearing, or indeed any problem with the viewfinder at all. In other words, I adjusted to the camera and found it working well for me.
Comfort    The GH2 has a rubber eyecup which compared to that on the GH3 is larger, thicker and softer.  I find it more comfortable. The GH3 eyecup is removable. I would like to see Panasonic make a softer, more comfortable version.
Summary of EVF characteristics and differences GH3/GH2/G5
Sharpness  GH2 [best] >G5 >GH3   In use the GH3 does the job quite adequately. The EVF does not give me an  impression of unsharpness or softness such as might interfere with the process of making photos.  It is a bit disappointing however to discover that on direct comparison an older model delivers slightly better sharpness/resolution with still photography in 4:3 picture format.
Color saturation/accuracy  Overall I rate the GH3 as delivering more natural colors across the spectrum and in a variety of conditions,  than either of the other two cameras. I can adjust the GH3 until the EVF colors appear mostly natural in bright light, low light, high and low  levels of subject brightness range. That is not possible with either the GH2 or G5. 
Highlight/Shadow detail   The EVF in the GH3 reveals substantially better highlight/shadow detail than the other two cameras. This is particularly noticeable in the dark tones where the GH3 shows more gradation, color and detail.
Panning  All three EVF's manage panning well without skipping, except in very low light levels where panning becomes jerky.
Refresh rate  I am not in a position to test this scientifically and in single shot mode the GH3 EVF refreshes quickly enough that it is not an issue. However when following a moving subject in M Burst Mode and Continuous AF,  EVF refresh rate becomes very important. As it stands, M  Burst Rate with the Lumix 35-100mm f2.8 lens is 4.6 frames per second.  This is just but only just, usable. The issue is the proportion of time with live view active  versus the proportion of time with the EVF blacked out. A faster refresh rate would be very welcome and would enhance this camera's sport/action capability.
Olympus EM5  I did not have an EM5 to hand for comparison testing but in my time with the EM5 I was very pleased with it's EVF, finding no problems with it's appearance. The only things I recall not liking were  1. The tendency of the eyecup to dig into the tissues around  my eye in portrait orientation and   2. That I couldn't set up the EVF and Monitor both to DSLR style, with  camera data beneath the image preview.
Summary  Compared to previous models the Lumix GH3  EVF  has improved color accuracy, improved gradation, color and detail in the dark tones, slightly less resolution/sharpness and in my personal estimation, slightly less comfort in use.
The smearing issue which I initially encountered was eliminated by accurate diopter adjustment, display adjustment and practice using this particular piece of equipment.


Lumix GH3 Review Part 3, Size

$
0
0

LUMIX GH3 USER REVIEW PART 3,  SIZE
It's Huge, It's ENORMOUS......Really ?
Author AndrewS  April 2013
Thanks to  camerasize.com   for several images used in this article. This is a very handy site for anyone wanting to make camera body/lens size comparisons with many makes and models available for viewing.
Introduction  When the Lumix GH3 was released to market several contributors to user forums expressed surprise, disappointment, dismay even,  that it was larger than any previous M43 camera body and indeed larger than any other Mirrorless ILC to date.  It's body  is  even larger than the smallest APS-C  DSLR, the Canon EOS 100D (Rebel SL1).  One blogger deemed it "enormous, nearly the size of a (Nikon) D7000 and considerably larger than the (Olympus) OM-D".  So has the Lumix product development team lost the plot completely or are they moving forward in a way which will enhance the appeal of the M43 system to discerning buyers ? 
Lumix GH3 body with Lumix 12-35mm f2.8 lens mounted. On the left is a Lumix 7-14mm f4 lens. On the right is a Lumix 35-100mm f2.8 lens. This body and these three lenses make a compact, high performance photo kit suitable for a wide variety of uses.


The promise of Micro Four Thirds and the mirrorless ILC concept  Early marketing for the M43 system strongly emphasized the way in which removing the mirror and prism of a DSLR allowed designers to shrink the dimensions of a camera body and some lenses, especially wide angle types.
This is the kit shown above in a Lowe Pro Adventura 160 bag with lens hoods in place reversed on the two f2.8 zooms,  lens cloths, puffer, wired remote shutter release, 2 spare batteries, lots of memory cards, close up lens. Total mass, 2.33 Kg.
The cult of smallness  Manufacturers competed with each other to make the smallest interchangeable lens camera body, as if smallness was an intrinsic virtue.  But very small cameras present the user with two main problems.
The first is ergonomic. Makers can shrink the camera but not the hands which operate the device. For snapshooters this may not be much of an issue, but for the photographer who wants to take control of the photographic process, very small cameras just lack sufficient real estate to provide a decent handle and a suite of user interface modules [UIM] such as buttons, dials, levers etc with which to drive the camera.
The second is lens size, which is largely determined by sensor size. Designers can shrink camera bodies but the current state of optical technology determines lens sizes.  In consequence there are some unbalanced body/lens combinations on the market.
On the left, Lumix G5 with Lumix 14-45mm f3.5-5.6 lens. On the right, Lumix GH3 with Lumix 12-35mm f2.8 lens.
The way forward for the M43 system I believe that if M43 is to break CaNikon's hegemony over the interchangeable lens camera market they need to make and actively market some high end bodies and lenses with appeal to the expert/professional photographer. The Lumix GH2 gained traction as a motion picture camera but was less convincing as a still photo device. The Olympus EM5 is an excellent still photo camera with some user interface idiosyncrasies, but is not a top tier motion picture device. It is clear from  Lumix promotional material that the GH3 is intended to be the "do everything well" camera at the top of the M43 tree. You see the shift in emphasis here. The cameras have moved on from trying to be the smallest.  Now they aim to be the best.
Doing everything well includes image quality, performance and ergonomics. The elements of ergonomics are holding, viewing and operating in each of the four phases of camera use. These are Setup, Prepare, Capture and Review. In order to achieve excellence in each of these phases and retain the faux DSLR  shape, the GH3 has to be larger than previous M43 cams.
Photo Courtesy of camerasize.com
Here are two body/lens combinations which appear unbalanced to me. On the left is the Canon EOS M with its standard 18-55mm kit lens. Already this combination looks a bit lens heavy. Now add a popular consumer travel zoom such as the 18-200mm shown here mounted via an adapter (as Canon's promotional material invites you to do) and you can see the result.
Box Volume  The box volume of a camera or lens or camera with lens attached is the volume of the notional box which would be required to contain the piece of equipment. This has obvious relevance to the selection of camera bags which might be required to carry it.
Photo Courtesy of camerasize.com
These two camera/lens combinations are well matched for image quality and performance. On the left is the Canon EOS 100D [Rebel SL1] the world's smallest APS-C DSLR with standard  18-55 mm STM zoom. On the right is a Lumix G5 with Lumix 14-42mm standard zoom.
Box Volume, Camera Bodies Below is a table of cameras which might be of interest to the reader considering a camera purchase in this size range. Dimensions are as measured by me where possible. Otherwise I have used the maker's stated dimensions. Note that some makers fudge their quoted dimensions, I know not why. For instance Canon USA gives the depth of the Rebel SL1 (EOS100D) as 69.4mm, but if the flash housing is included, the depth is 83mm. Likewise the Rebel T4i depth is given as 79mm but including the flash housing brings it up to 84mm. All the cameras below have a built in eye level viewfinder. 


Make/Model

Width cm

Height cm

Depth cm

Box Volume WxHxD  cc

Comment

Lumix G5

11.9

8.3

7.1

701

Built in handle, flash

Lumix GH2

12.3

9.0

7.5

830

Built in handle, flash

Lumix GH3

13.3

9.35

8.0

995

Built in handle, flash, large battery

Oly EM5 without HLD6  grip

12.2

8.9

4.3

467

Minimal handle, no built in flash

Oly EM5 with part 1 of HLD6 grip

12.2

10.0

7.3

890

No built in flash. Has unique 5 axis IBIS

EOS 100D

11.7

9.1

8.3

884

Smallest ever APS-C DSLR

EOS 650D

13.3

10.0

8.4

1117


EOS 60D

14.5

10.6

9.0

1383


Nik D7100

13.6

10.7

7.6

1106

Compact mid range DSLR

Sony NEX6

12.0

6.7

4.3

370

Eye cup and Mode Dial protrude


As you can see, the Sony NEX6  body is easily the smallest of  this group (excluding the eyecup and Mode Dial both of which protrude a bit), which may or may not be desirable depending on your user interface priorities. As with other NEX cameras the NEX6 has both the problems which I identified earlier as arising from the cult of smallness. Regarding the ergonomics, Jeff Keller and Amadou Diallo, in the dpr.com review of the NEX6,  wrote "Despite the new mode dial, the NEX6 remains largely menu driven, and said menus can be very frustrating to navigate". The other problem is that of lenses. While the NEX bodies are remarkably small most of their E Mount lenses are about the same size as any other lenses for APS-C cameras.
Photo Courtesy of camerasize.com
These two camera/lens combinations are a reasonable match for image quality,  performance, angle of view and aperture. The Canon lens has a slightly narrower angle of view throughout its focal length range.  On the left is a Canon EOS 60D with EFS 17-55mm f2.8 lens attached. On the right is a Lumix GH3 with Lumix 12-35mm f2.8 lens attached.
Box Volume, Camera with Lens   None of these cameras performs any useful function until a lens is mounted. The total space required for a kit with one body and 2-4 lenses will depend much more on the lenses than the body. Let us review box volumes of some body-with-lens-attached combinations. This table is not intended to be comprehensive but does put numbers to some of the size comparison photos in this article.
Model+lens

Width cm

Height cm

Depth cm

Box Volume WxHxD  cc

Comments

Lumix G5 + 14-42 mk2 standard

11.9

8.3

10.4

1027

Mid range compact kit

Lumix GH3 + 12-35 f2.8

13.3

9.4

13.4

1657

Pro style kit

EOS 100D + 18-55 STM standard

11.7

9.1

14.6

1554

Smallest Canon DSLR

EOS 60D +17-55 f2.8

14.5

10.6

18.6

2859

Approximate Canon equivalent to GH3 + 12-35


You can see that even the largest M43 camera fitted with a high grade f2.8 zoom lens has only slightly more box volume than the very smallest APS-C DSLR fitted with just the basic kit f3.5-5.6 lens.  Probably a better M43 comparison with the EOS 100D would be the G5 with it's kit lens. As you can see the G5 with lens has only 66% the volume of the 100D with lens.  A realistic comparison with the GH3 would be the EOS 60D with EFS 17-55mm f2.8 lens which has 1.72 times the volume of the GH3 with 12-35mm f2.8 lens combination.
One could go on with comparisons like this but my point is there is no free lunch in the world of camera and lens design.  For the expert/enthusiast photographer the camera body needs enough size to get ahold of and there needs to be enough real estate for control modules. Lens sizes are driven by sensor size. The more lenses in one's kit the more total kit size is determined by sensor size.
Photo Courtesy of camerasize.com
The Sony NEX  Way vs the M43 Way.
These two camera/lens combinations are a reasonable match for image quality and performance. On the left is a Sony NEX 6 with 16-50mm collapsing power zoom. On the right is a Lumix GH3 with 14-42mm collapsing power zoom. You can see that with these power zooms attached the NEX makes the more compact package.
 
The Sony NEX solution  As a student of ergonomics, I find much of interest in the Sony NEX  approach to the Mirrorless ILC.  From the ergonomic perspective I think the Sony designers got the basic camera shape and layout right. The elements of this are:
* Faux rangefinder  style with the viewfinder top left, and flat top. This allows the handle to be almost the full height of the body. This is the most efficient way to package the functional elements of the camera in the smallest possible volume.  There is no hump protruding from the top.
* Lens mount as far to the left side [as viewed by the user] of the body as possible.
* Relatively wide compared to the height. Compare this with a standard DSLR wich is relatively high compared to the width.
* Both the above features make room for a decent handle on the right side.
However I believe some of Sony's implementation decisions are problematic. 
The first is their market positioning of the NEX cams and the user group Sony is targeting. There is an interesting video about this on the Sony Australia website at  sony.com.au   Pro photographer Gary Heery presents Sony's view that the NEX series is for amateurs and snapshooters, users who prefer to set a camera to fully auto mode and leave it there. Pro's and serious photographers can step up to a DSLR.  I can see that from the maker's point of view all this appears perfectly logical. But from what I read on user forums, there appear to be plenty of photographers who want both. They want the small size of the NEX and the controllability of the DSLR and they want it all in the same product line, using the same lens mount.
The second, which follows somewhat logically from the first is that they made the NEX bodies very small. So small in fact  that there is limited space there for direct control modules. Sony's answer to this was, and mostly still is, to use menus and soft control modules. For the user who prefer direct control of camera operation this style of user interface can be frustrating.
Photo Courtesy of camerasize.com
Now let's attach some longer zoom lenses.
On the left is a NEX6 with E55-210mm zoom. In the center is a GH3 with Lumix 45-150mm zoom , providing slightly less zoom range than  the NEX lens. On the right is another GH3, this time with a Lumix 45-175mm zoom providing a smaller angle of view at the long end than either of the other lenses. You can see here the interaction between body size, sensor size and therefore lens size, with lens size becoming more important as the focal length increases. 
The third problematic decision was to use the APS-C/DX size sensor. This ensures the lenses will always be larger than those for M43 and much larger than those for the Nikon CX size sensor. I can't help thinking that for snapshooter/amateur photographers who want a camera with interchangeable lenses but are happy to leave their camera on the fully auto setting, the Nikon 1 Series with CX size sensor seems to make more sense. It certainly provides a more compact kit package and the image quality is more than enough for most family/holiday/kid's birthdays style of photos.
Photo Courtesy of camerasize.com
I included this to illustrate some design issues not often discussed. On the left is a Nikon D7100. On the right  Lumix GH3. Notice how the Lumix viewfinder eyepiece protrudes 15mm from the rear of the camera body while that of the D7100 does not protrude significantly. When using the GH3 with right eye view,  I can look almost directly straight ahead and view the world through the viewfinder or see with my left eye  past the left side of the camera.  Left eye view is not as ergonomic but even so the user's head does not have to turn as much as with the DSLR to see in the viewfinder.With DSLR's like the Nikon with non protruding eyepiece, the user has to turn the head left [for right eye use] or right[for left eye use] to get the nose out of the way, a less comfortable viewing posture with either eye.
The other design point to note is that although the GH3 is the smaller camera it provides more horizontal space for the handle which means more space for the fingers of the right hand.  It can do this because the lens mount is smaller and offset further to the left.
The M43 solution  Within one system, using one lens mount,  you can have camera/lens combinations which are very compact and might appeal to beginners, or you can move up to a slightly larger body and lens with greater image quality, features and performance, or you can step up further to high end equipment suitable for expert and professional use.
There is however one design decision made by both the Lumix and Olympus OMD teams which continues to puzzle me. They chose to use the faux DSLR shape for their cameras with built in EVF. The Lumix team did this from the very first G1 in 2008. Why ? I have no idea. Why go to all the considerable trouble and expense to develop an entirely new photographic system then make the cameras look like shrunken versions of existing DSLR's ?  To a camera buying public trained over many years by  CaNikon marketing to believe that bigger is better, then smaller must be worser, right ?? ...No ?
I live in hope that the Lumix/OMD teams will see the light and develop  M43 models based on the faux rangefinder shape but with GH3 style user interface.
Back to the GH3  And so we return by a somewhat circuitous ramble though the camera forest to my original proposition about the GH3.  Is it really huge ? Is it really enormous ?  Having used mine a great deal over the last month I have to say that of all the cameras I have used over a 60 year period the GH3  is the most comfortable to hold and the most enjoyable to operate.  For a camera using the DSLR shape, it is just about the ideal size and configuration for a user who wants to take direct control of camera operation. The GH3 is an excellent match for the 12-35mm f2.8 and 35-100mm f2.8 constant aperture, pro style zooms. Those who want a smaller package from the M43 stable have plenty of choice with many options for bodies with and without EVF  to the largest collection of lenses of any mirrorless ILC  system.


Lumix GH3 Review Part 4, Single Shot Focus

$
0
0

LUMIX GH3 REVIEW  PART 4,  SINGLE SHOT FOCUS
It really is very good
Author AndrewS  April 2013
Note about AFC: I will explore the GH3's performance in AF Continuous  with sport/action style subjects in a separate blog post. My investigation is ongoing but at this stage I can say that the GH3's  AFC  performance is better than many reviewers appear to realise and quite adequate for many sport/action situations.  Optimum setup, preparation and technique are essential for best results.
Lumix GH3 with Lumix 35-100mm f2.8 lens
Introduction    Way back in the good old days of mechanical cameras and manual focus lenses  [there were no consumer zooms in the 60's and 70's]  every lens had a focus distance scale and usually a depth of focus scale.  You could, and I often did, set the focus distance directly on the scale and set the lens aperture to give the required depth of focus. Many modern autofocus lenses lack a focus distance scale. Some new manual focus lenses with M43 mount, such as those from Cosina/Voigtlander,  do have such scales. But they lack electronic communication with the camera body so there is a downside to these lenses.   Many zooms, and as far as I am aware, all M43 zooms are of varifocal type which are not compatible with such scales as they change focus with zoom.  To date, no M43 cameras have implemented an effective electronic alternative to the old mechanical focus distance scale. I wish they had such a feature as the ability to pre set focus distance by scale would be very useful. It seems to me that it should be possible as the focus distance set by the lens is presumably known by the camera.  One consequence of this lack of focus scale is that modern camera/lens combinations are highly reliant on the effectiveness of their autofocus systems.
SLR and DSLR autofocus systems For many years I used Canon EOS film SLR's then Digital SLR's. The main reason I abandoned this camera system several years ago was it's unreliable single shot autofocus. If my memory serves me correctly I owned about ten of these cameras over the years and every one had an AF problem, some worse than others.
Micro Four Thirds System autofocus   Lumix M43 cameras had very good single shot AF [AFS] right from the first model, the G1. The early Olympus Pens were not so good but Olympus caught up with successive models and now the Pens have very good AFS.  Lumix M43 AFS has steadily improved with each model since the G1 to the point I would now say the GH3 has the best AFS of any camera I have ever used.  Other reviewers have expressed the same view. For instance Jordan Steele reviewing the GH3 on his Admiring Light blog wrote  "...in my opinion it's the best single shot autofocus available in ANY camera on the market today".

Qualities and Characteristics of GH3  SAF 
* It is Sensitive. I mean this in two senses  The first is that  it will focus on anything with texture, for instance brush marks in paint, the weave in cloth and similar. The second is that it continues to operate accurately in low light although in very low light the AF process slows a little.  As a result I have the AF assist lamp switched off  in the [Custom Menu, Page 2/8].
* It is Precise.  The word "precise" refers to the ability of a measurement to be consistently reproduced.  If you AFS  on a subject the camera will select the same focus distance time after time.
* It is Accurate  The focus distance precisely selected by the camera is the correct one. You could have an  AFS  system which is precise in the sense that it regularly selects the same focus distance, but that could put the subject out of focus every time. This is a problem for many DSLR camera/lens combinations using Phase Detect AF.
* It is Fast  So fast in fact that with most current model lenses and most subjects I hardly notice the AF process occurring.
* It uses Vertical lines [with the camera in landscape orientation] in the subject to acquire focus. The camera will not focus on a subject containing only horizontal lines with no texture between the lines. It will focus on diagonal lines presumably because of their vertical component. I do not know whether focussing on texture is a product of the camera identifying the multiple small vertical line components of texture or whether another process is operating in this case.
* AFS works Everywhere in the frame. However my tests show that with the particular camera body in my posession AF in the extreme top left corner of the frame is inaccurate in about 50% of test shots. I can't imagine why one would want to focus in one of the extreme corners but for safety I would exclude the corners. AF appears to be reliably accurate to the edges, top, bottom and sides.
Conditions favouring accurate AF
Lens:  Medium wide, standard, short telephoto. Wide aperture.
Subject:Bright light, definite shapes and structures, sun or other light behind the camera or from the side. Clear conditions with high subject brightness range. Subject close to the camera.
Conditions in which AF may not always be accurate
Lens:  Occasionally my ultrawide Lumix 7-14mm misses focus for no reason that I can determine.  Long zooms at the long end appear to have a slightly higher rate of focus misses than normal focal length lenses or the short end of zooms. This may be related to the subject, see below.
Subject:  Low light, ill defined subject elements, sun or other light behind the subject, haze, mist, dust, subject far distant from the camera.
In general the contrast detect AF [CDAF] system works best in conditions where high subject contrast is presented to the camera and worst with low subject contrast. No surprises there.  Sometimes CDAF systems struggle with subjects containing multiple small light sources within the frame.
Setting position and size of the active AF area  One of the advantages of a good CDAF system such as that found in the GH3 is that the active AF area can be positioned anywhere in the frame, [except with Pinpoint AF Mode which limits focus to a reduced frame area]  with reservations about the extreme corners as noted above. This enables the photographer to set the AF area precisely where required, as for instance on the near eye of a portrait subject. This enables multiple pix to be taken of the same subject without having to focus and recompose for each shot. In [1-Area] AF Mode, the GH3 provides two ways to change position and size of the AF area. You can use either or both.  With the touch screen active, [Custom Menu] > [Touch Settings] Page 7/8,  you can easily move the AF area around with the capacitive touch screen. There is also a feature called [Touch Pad AF] which renders the monitor touch sensitive when the viewfinder is in use, the idea being that you move AF area by touching the monitor while looking through the viewfinder.  All this touch screen/touch pad technology works as advertised.  The problem is ergonomic. When viewing on the monitor it is, in practice quite difficult to devise a smooth workflow in the Capture Phase of operation if touch screen AF area movement is used.  You have to remove either the right or left hand completely from the camera to be able to place a finger or thumb onto all parts of the screen. This completely unbalances the camera and disrupts all the Capture Phase functions of both hands while the AF area is being repositioned. The Touch Pad AF process when eye level viewing is even more awkward as you have to poke a thumb or finger of the right hand [for right eye viewers] or left hand [for left eye viewers] between the face and monitor.  
The second way to move AF area is with the Control Dial on the back of the camera. In [Custom Menu] Page 3/8, set [Direct Focus Area] ON.  Press the knurled ring around the Control Dial anywhere on the circumference once to activate the process. Now you will see the AF area bounded by a yellow box with yellow arrows on each side. Press up/down/left/right on the Control dial to move the AF area around the frame.  If you press and hold the Control Dial the AF area will move. Rotate the Control Dial, Front Dial or Rear Dial to change the size. To return to Capture Mode press the Set button in the center of the Control Dial or half press the Shutter Button. To return the AF area to frame center press the Disp Button with the AF area bounded by yellow. All this is much easier to do than describe. Using the Control Dial works with Monitor View or Eye Level View and in practice, with practice, works well. The left hand can stay in place supporting the lens, the right index finger can stay on the shutter button and  the right fingers can stay on the handle, although not gripping it. Some reviewers have complained that the Control Dial is difficult to operate as it's right side  is below the level of the surface of the handle.  I have found that as with many things a little practice is very useful although I do agree that a small detail redesign here could improve usability without making it too easy to accidentally bump the right side of the Control  Dial. Others have complained that the Disp button is hard to find as it is recessed, however again I have found that with a little practice it is actually easy to locate  by feel without having to look at the camera. With some practicethe whole process of changing AF area position and size can be carried out by feel without removing one's eye from the EVF. 
The missing JOG Lever  The process of changing AF area position would be greatly facilitated if this camera had a JOG Lever, similar to that offered in high end DSLR's. The optimum location would be in a spot between the existing AE Lock and Motion Picture buttons.  This would enable very fast, precise, direct control of AF area position without having to shift grip with either hand. Of course the existing buttons/lever would have to be relocated, but that would  pose no great problem. I will discuss my ideas about this in a separate blog post in the coming weeks.
Using back button AF start The GH3 offers back button AF start, a feature which has been commonplace on high end DSLR's for years and greatly appreciated by experienced photographers.  Previous G and GH cams can also enable back button AF start but the implementation is different, most noticably in AFC.   Go to  [Custom Menu, Page 1/8]  > [AF/AE Lock] > see Four options. Select the fourth,  [AF-ON]. In AFS, the AF-ON button starts, acquires then locks AF as long as the button is held down.  It also activates but does not lock AE.  This is very useful for acquiring and holding AF on a specific part of the subject while waiting for the subject to smile or whatever at which point the shutter button is pressed and the shot captured with minimal shutter lag.  In AFC the button activates and continues AF while it is held down.
AF + MF assist  As with previous Lumix models the GH3 offers AF+MF with MF assist if desired. Go to [Custom Menu, Page 3/8] Set AF+MF> ON. Scroll down to the next field, [MF Assist].    This allows you to allocate image enlargement to the Focus Ring on the lens, the AF Mode (Fn3) button, both or neither.  If [MF Assist] is allocated to the Focus Ring, the following sequence operates. First position the AF Area as desired. Next acquire AF with half press of the shutter button and hold the half press (right index finger). Second, start turning the Focus Ring (left hand). This will magnify the preview image in the EVF or Monitor. Rotate the Rear Dial (right thumb) to cycle magnification through 4x (with a central box), 5x or 10x (full screen). A certain amount of dexterity and practice is required to do this smoothly. With [1-Area] AF Mode this process alows you to fine tune focus very accurately on a specific part of a subject. Full press the shutter button to capture the shot. With practice all this is easier to do than read about.
Manual Focus  On the Focus Mode Lever around the AF Lock button, set MF. As described above you can set the MF Assist to the Focus Ring, Fn3 button or both or neither. If the Focus Ring has been selected, rotate it and the preview image enlarges, the degree of enlargement being controlled by the Rear Dial. The advantage of using MF is that focus will not be altered when you half press the shutter button. You just have to be careful not to bump the Focus Ring while making successive exposures at the same focus distance.
Using manual focus lenses without electronic contacts  Set [MF Assist] to the [AF Mode (Fn3)] button. This option is included for lenses without electronic contacts so you can control MF assist and preview enlargement from the camera body.
Riders Ready 1 Full Frame
Riders Ready 2 Full Frame
Riders Ready 1 Crop
Riders Ready 2 Crop


Explanation of the horse photographs:  The two photos were taken withing a few seconds of each other, with the GH3 and 35-100mm at 100mm and f2.8. The active AF Area was in the center of the frame for each photo. On the crops you can see that #1 is focussed sharply on the metal railing while #2 has the front horse's whiskers in sharp focus. I should have decided precisely which part of the subject I wanted in sharp focus and taken control of the process to achieve that.
Hints and tips for optimising AFS accuracy and reliability.
* You decide where to place the active AF area.  Use [1-Area] for most situations, or [Pinpoint] in specific circumstances. If you set AF Mode to [23 Area], [AF Tracking] or [Face Detect], the camera decides where to focus which may or may not produce the desired result.
* Dealing with backlight  When the light is coming from behind the subject and/or the background is brighter and/or more contrasty than the subject it is necessary to ensure the active AF area is smaller than the subject and is located within the visible boundaries of the subject.  All kinds of AF systems will home in on the brightest/most contrasty part of a scene unless specifically directed elsewhere.
* Explicit placement and size of AF area  I have found that on reviewing many photos that some have seemed a bit soft paticularly those taken with the Lumix 35-100mm f2.8 lens. On close scrutiny I realised the "problem", which is not really a problem, just a characteristic of the camera/lens combination,  is that:
1. Depth of focus at 100mm and f2.8 is quite shallow.
2. If I don't specify precisely which part of the subject I want to be in focus, the camera may select somewhere else, not to my liking. The camera cannot read minds, it requires explicit instructions about AF area placement and size.
Summary  I have found that in general photography using the GH3 in Single Shot Drive Mode and AF Single Focus Mode,  with thoughtful placement of the active AF area position and size, the camera delivers AF accuracy approaching 100% in a wide range of conditions. There are occasional slip ups which are usually due to operator error on my part. Most of my use and testing with the GH3 has been with the 12-35mm f2.8 and 35-100mm f2.8 zoom lenses.   


Lumix GH3 Review Part 5 Field of View

$
0
0

LUMIX GH3 REVIEW PART 5  FIELD OF VIEW
GH3  has less than GH2 and G5
Author AndrewS  April 2013
Introduction  Sometimes, in the course of testing photographic equipment,  one encounters an unexpected observation. While testing the Lumix 35-100mm f2.8 lens, using the Lumix G5, GH2 and GH3 cameras, I noticed that test chart pix with the GH2 and G5 included a larger area of the chart than those taken with the GH3.
The test  I use a simple kind of  test chart which is useful for comparing some aspects of the image quality of one camera or lens with another, but does not give absolute readings for technical matters such as resolution. I run the test chart pix in 4:3 image aspect ratio.  I found that with the same lens at the same focal length on the same tripod at the same distance from the chart, the horizontal field of view [HFOV] given by the GH2 and G5 was 2.5% more than that given by the GH3. I re ran the test with different lenses at different focal lengths but always came up with the same result. I used zoom lenses at the end of the zoom range to ensure there was no change in focal length from one test to the next. Unfortunately I did not have an Olympus OMD available for comparison testing.
Same lens, focal length and distance of focal plane from the test chart. The G5 and GH2 include 2.5% more horizontal distance as measured on the chart than the GH3.  In this case I used the 35-100mm lens at 35mm.  Actual HFOV  measurements were GH3 1026mm, G5 1053mm, GH2 1050mm. Viewfinder and Monitor view appeared to be 100% of the final output in each case

What does it mean ? 
1. For any lens at any given focal length and focussed distance the GH3 gives a slightly smaller HFOV than the GH2 and G5.
2. The actual imaging area of the GH3 sensor has to be smaller than that of the GH2 and G5.  Note that we know the total size of the GH2 sensor, also apparently used in the G5, is larger than most other M43 sensors because it was developed to be used with the multi aspect ratio facility of the GH2. I ran all the tests at 4:3 aspect ratio which I had expected would give the same HFOV with any M43 camera. Apparently not.
Published Data  The following tables have been compiled from various data sources, mostly the manufacturer or elsewhere as noted.
Sensor dimensions in millimeters and megapixels
Model

Nominal sensor dimensions, mm

Stated total

M pixels

Stated Camera effective

M pixels

Image size in pixels @ 4:3 AR

GH3

17.3x13

17.2

16.05

4608x3456

G5

17.3x13

18.31

16.05

4608x3456

GH2

17.3x13

18.31

16.05

4608x3456

GX1

17.3x13

16.68

16.0

4592x3448

EM5

17.3x13

16.9

16.1

4608x3456


Notes: 
* All the sensors are given as the same nominal physical size of 17.3x13mm which is presumably not literally the case. 
* The GH2 and G5 appear to be using the same sensor.
* The numbers don't add up. 4608x3456 = 15925248, not 16.05 or 16.1.
* Camera data gives the pixel dimensions for 4:3 AR as 4608x3456 for the GH2, GH3, G5 and EM5.
* DXO Mark gives a slightly different set of numbers. [dxomark.com]
Model

Pixel Pitch

Camera effective pixels

Resolution as pixels

EM5

3.73

16.11

4640x3472

G5

3.74

16.05

4624x3472

GH3

3.74

16.05

4624x3472


What can one make of all this ? Probably that the technology is beyond my limited grasp.
Logically it seems to me that the pixel pitch of the GH3 should be slightly less than that of the G5 but they are given by DXO as the same.
My observations remain however, namely that the GH3  gives a bit less HFOV with any lens than the GH2 or G5.

Lumix GH3 Review Part 6 Sport/Action

$
0
0

LUMIX GH3 REVIEW PART 6  SPORT AND ACTION
It does a better job than many reviewers realise
Author AndrewS  April 2013
Don't try this at home. GH3, 35-100mm lens.  This type of shot would be difficult for any AF system. The subject is backlit, the background is brighter than the subject which is only about 15 meters from the camera. The horse is galloping. The camera could keep the subject in focus at Burst Rate M up to about this point in the arena but as they horses got closer they became progressively less sharp.
Introduction    Mirrorless ILC's [MILC] use contrast detect autofocus [CDAF] taking data directly from the imaging sensor. DSLR type cameras use phase detect autofocus [PDAF] operating from a separate AF module located beneath the mirror box, or in the case of Sony SLT cameras up near the viewfinder. In the early days CDAF systems were slower than PDAF types, but the latest versions are very fast indeed with single shot AF.  Until recently however mirrorless cameras have had  difficulty achieving follow focus on subjects moving towards or away from the camera with AF continuous and  Burst/Continuous drive at several frames per second.
GH3 with 35-100mm lens. Hang Gliders are easy subjects to photograph as they glide gently across the cliff top. In AFC  the GH3 will get almost 100% of frames sharply in focus if I frame accurately.

MILC focus systems   Manufacturers have used various strategies to improve focus speed  for MILC's. Most  have designed completely new style focussing mechanisms in MILC lenses utilising direct, low friction electro magnetic drive of the focussing lens group. This allows the lens focus to be racked back and forth at a much higher speed than was the case with previous technologies.   Another strategy, used by Canon, Nikon, Fuji and Sony, has been to allocate some 10,000 or so pixels on the imaging sensor to PDAF. The idea is to use the PDAF function to bring the lens quickly to near the correct focus point then locate the exact point with CDAF on the same sensor. From reports, this technology appears to have been implemented successfully by Nikon with the 1 Series, with the other makers to a greater or lesser extent playing catch up at the time of writing.
The conventional wisdom has been that CDAF could never match PDAF for sport/action use. However the Lumix  and Olympus M43 cameras have stuck with CDAF and are in fact making significant progress with follow focus capability.
GH3 with 35-100mm lens. This subject was handled easily by the GH3. This is one of a burst of 13 frames, all but the last few with the cars very close to the camera, were sharply in focus.
Note on "AF Tracking" often referred to incorrectly in user forums as "Focus Tracking"
Readers please note: There is much confusion about this in user forums.  There is no option called "Focus Tracking" in the lumix M43 Menu list.
AF  TRACKING  IS NOT THE SAME AS FOLLOW FOCUS
AF Tracking is a specific AF Mode in the GH3 and other  M43 cameras. In the GH3 it is selected via the [Fn3/AF Mode] button. The other AF Modes are Face Detection, 23 Area, 1-Area and Pinpoint.  It refers to a technology by which you ask the AF system to remember a specific subject element in the frame, such as a person's face,  your pet dog, or whatever, and continue to maintain focus on that subject element when it moves laterally within the frame. If you are really lucky your dog might stay in focus as it moves towards or away from the camera as well.
Follow Focus  This is a term which I use. It refers to the process by which the camera's AF system can sustain focus on a subject moving towards or away from the camera, using AF Continuous and Burst/Continuous Drive Mode. In this case it is the operator's duty to keep the active AF frame on the chosen subject to ensure the AF system is following the desired subject.
This article is about FOLLOW FOCUS   
I do not use focus tracking as it relinquishes to the camera an essential aspect of control over the focussing process which I want to keep myself. That is: On which part of the frame do I want the AF system to focus ?  I would be quite happy if the Lumix product team quietly dropped  "AF Tracking" from the list of AF Modes.
Readers please note:     The term "Follow Focus" does not appear anywhere in the Lumix list of focussing options.
It is the term I  use in connection with the process of autofocus on subjects moving towards and/or away from the camera. I always use and recommend setting [1-Area] AF Mode for this purpose.
I suspect that many of the adverse reports about this camera's AFC performance may have been due to the reviewer having set AF Mode to [AF Tracking] in the mistaken belief that this was appropriate.
Successful follow focus depends on optimal setup, preparation, technique and practice.
GH3, 35-100mmm lens. Large, steadily moving subjects in bright sunny conditions are managed easily by the GH3. Over several sequences totalling 50 frames, one was unsharp. 
Setup
Rec Menu
Page 1,
* Photo Style--Standard (only applies to JPG)
* Aspect Ratio--Any, I usually use 4:3 which provides the most opportunity for post capture cropping which is almost always required.
* Quality--Any. I use RAW. The GH3 has a fast procesor and big buffer which makes RAW capture very possible. Previous M43 cameras with slower processors and a smaller buffer required JPG capture for a sustained burst.
* Metering--Multiple.
Page 2,
* Burst Rate-- M or L.  M is the fastest rate which provides Image Preview [Live View]  on every frame.  The camera will focus on each frame at Burst Rate H but preview on each frame is  lost. Burst rate L obviously gives less frames per second but in many situations is quite adequate. The advantage of Burst Rate L is that the ratio of  Live View Time to Blackout Time is higher which makes the subject easier to follow in the EVF.
* i-Dynamic and i-Resolution--Off. You want to relieve the camera of any unnecessary data processing which would slow down frame rate performance.
Page 3,
* E-Shutter.    Burst Mode and AFC work with E-Shutter on however I usually leave it off because of the "rolling shutter" effect which can cause distortion with moving subjects or a moving camera and you will generally have both with sport/action.
Page 5,
* Shading Comp--Off
* Color Space--Adobe RGB
* Stabiliser--On--Standard
* If you are shooting JPG you can select Ex.Tele Conv or Digital Zoom here. Ex. Tele Conv works best as it allows full control of the position and size of the active AF area. Note that Ex.Tele Conv only works if Image Size is set to M (Medium, 8Mpx) which gives 1.4x, or S (Small, 4Mpx) which gives 2x.
Page 6,
* Face Recognition--Off.
GH3, 35-100mm lens. Same situation as the top photo.  Both frames are cropped.  I got about 50% of these sharply in focus which I consider a very good result in the circumstances. 
Custom Menu
Page 1,
* AF/AE Lock--AF-On. This allows the operator to start AFC with the back button if desired.
* Shutter AF--On
* Half Press Release--Off
Page 2,
* Quick AF--Off
* Eye Sensor AF--Off
Page 3,
* Direct Focus Area--On
* Focus Release priority--Focus.
Page 4,
* Histogram--Off
* Expo Meter--Off
Page 5,
* LVF and Monitor Style--Set to the style which places main camera data in a black strip beneath the preview image. You do not want anything cluttering up the preview image and you do need to monitor the shutter speed in particular without the distraction of having the data readouts overlaid on the preview image.
Page 6,
* Auto Review--Off.
Page 7,
* Eye Sensor--Auto. Some people prefer to have direct control of the EVF and prefer manual switching using the LVF/Fn5 switch.
* Touch Settings--Off.
GH3, 35-100mm lens. Pilot and photographer doing it easy.
Disp Button  Cycle this until the preview image is clear of all camera data. You need to have clear view of the lens aperture, shutter speed and ISO in the data strip beneath the preview image. The only items overlaid on the preview image are a minimal two line grid, if desired and the active AF area square.
Drive Mode Dial--Set to Burst.
Main Mode Dial-- Set to P or S. Depending on the lens in use and the subject a shutter speed of 1/500sec or faster will usually be required.   Another possibility is to make a Custom Mode setting after all the camera settings for Sport/Action are in place.
Focus Mode lever--Set to AFC.
Auto Focus Mode (AFMode/Fn3Button)--Set to [1-Area] Not AF tracking
ISO-- Usually set to Auto, however if you have set P Mode there may be situations where Auto Iso does not give a fast enough shutter speed in which case you will need to set a high ISO manually or switch to Shutter Priority Mode or both.
White Balance--Auto
Exposure Compensation--Usually nil. However there may be situations such as ice or snow when exposure compensation is required.
Preparation 
This is a camera user review not a camera use tutorial, however readers are advised that the follow focus performance of the GH3 or any other camera is highly dependent on user preparation and skill. Aspects of preparation include:
Lens Selection  Some lenses, particularly older ones operate more slowly than newer models. By this I mean they deliver a slower frame rate for any given camera settings. Presumably this relates to slower AF and aperture diaphragm operation. The Lumix 100-300mm OIS is unfortunately about the slowest I have tested which is a pity as it would otherwise be a first pick for sport/action. It is quite suitable for subjects which move fairly slowly and steadily in good light, such as board surfers. The Lumix 35-100mm f2.8 is faster but obviously suitable for a different subject profile due to the wider angle of view. The Lumix 45-150mm runs decently fast.
Shutter Speed/Aperture/ISO   When preparing to make action photos run some preliminary frames, keeping a close eye on your shutter speed and aperture. Make sure the ISO is high enough to give adequate shutter speed. The keeper rate will increase if you use an f2.8 lens at f5.6. So the camera focusses at f2.8 and captures at f5.6 for a bit more depth of focus.
Check the Light and the Background All autofocus systems of any description look for areas of the frame with high brightness and/or contrast. Try to take a camera position to locate the light source behind or on one side of the camera and try to avoid bright/cluttered backgrounds. As you might expect AFC works best in bright light with subjects having a high brightness range ("contrast").
Technique
Zoom in to frame the subject but no too tight. Once the action starts you need to leave plenty of room to cope with the inevitable variations in framing accuracy. View through the EVF. You need to hold the camera as steady as possible and exclude non subject distractions.
Adjust the size of the AF box so it is no larger than the subject. You can shift position of the AF box also but I usually leave it in the center.
Don't zoom during capture bursts. I have tried this but it appears to throw the camera off target.
Start AFC with either back button press or half press shutter button and hold this for half a second or so for the AF system to acquire target. Then start capture by fully depressing the shutter button and hold it down for the duration of the burst.
In many situations Burst Rate L will be perfectly adequate and is easier to use than M rate as there is a greater proportion of viewing time to blackout time.
Performance-- Speed
The GH3 with Lumix 35-100mm lens, RAW capture, AFC, Burst Mode M, giving Live View and AF on each frame, using a Sandisk 95 MB/sec card, will capture 28 frames in 6 seconds [4.6 fps] before the frame rate slows suddenly. If capture is stopped at this point, the buffer clears in 7 seconds.
With the same settings and  Burst Rate L  the camera will continue to shoot RAW capture at 2.8 frames/sec for 50+ frames without slowing. Ifcapture is stopped at 50 frames the buffer clears in 8 seconds.
This camera has a much faster/ higher imaging throughput capacity than previous M43 cameras and has more capacity than most cameras of any description.
Performance--Accuracy
The percentage of frames sharply in focus  is dependent on circumstance and operator skill.
Here are some examples :
Subject

Lens

% Sharply in Focus

% Just unsharp

%Blurred

Comment

Cars accelerating 15-40 kph

35-100mm @100mm  f2.8

75

22

3

*1

Cars accelerating 15-40 kph

35-100mm @ 100mm f5.6

78

20

2.5

*1

Cars at 60 kph

35-100mm

@100mm

90

8

1

*2

Cars at 60 kph

100-300mm @250mm

52

34

14

*3

Board surfers

100-300 @300mm

68

28

4

*4


Comments
*1. Closing down the aperure from f2.8 to f5.6 gave a slightly higher rate of frames sharply in focus.
2.  All frames had to be cropped after capture as each car was not large in the frame.
3.  This test was run from the same camera position as the one above. The 100-300mm lens had a more difficult task as all the cars were larger in the frame so the change in focus position from one frame to the next was greater.
4. On a bright sunny day most surfing frames will be sharply in focus.
General Comments:
Most of the out of focus frames are those at the end of a burst when the car or other subject has come very close to the camera such that the change in focus from one frame to the next is beyond the camera's capability.
See the photo captions for further comment.
Conclusion  The Lumix GH3 is a moderately competent sport/action camera. I would place it approximately at the level of upper entry or mid range enthusiast DSLR for follow focus capability.  There are many types of subject in motion which it can manage quite easily with a high percentage of frames sharply in focus.


Lumix GH3 Review Part 7, Ergonomics

$
0
0

LUMIX  GH3 REVIEW PART 7  ERGONOMICS
Holding, Viewing, Operating
The best M43 camera yet but can improve further
Author AndrewS  April 2013
GH3 Rear view
Introduction   The Lumix design team has been gradually improving the ergonomics and user interface of it's G-with-built-in-EFV cameras since the original G1 of 2008.  In fact the G1 design triggered  my interest in camera ergonomics and led to the creation of this blog. The G1 was so awkward to use I sold it and spent two years with a Samsung NX10. This camera was some way from ergonomic perfection but had a more user friendly basic design and layout than the G1. The GH2 delivered clear ergonomic improvements, with further upgrades in the G5, leading to the GH3 which represents a big step up in holding and operating compared to previous Lumix models.
Elements of ergonomics  In this article I will discuss Holding, Viewing  and Operating.
Natural half closed hand position. The hand takes this position with minimal muscle tension. The ideal camera will be designed to fit into this hand position. The GH3 comes close to that ideal.
Holding  The GH3 is 20% larger than the GH2 by box volume. This has allowed the designers to use a completely different handle and thumbrest design which conforms much better to the natural shape of the adult hand.  Human hands have not changed shape in the last 20,000 years. Camera designers just needed to adapt their products to fit the hands which use them, not the other way around.  With the GH3 they got it right. At last. Better late than never. Holding this camera feels very comfortable and secure, without strain.
Right index finger on shutter button.  The hand position is close to ideal.


Shutter buttonThe center of the shutter button is now inset 27mm from the right side of the handle.  This allows a more natural index finger position than on previous models.  The GH2 shutter button is only inset 15mm.
These numbers and descriptions will not mean much until you have a chance to hold these cameras and play with them for a while when the benefits of the new design will become readily apparent.
Right index finger on front dial. The finger moves easily onto the position required to operate the dial.
Right index finger on the ISO button. Here the index finger has to stretch to it's maximum angle away from the middle finger in order to reach the ISO button.
Viewing  I discussed the GH3's EVF at length in Part 2 of this series. Over the years I have used fixed, swing up/down and fully articulated Monitors. The GH3 uses the fully articulated type which I find to be the most versatile and useful. You can hold the camera at waist level in landscape or portrait orientation, hold it at low level or above the head. The Monitor readily enables all these shooting positions.  It can also be turned inwards as seen in the photographs to prevent damage to the screen when carrying the camera or using the EVF.
Transition from eye level to monitor viewing is seamless, with the same information presented the same way on both viewing devices. Both provide a 100% accurate view. Both can be set up to provide key camera data on or beneath the image preview. Both can be configured with maximal or minimal data overlay at the press of the Disp Button. You can have an electronic 2 axis level guide, histogram, Expo Meter display, choice of grid lines, etc...etc.  
The GH3 allows the user to clearly see readouts for the primary and secondary exposure  and focussing parameters. It has the control systems in place to allow each of these to be quickly and easily adjusted.
Rear view. Thumb in comfortable hold position, angled across the back of the camera not squeezed up on the extreme right side as required by some cameras.
Rear View. Thumb has been moved across onto the rear dial which it can operate without having to flex the interphalangeal joint. This maintains a stable grip on the camera with the base of the thumb.
Operating  Overall this camera provides a very well designed user interface allowing fast accurate operation.
Set and See Modules  The On/Off switch, Main Mode Dial, Drive Mode and Focus Mode functions are all on set and see modules. These allow the user to see at a glance and change as required, without having to turn the camera on which Main Mode, Drive Mode and Focus Mode is set.
Operating the Control Dial. This is no different from other cameras having a 4Way controller/Control Dial in this position. It is workable but disrupts grip on the camera with the right hand.
Mode Dependent Scroll Wheels  These are the Front (top) Dial, Rear (upper) Dial and Control (rear lower) Dial. These are a huge improvement from the arrangements on previous G, other M43, and indeed most DSLR cameras which I have used.  The first thing you will notice is that there are three scroll wheels. To a user unaccustomed to this many, three may seem overkill but in practice works extremely well. I was previously a proponent of the single scroll wheel approach but having used the GH3 I am now a convert to the multiple scroll wheel system.  It allows users to select whether they want to use the front or rear dial for routine adjustments such as changing aperture in Aperture Priority Mode.
Location  At last they put the front dial in the right place !!  which is just behind the shutter button. The dial is well positioned, 12mm behind the center of the shutter button and slightly angled down and across the camera body. 
The rear dial has also arrived at the right place, where it can be operated by the thumb without having to flex the interphalangeal joint. At last, they got it right. Excellent !!
The Control Dial is now large, has knurled edge and is easy to find and operate by feel. Some reviewers have complained that in their (successful) efforts to prevent accidental activation the Lumix designers have recessed this dial a little too much. I can see their point but I have found that with a little practice the dial is easy to operate. It is much better than the G5 on which I am forever accidentally hitting the WB button by mistake.
Design detail  It is often said that the devil is in the details and that is true of camera design. Previous Lumix scroll wheels were deeply recessed into the body and  had rounded serrations. Those on the GH3 protrude  more prominently from the body and have sharper serrations. The combination of correct position and improved detail design makes them very much easier to use than anything I have previously used from M43 or, indeed any other camera system.
Pressing the Disp button. This is  easy enough with a little practice. However this button has to be pressed to reset  active AF area to the center position. This is not a bad arrangement but a JOG lever  between the AFL and Motion Picture buttons would be faster and smoother with less disruption to grip on the camera.
Buttons Most of these are well located and designed, with one partial exception, see below. Most are user configurable however I would like to see all of them capable of user choice as to function. The Playback, Motion Picture, WB, ISO and EC buttons could all have user selectable function. It is just a firmware issue. Most of the buttons are well sized and shaped although I think most could be just a fraction larger (in diameter, they are 6mm and I think could go up to 7mm) and more prominent (they could I think, usefully project about 0.5mm more from the camera body surface).  The Disp button has to be recessed so it is not accidentally activated, which is fine, but it too, could be just a little larger.  The exception is the top trio of WB, ISO and EC. These are in a row 23mm behind the center of the shutter button. Reaching them with the index finger without disrupting grip with the right hand is possible but only just and it's a bit of a stretch. These buttons could be 2-3 mm closer to the front scroll wheel and angled across the camera more to better follow the line of the right index finger. They could also sit up slightly higher with the center one being more prominent than the others and having a different shape to make it easier to locate by feel without looking.
All these picky little details about buttons add up to make the total user experience and are important.
Operations  All the actions required to take control of the camera's function are easily and quickly carried out. The camera does not get in the way of the image capture process but works with  the user in getting on with the job.
I would just say that if the Lumix guys (they do all seem to be guys) want to make the GH line the best cameras in the world they need to fit the next model with a JOG lever, located just between the existing AE Lock and Motion picture buttons (which would have to be relocated of course). If this were implemented optimally they could create a category killer camera design.
Summary The GH3 represents a big step up in ergonomic capability for the M43 system. Panasonic now has a camera and system which make a very good case for DSLR users to change camps.


Lumix GH3 Review Part 8, Image Quality

$
0
0

LUMIX GH3 REVIEW PART 8  IMAGE QUALITY
Good enough for almost anything
Author AndrewS  April 2013
Evening in Sydney. The GH3 has done a good job with long exposure and extreme subject brightness range. Only the streetlights and headlights are blown out.
Introduction  Early 4/3 and M43 format cameras struggled with image quality plainly inferior to that available in cameras with APS-C sensors, both DSLR's and Mirrorless ILC's.
Sony to the rescue  With the EM5, Olympus used a sensor made by Sony in preference to previous sensors made by Panasonic.  The result was an immediate improvement in image quality. Olympus used the same sensor on subsequent Pen models and the Lumix design team is rumored to have used the same sensor on the GH3.
Good enough image quality  Regardless of the origins of the sensor, most reviewers find the image quality of the GH3 to be  the same as or extremely similar to that of the EM5.  Most users posting  impressions of personal experience appear to indicate they find the GH3 image quality good enough for most purposes. My own experience is that this is the first M43 camera which I will take with confidence into almost any photographic situation having a high level of expectation that the photos will be correctly focussed and exposed and deliver good enough image quality for magazine reproduction at the very least and often good enough for large poster size prints.
Snow Cones, anyone ?  With help from ACR, the GH3 has retained detail in the clouds, the little girl's hat and the lady inside the shop, albeit with quite a bit of  grain visible on her face.

Comparison GH3-vs-GH2-vs-G5   I won't bore you with a lot of grainy pictures of books on shelves which is what I used for my basic comparison testing. A summary of the results is:
* Looking at RAW conversions straight from Adobe Camera Raw 7.3, I found that in the ISO 3200-6400 range, the GH3 advantage over GH2 was about 2/3 stop less noise. The GH3 advantage over G5 was about 1/2 stop less noise.
* I also found that the default RAW conversion by ACR produced files with noticeably different mid tone and shadow brightness. The GH2 files were the darkest in the mid tones and shadows, and the GH3 files lightest in the mid tones and shadows. The G5 tone curve lay between the other two.  The point here is that to adjust a GH2 file to match a GH3 file in mid tone brightness, I had to use the sliders in ACR to lift the darker tones. Those darker tones contain most of the noise. So the final outcome is that the GH3 improves on the GH2 by one stop of noise in the ISO 3200-6400 range and is 2/3 stop better than the G5.
* Highlights are less often blown out with the GH3 than the other two.
* GH3 colors are more accurate right across the ISO range than the other two.
* Resolution is the same with all three cameras.
* If a particular photo requires substantial highlight and/or shadow recovery in ACR, the GH3 files cope with this better than the other two cameras with less artefacts at the bright end and less noise at the low end.
iDynamic and iResolution  These functions appear as active in the Rec Menu with RAW or JPG files. With JPG files iDynamic applies a negative exposure compensation to the normal exposure for that scene then lifts the dark tones for an end result having better detail in both light and dark tones than a standard single exposure. With RAW files iDynamic just applies the negative exposure compensation and nothing else.
I ran a number of tests with iResolution on different scenes and have to confess I never quite convinced myself that it did anything that I could see.
Dynamic Range  I lack the technical expertise to evaluate this scientifically. In general photography in conditions with high subject brightness range there does appear to be a slight advantage to the GH3, but it is subtle.
I rarely need to resort to HDR strategies with the GH3, even in conditions with very high subject brightness range. There is almost always enough information in RAW files for ACR to give me a satisfactory level of detail in shadows and highlights.
Watching Telly, ISO 6400.  As usual, with help from ACR, the colors are reasonably accurate, surprising given the mixed nature of the light sources,  grain is moderate and detail quite reasonable for a high ISO shot.
High ISO  With judicious work in ACR I find even ISO 6400 files good enough for magazine reproduction with most subjects.
Summary  You can look up all the technical data at  dxomark.com  or  dpreview.com  and I would  recommend that anyone with an interest in image quality do so. However from a user's perspective the GH3 does a fine job right across the spectrum of imaging conditions from low to very bright light and low to very high subject brightness range.

Lumix GH3 Review Part 9, Stop The Shakes

$
0
0

LUMIX GH3 REVIEW PART 9,  STOP THE SHAKES
How to get really sharp photos handheld or on tripod
Author  AndrewS  April 2013
Circular Quay Sydney. GH3 with 35-100mm lens on lightweight tripod, 1 sec @ f4.  Shutter Delay used. This frame is sharp but several others in the sequence were slightly unsharp due to the breeze causing camera movement on the light tripod.
Introduction  SLR and DSLR cameras can produce unsharp photos at certain shutter speeds due to a phenomenon called "Mirror Slap". The flipping mirror shakes the camera as it lifts up just prior to the exposure. DSLR's avoid the problem by using mirror lock up. Mirrorless ILC's have no mirror slap of course but they do have a potentially even more troublesome problem which I call Shutter Shock.  The standard mechanical shutter on a MILC cycles through four movements with each exposure, like this:
Press shutter button>Shutter Closes>Shutter Opens>.....Exposure Occurs...>Shutter Closes>Shutter Opens.
A DSLR shutter only has 2 movements in SLR viewing mode, The sequence is: Press Shutter Button>Mirror flips up>Shutter Opens>....Exposure Occurs...>Shutter Closes>Mirror drops.

Shutter Shock    It appears that the initial MILC Shutter Close  action sends a shock wave through the camera and lens which can cause unsharp pictures typically in the shutter speed range 1/20 to 1/200 sec. Not all lenses are affected and some lenses are affected more than others. I have written about this at length in previous posts on this blog in May and September of 2012. The mechanical shutter also produces a small but palpable shock from the first Shutter Open action. Does this also degrade image quality ? I don't know but presumably it is less a problem than the shutter close action.
The camera makers know all about it but they have not, as far as I am aware, referred  directly to the problem in their communications to consumers or in the published owner's manuals. I find this most disappointing. If they openly acknowleged there is an issue and engaged consumers with information about effective strategies to deal with it they would make many friends, I feel sure.  Failing to deal openly with problems is a sure fire way to alienate actual and potential customers. I would very much like to see Panasonic and Olympus come out and discuss this matter frankly.
However since it seems that is not happening, I hope this little article fills the void and will help you  Stop The Shakes and fully realise the imaging potential of your GH3 (and other M43 cameras) and lenses.
A recent reminder  I have recently been using and testing the Lumix 35-100mm f2.8 lens which is capable of extremely sharp results but only if used in such a way as to allow the lens to deliver it's full potential. More about that when I publish the lens test but it mostly consists of achieving exactly correct focus and making sure the camera is still at the point of exposure.
Palm Beach, Sydney. Lumix G5 with Lumix 45-150mm lens, hand held, OIS on. I included this to show that very high quality results can be obtained even with a middle level camera and budget zoom lens.
Hand Held Camera
Techniques  There are several camera work techniques which increase the likelihood of sharp photos. They could apply equally well to any camera.
* Slow down.  Hold the camera securely but not tightly. Do a little muscle relaxation exercise before a photo session. Mini meditate with some slow breaths in and out to slow the pulse and reduce muscle tremor. Look through the eye level viewfinder which helps stabilise the camera. Achieve focus with back button or half press of the shutter button. Breathe in, then out and smoothly squeeze the shutter button at the point of maximum exhalation.
* Manual focus if the subject and circumstances permit. Think about which part of the subject should be the focus point. Think about depth of focus and aperture required.
* Use the optimum aperture of the lens.
* Watch the shutter speed readout in the viewfinder and change ISO as required to keep it at or faster than the reciprocal of the lens focal length x 2.
If your lens is or might be one of those subject to the shutter shock problem, avoid shutter speeds in the 1/20 to 1/200 sec range.
Don't know if your lens is one of those ? Try asking a question on dpreview.com Micro Four Thirds Talk Forum, or one of the Mu-43.com forums. Somebody will know.
Crop of the photo above. The time is 1045.
Technologies
* Optical Image Stabiliser (IBIS in Olympus cameras) There has been much debate on M43 user forums about the value of  OIS, with some users and reviewers reporting a degradation of image quality at some shutter speeds and some lenses with OIS switched on.  There appears to be no general consensus about this so I generally leave OIS  ON for hand held photography. Some users routinely leave it  OFF.  Be aware that neither OIS or IBIS are truly OFF when the camera is powered up. The Image stabiliser module, which is  either a lens group in the case of OIS  or the entire Sensor module in the case of IBIS does not assume correct operating position until it is powered up continuously. It is held in the correct place by electromagnetic forces not mechanical restraints.   I can only suggest you conduct your own experiments if you think there may be a problem with the OIS on one of your lenses.
 * E-Shutter is, at this time,  available on the G5 and GH3 cameras. E-Shutter eliminates shutter shock but has some side effects and causes some limitations to camera performance.
E- Shutter is an electronic process which scans the image frame line by line in 0.1 seconds, something like an electronic focal plane shutter moving up the sensor reading out one line or group of lines (I don't know which) of pixels at a time.  As a result if the camera is panned horizontally or the subject moves horizontally during the exposure the shape of the object becomes distorted.
Images made with the E-Shutter can show alternating horizontal lines of light and dark with certain pulsing light sources which interact with the scanning action of the E-Shutter. I have encountered this with fluorescent lights but I believe other types can have the same effect.
E-Shutter limits available ISO to 1600, I have no idea why.
E-Shutter limits the longest available shutter speed to 1 second.
Flash is not possible.
Apart from all the above it works really well and I find that in many situations it is my preferred shutter type. I have it allocated to the Fn5 button on the GH3 for quick access. For further information about E-Shutter see http://m43photo.blogspot.no  
Luna Park, Sydney
GH3, 35-100mm lens at 100mm, 1 sec @ f4. Lightweight tripod. Shutter Delay, 2 sec. You can see individal rivets on the Harbour Bridge 900 meters from the camera.
Tripod Mounted Camera
Techniques
* Understand the relationship between aperture and depth of focus.
* Focus manually where possible.
* Use remote or delayed shutter actuation, see below.
* Avoid shutter speeds between 1/20 and 1/200sec with the mechanical shutter.
* Switch OIS  OFF.
* Never forget the benefits of the proverbial Sturdy Tripod.  I was doing some evening shots in the city recently using a lightweight Velbon Max i 343E (0.9 Kg) tripod, which I selected because I did not want to carry the larger Velbon Carmagne 630 with it's sturdy, ancient and long out of production Manfrotto 3 way head (1.9 Kg). There was a light breeze that evening which was enough to cause several of my shots with the Lumix 35-100mm lens to show definite signs of camera movement. There is nothing wrong with the Max i 343E in calm conditions, it's one of the best sub 1Kg tripods ever made, but in wind, there is no substitute for size, rigidity and mass. 
Technologies There are three ways to achieve indirect shutter actuation.
* Wireless, via Wi-Fi using a smart phone.
* Wired shutter release cable, DMW-RSL1, genuine Lumix or copy, they all seem to work OK.
* Self Timer. I usually find 2 seconds delay is sufficient.
* E-Shutter works well on the tripod, but is not available for exposures longer than 1 second.
* Shutter Delayis a new feature on the GH3, not seen on previous Lumix cameras. You find it in the [Rec Menu, page 3/6].  Shutter Delay cannot be allocated to the Q Menu or to a Fn button. You can however include it in a group of settings allocated to a Custom Mode. It works as follows with the mechanical shutter:
Press shutter button or activate shutter by self timer or wired or wireless remote> Shutter Closes......The set time passes......Shutter Opens>......Exposure Occurs......Shutter Closes>Shutter Opens. 
Shutter Delay can be set to 1, 2, 4, 8 seconds or Off.  It works  like Antishock on Olympus cameras but with a longer time delay. The briefest delay available with Olympus Antishock is 1/8 second.  The purpose of both technologies is to allow vibrations from the first shutter closing action to dissipate.
You can combine Shutter Delay with one of the indirect shutter actuation methods.
Note that Shutter Delay is also compatible with E-Shutter. In this case it delays exposure by the set time after actuating the shutter button, directly or remotely.
All this leads to two suggestions for operating method with the camera on a tripod.
Method 1, Shutter Speed less than 1 second.  This method gives a stable camera without the need for a wired or other remote.
* Timer 2 sec delay [Drive Mode set and see dial]
* E-Shutter ON. [Allocate to Q Menu or a Fn Button]
* Press the Shutter Button.
Method 2, Shutter Speed Greater than 1 second.  This method also allows stable operation without remote shutter actuation.
* E-Shutter OFF
* Drive Mode to Single Shot.
* Set the Shutter Delay to preference, 2-4 seconds is generally satisfactory.
* Press the Shutter Button.
To streamline access to the Shutter Delay setting, you can prepare the camera before the shooting session. Set [Menu Resume] ON, Setup Menu, Page 4/6. Next go to Shutter Delay in the Rec Menu, Page 3/6. Leave the setting to OFF until you need it and close the Menu Screen. Then when you next go to Rec Menu, it will open at Page 3 with Shutter Delay already selected ready for you to change.
Technology not found in M43 cameras  Some cameras offer the so called "Electronic First Shutter" technology. If I understand this correctly exposure is started electronically and ended mechanically. I have tested this in a Canon EOS 60D and found no evidence of shutter shock with live view shooting. I have no idea why it is not offered in M43 cameras. Patent issues ?
 One day, I hope to see the advent of the long hoped for "Global Shutter" a technology which promises to make most of the complicated strategies in this article redundant.
Summary  Extremely sharp photos can be made with the GH3 and other M43 equipment. The percentage of sharp shots will increase if the techniques and technologies described here are used.

Lumix GH3 Review Part 10, Setting Up the Camera

$
0
0

LUMIX GH3 REVIEW PART 10  SETTING UP THE CAMERA
It's complicated but mostly logical
Author AndrewS  April 2013
Port Botany. GH3, Lumix 100-300mm lens.
Introduction  Since the advent of digital photography, cameras have been getting increasingly complicated with each new model. Users like me have asked manufacturers for cameras which are highly Configurable which means that the device can be set up to suit an individual's likes and preferences. 
The GH3 is such a camera. Many of it's functions can be user selected to suit personal preference. This is wonderful but the ability to set user preference for so many camera operations brings with it the necessityto do so.  The new GH3 user could just leave everything at factory default while learning how to use the camera. But sooner or later they will have to brave the menu system and make a large number of choices in order to  best use  the camera's many capabilities.
Owner's Manual  I very strongly recommend that readers download and print out the entire 319 page GH3  "Owner's Manual For Advanced Features".  You can find it on any of the Panasonic National websites. Just follow the prompts for the GH3 camera. The Lumix team has been gradually improving their owner's manuals such that the GH3 manual is more coherently laid out than those for previous model cameras.  It is still very complex however, which unavoidably comes with the territory of a modern electronic camera. The reader is constantly being directed to jump back and forth from one page to another which is tedious with the PDF on screen. Page numbers in this article refer to the Owner's Manual (Advanced).  I have found it useful to stick physical tabs on key pages of the Manual so I can quickly go to one of the Menus or Fn button selections, for instance.
Setup advice  Each individual photographer has his or her own ideas about how a camera should operate and what it should be able to do. In this article I will try to indicate the possibilities available at each choice point. I will indicate my own selections with reasons. Yours will be different because you will have different ideas and expectations about how  you want a camera to work.
The emphasis of this article will be on Still Photo Capture, Expert User. I have nothing to say about Motion Picture, iA Mode, Scene Guide Mode or Creative Control Mode.

Setup Menu[Pages 45-52]
* Clock Set, World Time, Travel Date.  Set as required.
* Wi-Fi.  This could be the subject of a separate article. Setting up Wi- Fi is beyond the scope of this one.
* Beep.  You can set Beep Volume and E-Shutter Volume. For silent operation set Beep and E-Shutter Vol to OFF.
* Speaker Volume, Headphone Volume. Adjust to preference.
* Monitor/Viewfinder Display. Note that Monitor Display becomes Viewfinder when you look in the viewfinder.  Please see Part 2 of my GH3 review for a full discussion about this.


* Monitor Luminance. Mine is set to Auto, which appears to work well. You might want to experiment with Mode 1 or Mode 2 if more direct control of Monitor brightness is required.
* Economy.  You get plenty of choices here. I have Sleep Mode set to commence in 5 Minutes and Auto LVF/Monitor Off to activate in 1 Minute. You will likely want to experiment with this.
* Battery Use Priority. This applies when the accessory battery grip is fitted, see Page 268.
* USB Mode, Output, Viera Link, 3D Playback.  All these options are a matter of personal preference or are guided by equipment requirements.
* Menu Resume. This is useful. When set to ON the item highlighted when a Menu is selected is the one you last accessed. If you use something frequently, for instance I frequently format memory cards, it is handy to have that option appear first when I select Setup Menu.
* Menu Background. Plenty of choice here.
* Menu Information. when ON, displays a horizontal scrolling description along the top of the screen, of the current Menu setting. It is somewhat useful especially in the learning phase.
* Language.
* Version Disp. Go here to display the current firmware version of the body and lens attached if any.
* No. Reset, Reset and Reset Wi-Fi Settings. The Manual provides a comprehensive explanation of these items.
* Pixel Refresh. This initiates a software solution for hot pixels should any develop.
* Sensor Cleaning. This is performed automatically when you turn the camera on but can also be done on command.
* Format.  Formats the memory card.
Custom Menu  [Pages 53-63]
* Cust.Set.Mem.  Here you make Custom Mode settings. The process is well described on page 115. Just remember that a Custom Mode duplicates EVERYTHING in the camera's operating system except Set and See Module settings (Drive Mode and Focus Mode). It will duplicate whatever Shooting Mode was in use at the time the Custom Mode was set. Make sure you trawl carefully through all the Main Menus, Q Menu and  Fn button settings before committing to a Custom Mode. Once in a Custom Mode you can use the camera normally, altering any settings. Rotating the dial off the Custom Mode then back onto it will reset all parameters to the original Custom Mode selections.  You can, of course Re-Set a Custom Mode with different parameters at any time.  Custom Modes are very useful when you want to allocate a group of settings for a specific purpose, for instance, Tripod/Landscape or Sport/Action. They are easy to set, and you can see at a glance which Custom Mode if any, is currently active.
* AF/AE Lock. The options are described in Page 151. The fourth option, AF-ON is new to the GH3. You might want to spend some time experimenting with the options on this button to discover which suits you best. I like to use back button AF start, DSLR style,  so I have AF-ON set. In AFS this activates AF start then lock while the button is held down. It also starts AE but ISO is not displayed until the shutter button is half pressed. In AFC it activates and continues AFC. 
* AF/AE Lock Hold.  This option is greyed out if AF-ON is set in the panel above. If one of the other options is set this decides whether AF or AE Lock or both is held by pressing the button once or by continuing to hold it down.
* Shutter AF.  Set to ON.  The camera acquires and locks focus and exposure with half press.  This is the usual way most people would expect the shutter button to operate.
* Half Press Release. When set to ON, the shutter will fire with half press of the shutter button, as soon as focus is acquired and exposure is set. I find this somewhat alarming, in that the camera fires before I am ready,  and don't quite understand why the option is provided. But hey, modern cameras have lots of options which don't make much sense to me.
* AFS/AFF.  AF Flexible Focus Mode was introduced with the G5 with selection between AFS, AFF, AFC and MF via the Q Menu. But on the GH3 Focus Mode is selected with the set and see lever around the AFL button which only allows for three positions. So you have to tell the camera here in the Custom Menu whether you want the AFS/AFF position to activate AFS or AFF.  AFF is like Ai-Focus on Canon DSLR's. It works like AFS until the subject moves then it turns itself into AFC to follow focus on the moving subject. It might even work, I don't know.  I prefer to have direct control of the Focus Mode so I set AFS. But give AFF a try, it might work just fine. Be aware that AFF disables the ability to have AF + MF. You can't have MF if the camera is liable to switch to AFC at any time.
* Quick AF. When set to ON, this has the camera continuously attempting to find focus on the active AF area, without touching the shutter button. But the active AF area is not displayed until you do half press the shutter button or the back button for  AF. This is one of those functions which some users might like, but it does use up battery power. I set it to OFF.
* Eye Sensor AF. This is another one of those "Helper" functions which some people might find are actually helpful but others might find unhelpful or even irritating.  I am one of the latter because as with many of  these helper functions I would prefer to feeel as though I am in control of the camera. It does not work in low light. Sometimes it operates even when I have it switched off.  Strange...............
* Pinpoint AF time. This will start to make sense when you have the camera in hand and experiment with Pinpoint AF Mode. In Pinpoint Mode the preview image is automatically enlarged for a short time with half press shutter button. You can chose 1.5, 1.0 or 0.5 seconds. As use of Pinpoint Mode implies a deliberative photographic process I use and recommend the Long Time, 1.5 seconds. This is the mode for focussing on a small bird in a large tree,  an insect in a flower or something like that.
* AF Assist Lamp.  AF on the GH3 is so good I just switch the assist lamp off. This avoids startling your subjects with the red ray beam.
* Direct Focus Area. If you look at a G5 you can see the 4 Way controller is home to ISO, WB, AF Mode and Drive Mode. On the GH2 it hosts ISO, WB, Fn2 and Fn3.  The GH3 has moved all these functions elsewhere. This frees up the Control Dial/4Way Controller (aka Cursor Buttons) for AF area control duty.  You can allocate [Focus Area Set] to a Fn button, so the process of changing AF area is activated by pressing that button.  Or you can save that Fn button for some other function and set [Direct Focus Area ON]. Now the process of changing AF area position and size is activated by pressing anywhere on the knurled Control Dial.  Press the up/down/left/right cursor regions on the Control Dial to move the AF area. Rotate the Control Dial, Front Dial or Rear Dial to change the size. Confirm with half press shutter button or press Menu/Set.  With the AF area active, indicated by a yellow bounding box and 4 way arrows, press the Disp Button to return the AF area to the center.
In 1-Area Autofocus Mode the AF area can be positioned anywhere on the frame. In Pinpoint and MF Modes a reduced area of the frame is available.
* Focus/Release Priority. I fail to comprehend why one would want the camera to make the shot until the subject is in focus,  so I set this to Focus Priority. It still allows plenty of not in focus frames anyway especially in AFC.
* AF+MF. This allows focus to be adjusted manually while Autofocus is active. Definitely set to ON.
* MF Assist. This is linked to the item above. It enlarges the preview image when the MF Assist method is activated. The degree of enlargement can be cycled through 4x, 5x, 10x by rotating the Rear Dial with the right thumb, while half pressing the shutter button with the right index finger, while gently turning the focus ring on the lens ( if that is the MF assist method selected)  with the fingers of the left hand.  Some practice and dexterity is required.
For dedicated M43 lenses select [Enlarge by rotating the lens focus ring/lever]
For MF lenses with no electrical contacts select [Enlarge by pressing the AF Mode/Fn3 Button]
* MF Guide. This feature brings up a horizontal analogue focus distance bar on the lower part of the preview image. There is a mountain symbol at the left end and a flower symbol at the right end. If there were proper distance markings and even better, distance plus depth of focus indications, this feature might be genuinely useful. Fuji can do it with their compact X10/ X20 cameras. As it stands there is no way for the user to preset a focus distance by scale on the Lumix cameras. Were this feature available I would find it extremely useful for aerial (set at infinity) landscape (set at the hyperfocal distance) and street ( set at a mid distance, say 5 meters) photo assignments.
* Histogram. A  Live View histogram is another one of those features which one imagines would be useful but in practice is of limited value. When set to ON it appears on the preview screen in one of the options which is cycled with the Disp Button. It can be located anywhere on the frame except the edges. There are two problems with the preview histogram. The first is that it clutters up the image preview. The second is that the GH3 has such a reliable auto exposure capability that the histogram is infrequently useful. I have it set to ON but mostly use the preview screen with no camera data overlaid on the preview image.  I can bring up the histogram along with other data on screen if desired, by cycling the Disp Button.
* Guide Line. I find this very useful as I often want to know if a vertical line in my composition will be vertical in the photo. For this I use the Type 3 style [one vertical and one horizontal line]  The lines can be set anywhere in the frame. To set them both passing through the frame center, press the Disp Button when the lines are active [yellow]. This setup is good for buildings where I want the vertical lines in the building to be vertical in the center of the resulting photo. This allows easy post capture perspective correction in Adobe Camera Raw.
* Highlight. This operates in Auto Review or Playback.  Overexposed highlights are indicated by "blinkies". These can sometimes be fully or partly  recovered from RAW files in Adobe Camera Raw. Set to ON.
* Constant Preview. When set to ON, the Preview Image brightness responds to changes in Aperture or Shutter Speed in Manual Exposure Mode. When using external flash with a separate  meter to judge exposure, set to OFF so the preview image stays the same as you alter aperture and shutter speed.
* Expo Meter.  If you like your preview screen absolutely totally cluttered up with information set this ON.   Even with it on, only two of the Disp selectable screens display it, so if you think it might be useful one day you can set it ON then make it come and go by cycling the Disp Button.
* LVF Disp.Style/Monitor Disp.Style. Both can be set to the same style, which aids seamless transition from one to the other.  You get to choose between "Monitor Style" with basic camera data overlaid on the preview image or "Viewfinder Style" with a smaller preview image but the camera data is easier to read in all conditions, being located on a black strip beneath the image. Take your pick. I find Viewfinder style much more ergonomically effective as the camera data is always clearly visible and does not impair view of the subject.
* Monitor Info.Disp.  If this is set to ON, then cycling the Disp Button [Page 72] includes the (E) screen, "On monitor Recording Information". If the touch screen is active settings can be adjusted by touching an item on the screen. It provides yet another way for users to alter camera settings. I have it OFF in an attempt to simplify camera control operations.
* Rec. Area. If set to Motion Picture the preview screen will show a 16:9 image regardless of the still photo aspect ratio being captured. 
* Remaining Disp. Can be set to indicate remaining shots for still photo or remaining time for motion picture.
* Auto Review. The camera can automatically display a review of each photo taken. The review can be set to 1-5 seconds or Hold, which holds the review until you half press the shutter button. I notice some photographers at tourist destinations habitually looking at their auto review screen. More experienced photographers accept that it is a camera and yes, it does indeed make photos. They switch Auto Review OFF. This greatly facilitates shot to shot framing and capture. You want Auto Review OFF for sport/action work with AFC.
* Fn Button Set. See Below.
* Q Menu. See Below.
* Dial Set. [Page 60] Please read Page 60 carefully. I would suggest leaving dial operation  at factory settings until you are very familiar with the camera. The factory settings provide the action and rotation which I think many photographers would expect to find on a camera like this one. You can change these, but there is nothing quite so ergonomically disorienting as a control dial that works the opposite way to that which you expected.
You can assign Aperture/Shutter Speed, Rotation Direction and Exposure Compensation.
I did try assigning exposure compensation to the rear dial directly but it kept getting bumped accidentally so I sent EC back to the top button.
The dial options are extensive but not quite as over-the-top as those available on the EM5 which allows you to configure the dials differently in each of the P,A,S and M modes.
Note that after pressing the WB, ISO or [+/-] buttons you can switch function of the Front and Rear dials by pressing the Disp. Button. This means you can decide if you prefer to make the most common adjustment with the Front or Rear dial.
* Video Button. For those of us who do not  use video, this option allows the button to be diabled so it will not be pressed in error.
* Power Zoom Lens. If you have a PZ lens, the options on Page 61 are for you.
* Eye Sensor.  The Auto setting automatically switches the preview display to the EVF when the camera is brought to the eye. Judging from the negative user feedback when the Lumix team removed this feature from the G3, it would appear most users prefer the Auto switching feature ON. But some prefer to use manual switching with the LVF/Fn5 button which is also possible. The eye sensor sensitivity can be adjusted. The LOW setting works well for me.
* Touch Settings/Touch Scroll. Lots of options here. The main one is to decide if you are going to drive the camera with the touch screen or the direct  controls. Judging from comments I read in user forums, the camera community appears to be divided on this with some saying they  love the touch screen controls while others like me, just find them an impediment to the photographic process. The GH3 lets you try both and decide for yourself.
* Menu Guide. This refers to the Scene Guide and Creative Control Modes. ON activates the Mode Menu when the Mode Dial is switched.
* Shoot W/O Lens. Set this to ON so you can operate the camera without a lens or with a lens having  no electronic contacts.
Record Menu [Pages 158-175]
* Photo Style. This only applies to JPG capture. Setttings here do not affect RAW files. You can cycle through style presets with the right cursor button, or use the down button to select then alter Contrast, Sharpness, Saturation and Noise Reduction. The selections thus made can be regisered as a Custom Style which overwrites a previous setting. Those who use JPG frequently may need to spend some time investigating the options here as individual preferences will vary.
* Aspect Ratio. The most disappointing feature of the GH3 is that it no longer has the Multi Aspect Ratio Sensor which was a key feature of the GH2 and which I used frequently. So although you can still change aspect ratio, 3:2 and 16:9 are just crops of the native 4:3 frame. For RAW capture I always use 4:3 and crop later in ACR if required. JPG shooters might get more benefit from setting other aspect ratios at capture. But do so in the Q Menu or via a Fn Button, not here in the Rec. Menu.
* Picture Size. In 4:3 AR you can set L=16Mpx, M=8Mpx or S=4Mpx. The main reason one might use anything smaller than L is to set the camera up for Ex.Tele.Conv. In still photography, M enables 1.4x and S enables 2x. (JPG only).
 * Quality. You get 5 choices here from RAW, through 2 JPG quality levels and RAW+JPG at two levels. Note the list of effects listed on Page 161 which are available with JPG but not RAW capture.
Exclusive to the Q Menu there is a feature called "Picture Setting" which is an amalgam of Picture Size and Quality.
* Metering Mode. The choices are Multiple, Center Weighted and Spot.  Probably the most useful for general photography is Multiple. Spot is the most difficult to use but could be useful in specific situations.
* Burst Rate. The details are on Page 153. Use M or L if autofocus and live preview are required on each frame.
* Auto (Exposure) Bracket. Here you enter your preferred Auto Bracketing settings. Auto Bracketing will be activated when set on the Drive Mode Dial. 
Single/Surst Settings. Single means you have to press the shutter for each of the 3, 5 or 7 frames in the sequence. Burst means that if you hold down the shutter the camera will quickly fire all frames in the sequence. Unfortunately there is no setting for Timer+AEB on the Drive Mode Dial. So a cable remote is required. I have not yet checked if the Wi-Fi system can operate AEB with Burst. AEB is compatible with E-Shutter.
Step Gives you many choices, maybe there is some overkill here but some might find a 7 step bracket is occasionally useful.
Sequence You get another lot of choices here also.
* Self Timer. I find 2 seconds is enough to settle the camera after pressing the shutter button. 10 seconds if  the photographer wants to get in the photo. Or fire the camera with a smartphone. There is an intermediate setting which fires 3 pictures after a 10 second delay. Unfortunately I can't find any way of linking this to AEB.
Note that you can assign Auto Bracket and Self Timer to the Q Menu and/or Fn buttons but only for the setup steps as per the Rec. Menu.  There appears to be no way, at least not that I have yet found,  to fire the camera with the Timer linked to AEB.  They are separate on the Drive Mode Dial and I guess the principle is that a hard module setting cannot be over ridden by a soft selection.
* i.Dynamic.  You can select High, Standard, Low and OFF.  With JPG capture and Standard setting i.Dynamic reduces exposure by 1/3 stop from that which would normally be given, then lifts shadow brightness in camera. The result is better detail in both highlights and shadows. The penalty is a bit more noise in the dark tones. With RAW capture, i.Dynamic just reduces the exposure 1/3 stop from normal with no further processing in camera.
* i.Resolution. The Owner's Manual is vague about the claimed benefits of this feature and after testing it, so am I. With  JPG and RAW files I couldn't convince myself that photos with  i.Resolution On were different from those with i.Resolution Off.
* HDR.  Page 164. This feature is available only with  JPG capture. You can select the Dynamic Range and also select Auto Align.  Having tested this feature, I can say it works as advertised but is not, in my experience, very useful. There are several reasond for this. First, it is not available with RAW capture. Second, with RAW capture not many subjects are beyond the Dynamic Range of the GH3+Adobe Camera Raw. Third, the pictures which result from the HDR process have an un-natural, processed appearance. There is often also evidence of movement of leaves, foliage etc between one frame and the next.
* Multi Exp.  Page 165. This feature also works as advertised and may have application in special circumstances. Exposition of the feature probably requires a separate discussion.
* Time Lapse Shot.  Page 166. This feature could be useful in many applications, such as wildlife, scientific, commercial etc. Setting the Start Time, Shooting Interval and Image Count are all quite straightforward. With longer time intervals, the camera will power down between shots to save battery and will re start before the next frame as required. Some cameras with Firmware Version 1.0 had uneven time sequencing, reported to have been fixed with the 1.1 upgrade. Time Lapse is compatible with E-Shutter but not with Timer Delay. The camera adjusts exposure and focus for each frame in the sequence.
 * Electronic Shutter. 
Advantages:  No blur from shutter shock, Silent operation if beeps set to Off. [Page 46]
Disadvantages. Not compatible with flash, Max ISO 1600, Slowest shutter speed, 1 sec, Distortion with subjects moving laterally in relation to the camera, Horizontal alternating light/dark broad lines across the photo with some light sources, eg fluorescent, and possibly others.
* Shutter Delay.  This feature is new to the GH3.  It operates with the mechanical shutter as follows:
Press Shutter Button>Shutter Closes>.....Nominated Delay Occurs....Shutter Opens>....Exposure Occurs....Shutter Closes>Shutter Opens.   The delay between the first shutter closing action and the exposure allows vibrations to dissipate, reducing the likelihood of shutter shock blur using the mechanical shutter.  You can set 1-8 seconds delay. It would also be another way for the photographer to get in the photo. Shutter Delay can be used with Timer Delay if required, although there would appear to be little purpose in doing so.
Note that Shutter Delay also works with  E-Shutter. In this case the effect is to delay the exposure by the the time nominated, after pressing the shutter button.
Shutter Delay cannot be accessed via the Q Menu or a Fn Button, only via the Rec Menu. You can allocate it with a group of settings to a Custom Mode.   I would like the the Lumix Team to add Shutter Delay to the list of features which can be allocated to the Q Menu or a Fn Button.
* Flash. The GH3 has extensive options for on and off camera flash operation. One or many DMWFL360L flash units can be controlled by the inbuilt, pop up flash unit. Pages 125-132. This is properly the subject of a separate discussion.
* Red Eye Removal. Only available in Face Detect AF Mode.
* ISO Increments. The GH2 only allows 1/3 EV  ISO increments which I found irritating every time I changed ISO on  that camera. Fortunately the GH3 allows 1 EV increments which is much faster. The camera provides 1/3 EV increments with Aperure and Shutter Speed so 1/3 steps for ISO is redundant. However for those who want it you can still set  ISO in 1/3 EV steps.
* Extended ISO. Set this to ON.  I can't think of a reason to set this option OFF. Auto ISO will still use the standard ISO setting range.
* Long Shtr NR (Long exposure noise reduction) The shutter speed at which this is triggered varies with ISO.  On my tests from ISO 125-400 it comes in at 8 seconds. At ISO 1600 it is applied to shutter speeds from 2 seconds. The only disadvantage I can see with long exposure noise reduction is that each exposure is made twice, once with the shutter open and once with it closed. This could slow proceedings substantially with very long exposures.
* Shading Comp, Page 170. This is to automatically reduce image darkening in the corners. It displays as active with both RAW and JPG capture. The extra processing work might slow down the frame rate in Burst Mode.
* Ex. Tele Conv, Page 120. This feature works well on Lumix cameras.  JPG only. For still photography, M Image size gives 1.4x zoom, S image size gives 2x zoom. My tests show that the final image quality obtained by cropping a RAW image (via ACR) then converting to JPG is the same as that achieved by original capture with  Ex. Tele Conv. Position and size of the active AF Area can be changed normally.
* Digital Zoom, Page 119. This is probably more useful with Motion Picture. Normal control of the AF Area is lost.
*  Color Space. Set this to Adobe RGB. There is no reason to set sRGB. The color space will automatically revert to sRGB when JPG capture is used.
* Stabiliser, Page 117. This is where you set Normal or Panning OIS. Otherwise set OIS on the lens for those lenses fitted with an OIS switch,  or assign OIS to the Q Menu or a Fn Button.
* Face Recog.  Page 172-175.  This is several computing steps up from Face Detect and a feature one might expect to find on surveillance equipment.
* Profile Setup. Page 176. This feature might seem more at home on a snapshot compact.
Brief summary of functional ergonomics.
Before delving into Q Menu options, it might be useful to review the four stages of camera use. These are Setup, Pepare, Capture and Review.
Setup includes the tasks one might perform at home, prior to a photography outing, and largely involves making selections in the Setup, Custom and Record Menus as detailed above. It might also involve charging batteries, formatting memory cards, cleaning equipment etc.  As far as possible, assign to the Main Menus  items which you will not need to access when out and about.
Prepare Phase generally occurs in the few minutes prior to image capture, when the photographer decides specific settings for the coming photographic task, be it landscape on tripod, sport/action high speed, or whatever.
Capture is the Phase when one is in the process of taking photos, making any necessary adjustments to primary and secondary exposure and focussing parameters along the way.
The items which might need to be adjusted in Capture Phase are the Primary Exposure [Aperture, Shutter Speed, ISO], Secondary Exposure [Exposure Compensation, White Balance], Primary Focussing [AF, MF, Zoom] and Secondary Focussing [AF area position and size] Parameters. Control of these items is best allocated to hard modules directly accessible to the right index finger, right thumb and fingers of the left hand, preferably with all adjustments being enabled without having to change grip with either hand. That is potentially a lot of adjusting in a very short time span, while also taking photos. Which is the reason good ergonomic design is crucial especially in Capture Phase. You can see that the GH3 is better designed than many other cameras in this regard.  A,SS,ISO,EC,WB, Capture are all allocated to the right index finger. [with the thumb as alternate for some of these, for those who prefer it]  AF can be initiated by the right index finger or the right thumb. MF and zoom are assigned to the fingers of the left hand. AF area position and size is controlled by the right thumb, in a somewhat less than perfect ergonomic process as the right hand grip is disrupted. The GH3 needs a JOG lever.
This leaves a group of parameters which could usefully be adjusted in Prepare Phase. Some of these are allocated with fixed function to the Set and See Dials/lever [Mode Dial, Drive Mode, Focus Mode] . Others can be assigned with user selectable function to the Q Menu and the Fn Buttons.
Q Menu,  Pages  39-41.
While the parameters which might require adjustment in Capture Phase are more or less the same for any photographer or image capture task, the same cannot be said for Prepare Phase adjustments. Here we might find individual photographers with very different ideas about the items to which which they require ready access. Therefore there are many items from the Rec, Motion Picture and Custom Menus which can be allocated to the Q Menu.
Best use of the Q Menu is gained by setting a Custom list of items. Start by setting Q Menu to Custom in Custom Menu Page 6/8.  The process is well described on Page 41 of the Manual. Up to 15 items can be set but only 5 appear at any time. 5 is therefore the optimum number of items to allocate to the Q Menu, so they are all visible on the startup screen.
I would expect that many GH3 users will need to experiment with several versions of their preferred Custom Q Menu before settling on one long term. Also it might take considerable time and experiemce with the camera to decide which items go best on the Q menu and which on a Fn Button. Note that there is an item called Picture Setting available to the Q Menu but not to any of the Main Menus. This is an amalgam of Aspect ratio and Picture Size, the displayed screen dependent on Image Quality. For what it is worth, which is not much as individual preferences will vary widely, I have Burst Rate, Ex.Tele Conv, Stabiliser and Picture Setting on the Q Menu.
Function Buttons,  Pages 42-44.
There is quite a bit of overlap between the Fn button list and the Q Menu list but there are several items not common to both. Also note there are less options for Fn4 than the other hard Fn buttons. To set up the Fn buttons go to the Custom Menu, Page 6/8 and scroll to Fn Button Set. Follow the prompts. No two individuals will select the same options here and a final selection might take quite some time to settle on. Bear in mind that the easiest Fn buttons to operate while using the camera are, in order, Fn2, Fn3, Fn4, Fn1, Fn5. Also recall that the Fn2 button is also the Q Menu button, so if you want Q Menu, that takes Fn2 out of the Fn button list.  For what it is worth, which, as for the Q Menu selections is likely not much, I have the Fn buttons allocated  thus:  Fn1>Image quality, Fn2>Q Menu, Fn3>AutoFocus Mode, Fn4>Level gauge, Fn5>E-Shutter. I have the touch screen disabled, so Fn6 and Fn7 soft tabs are not available.
Custom Menus, see Cust. Set Mem. page 115.
If you want still more customisation here it is. You can register current camera settings  to one of the 5 custom Mode positions on the Main Mode Dial [three of the settings branch off C3]  Thus you can make a group of settings for Landscape, Sport/Action, Macro or whatever you choose.  Just remember you can't allocate Drive Mode or Focus Mode settings to a Custom Mode (but you can easily see the setting in use simply by looking at the camera) and you do assign everything else to the Custom Mode. You can use the camera normally in a Custom Mode changing any parameters as desired. These changes are not remembered by the camera so if you switch the camera off or leave a Custom Mode then return to it the settings will be as you registered them in the first place.  You can, of course overwrite a custom Menu with a new group of settings.
The last Word  The Lumix GH3 provides a user interface which can be extensively configured to suit individual preference. This opportunity brings with it the necessity to make many decisions in the quest for optimal setup. This article is an attempt to help GH3 users manage the challenge.


Lens Test Lumix 35-100 mm f2.8 Premium Tele Zoom for M43

$
0
0

LENS TEST
Lumix GX Vario 35-100mm f2.8 Power O.I.S.
Premium mid range zoom lens for the Micro Four Thirds System
Author AndrewS  April 2013
Lumix 35-100 mm lens on Lumix GH3 body
Introduction  This constant f2.8 lens completes a trio of premium zooms for the M43 System. The first was the 7-14mm f4, the second was the 12-35mm f2.8. I have reported on my experience with both on this blog.
Lumix 12-35 mm lens on GH3 body with Lumix 7-14 mm on the left and Lumix 35-100 mm lens on the right.
Test Procedure    I bought my 35-100 mm lens in February and have been using it on a Lumix GH3 over the last 2 months in a wide variety of photographic situations, allowing me to test it thoroughly in real world use involving several thousand exposures. I have photographed a test chart, a grove of casuarina trees with fine foliage, landscapes on and off  tripod, portraits indoors and out, sport/action, day and  night shots, OIS tests, AF tests and shutter shock tests. I gave the lens a thorough workout. I shoot RAW and inspect the images post capture in Adobe Camera RAW.  Both the GH3 and 35-100 mm were  running firmware version 1.1
The three lenses and body illustrated above plus puffer, lens cloths, spare batteries, memory cards etc in a Lowe Pro Adventura 160 shoulder bag.
Place in the M43 System  For many years professional photographers using DSLR's with a 24x36 mm sensor [a.k.a. Full Frame] have relied on two constant f2.8 zooms for much of their work. These are the 24-70 mm f2.8 and the 70-200 mm f2.8.  Canon regards the 70-200 mm focal length as sufficiently important to offer 4 versions; f2.8 with and without OIS and f4 with and without OIS.       If  the  M43 System is  to seriously challenge CaNikon's hegemony of the interchangeable lens camera market there needs to be a M43 version of  the fast mid range pro level zoom.
The 35-100 mm f2.8 is that lens.
photo courtesy of imagesize.com
On the left Canon EOS 5D with EF 70-200 mm f2.8 lens.   In the center Canon EOS 60D with EF 70-200 mm f4 lens.
 On the right  Lumix GH3 with Lumix 35-100 mm f2.8 lens.
Rear element of 35-100 mm f2.8
Features  The most obvious visible feature of this lens is it's compact size. When the M43 system was inroduced much of the marketing message emphasized how losing the DSLR mirror and prism could reduce camera body size.   All this is still true of course, but the greatest opportunity for size reduction is to be found with the lenses.  Moreover, longer focal lengths mean more opportunity for size reduction. The difference between the M43  35-100 mm f2.8  and the full frame 70-200 mm f2.8  is dramatic, as you can see in the photographs.
35-100 mm on m43 provides the same diagonal angle of view [34-12 degrees] as 70-200 mm on full frame, although the native aspect ratio of M43 [4:3]  is different from that of DSLR's [3:2].
The Lumix 35-100 mm is weather sealed with a thin gasket around the mount. The lens does not extend  with zoom or focus, both  actions taking place internally.   This feature makes the lens a pleasure to handle.
The front element  does not rotate with zoom or focus.  There is an OIS ON/OFF switch on the lens barrel, but no distance or depth of  focus marks and no AF/MF switch. The lens is of varifocal type, which means that it has to be refocussed after zooming.
As with the 12-35mm,  the rear element is as far back in the optical pathway as possible. It is a fixed double element about 21 mm in diameter, almost that of the sensor diagonal measurement. Care is required when handling the lens as the rear element is very close to the outside world. If you try, as I have done several times, to quickly mount a body cap on the lens instead of the correct lens cap, damage to the rear element is possible.
A reversible hood is supplied with the lens. I use it all the time.
Diagram courtesy of Panasonic
Optical construction diagram for Lumix 35-100 mm
MTF Diagram courtesy of Panasonic
Specifications
Measured length with UV  filter, front and rear lens caps is 120 mm.
Measured diameter with the lens hood reversed on the lens is 78 mm.
The bare lens without filter, caps or hood is 103 mm long and 67 mm in diameter.
Mass is  350 grams bare, 440 grams with front and rear caps, filter and hood.
Price
Prices vary with country, vendor and time. However for comparison I checked prices listed at the time of writing by a Sydney vendor, Digi Direct.
Lumix 35-100 mm f2.8 OIS                     $1459
Canon 70-200 mm f2.8 L IS 2                  $2375
AF- S Nikon 70-200 mm f2.8 ED VR 2  $2868
In most markets the 35-100 mm is the most expensive M43 lens, leading to  adverse comment from some contributors to M43 user forums.  However when compared to the full frame equivalents it looks quite a bargain. I bought mine from the camera shop mentioned above together with the GH3 body for a significant discount on the listed price for both. I expect that over time the price will come down a bit.
When reviewing models and prices I noticed that Canon does not offer an EFS 46.6-133 mm f2.8 lens and Nikon does not offer a 44-125 mm f2.8, either. These would be the equivalent lenses for the Canon EFS and Nikon DX camera lines. It would appear that neither Canon nor Nikon is supporting their APS-C model lines as alternatives for the professional photographer.
Panasonic, having no other line of interchangeable lens camera to support, can offer the 35-100 mm without taking sales from itself.
Sydney, evening. Lumix GH3 with 35-100 mm lens, tripod
Performance, Mechanical 
Like other M43 lenses with OIS, the unpowered 35-100 mm rattles when shaken side to side, due to movement of the OIS unit. 
With one's ear right on a powered lens noises can be heard from the OIS unit, AF motor and aperture diaphragm operation.
The zoom action is very smooth.
Single autofocus is very fast and accurate on the GH3.  Continuous AF also works well making the lens quite suitable for many types of moving subject.
If pointed at a bright light source, the lens sometimes behaves like the 12-35 mm in that the aperture diaphragm can open and close without user input. This makes a  noise which is audible in a quiet place. Some contributors to user forums have reported this as a fault, but it appears to be the normal behaviour of the lens. It may possibly serve the function of protecting the sensor from excessive light, I don't know.  
Manual focus operates the usual way,  by rotating the focus ring which triggers an electronic mechanism. This works without problem however I personally would prefer a little more drag on the focus ring for more feel.
The Optical Image Stabiliser works well to stabilise the preview image in the EVF, an effect most noticeable at the long end of the zoom range. Some reviewers have stated the OIS allows sharp handheld photos up to 4 shutter speed steps slower than without OIS.   My tests found the difference to be about 1.5 steps. The difference may lie in the test procedure. Many reviewers measure the percentage of unsharp shots with OIS on vs OIS off.  But I want to know the shutter speed at which every shot is sharp which may be a more stringent test.
Note that one reviewer, Jordan Steele (Admiring Light),  found that photos with OIS  On,  were less sharp at very fast shutter speeds [1/3200, 1/4000]  than at more frequently used shutter speeds.  I have not observed this issue but that may be because I rarely use such fast shutter speeds.
Shutter Shock  This is a well known potential source of unsharpness in photos made with M43 equipment, about which I have written elsewhere on this blog. I ran formal tests using a test chart and tripod, then many hundreds of real world photos in the shutter speed range 1/80 -1/100 sec with E-Shutter on and off.  My conclusion is that I could not find any convincing evidence of softness or blurring which might be attributable to shutter shock with the 35-100 mm lens on a GH3 body.
Boatyard. GH3 with 35-100 mm lens, handheld
Performance, Optical
Sharpness/resolution  For comparison I used the Lumix 12-35 mm, 14-45 mm, 45-150 mm and 100-300 mm lenses.
At 35mm focal length, the 35-100 mm and 12-35 mm gave the same level of sharpness/resolution. Without the EXIF data I could not distinguish one from the other on any test.
At the longer focal lengths the 35-100 mm was better at f2.8 than any of the other zooms at any aperture.
Image definition in a broad area covering most of the frame is excellent from f2.8 at all focal lengths, with excellent resolution of fine surface texture and faithful  rendition of all skin blemishes in people pictures.  Ladies will hate portraits made with this lens. Stopping down to f4 sharpens the corners perceptibly. My copy delivers very even performance right across the focal length and aperture range. Best overall aperture appears to be in the f4-5.6 range but f2.8 gives really excellent results except for slight softness in the corners.
Roger Cicala of Lens Rentals reported his tests on  7 copies of this lens in October 2012. He found generally excellent results but resolution below expectations at the 100 mmm focal length and f2.8 on all 7 copies. My experience with a lens presumably from a later production run has been that I did not notice this issue at all even though  I was looking for it having read Roger's review prior to doing my own tests. In fact my copy is notable for it's ability to deliver excellent resolution at all focal lengths and aperures.
Chromatic aberration  This is corrected in camera in Panasonic RW2 files and was not evident in any of my photos. It may be an issue on Olympus cameras which do not correct for CA.
Some Corner shading  is  present at f2.8 but not to a degree which I thought required correction on any of the thousands of photos I have made with this lens.
Distortion  is corrected in camera such that it is not evident in general photography, even where this includes buildings. Some reviewers have  examined uncorrected RAW files and discovered substantial barrel distortion at the short end of the zoom range.
Bokeh  Out of focus rendition is generally pleasing and smooth, without tramlining or other jarring intrusions into the viewer's awareness.
Contrast/microcontrast  is excellent.
Lumix 35-100 mm sun in frame.
Flare  The lens is supplied with a deep hood, which I use for all outdoor photographs. This prevents the sun 's direct rays falling onto the protective filter and as a result flare is an infrequently encountered issue with this lens. If the lens is pointed directly at the sun flares of various types are readily induced, to the detriment of image integrity.
Close focussing capability  appears not to have been a priority for the designers of this lens.   Minimum focus distances, measured from the subject to the sensor plane are
At 35 mm focal length,   630 mm
At 100 mm focal length,  780 mm
At 100 mm with +2 diopter Close Up lens,  420 mm.  Horizontal subject field at this distance is 70 mm.
Comparison with other M43 telephoto zooms 
The main advantage of the 35-100 mm is the constant f2.8 aperture, which does not reduce with zooming out. This allows the lens to be used at wider apertures in all conditions than the more consumer oriented optics. This in turn allows for lower ISO settings or faster shutter speeds or both. The consequence is better potential image quality.
The absolute resolution available with the 35-100 mm is slightly better than the less expensive zooms but I had to look hard at 100% and 200% enlargement of test photos to see the difference.
Up a gum tree. GH3 with Lumix 35-100 mm. Hand held. prefocussed manually on the log.
Value for money  I would have to rate lenses like the Olympus 40-150 mm [occasionally on sale for the astoundingly low price of $99] and the Lumix 45-150 mm [at around $300] as the best value tele zooms in the M43 system. Their performance to price ratio is remarkable. The extra 1-2 stops of aperture available in the 35-100 mm comes at a premium price. For M43 users who prioritise small size and low cost, the 35-100 mm is overkill. But for those who want the best performing tele zoom lens and can afford it, the 35-100 mm is perfect.
Comparison with Canon EF 70-200 mm f4 L IS USM      I bought  this lens for use on a Canon EOS 60D two years ago and at the time rated it the sharpest lens I had ever used. I sold off the Canon gear mainly because the camera would not reliably focus the 70-200 or the 15-85 mm lenses which I was using at the time. The size and weight of the Canon kit didn't help much either. I did not have the opportunity to test the Lumix and Canon lenses side by side but I shot several favourite scenes with both and was able to make a reasonably useful comparison based on viewing the photos. My impression is that the Lumix 35-100 mm lens gives slightly better sharpness and resolution across the frame.  This should be no surprise, by the way. The Canon lens is designed for full frame so cannot deliver it's best performance on the reduced frame of the 60D. The Lumix lens is being used on the imaging sensor for which it was specifically designed.
Hints and tips for best results with this lens
Focussing   Depth of focus at f2.8 is quite shallow. In consequence the user needs to tell the lens exactly where to focus. If the camera is left to select a focus point, results are out of the user's control and may not be as intended.   Please refer to my discussion about this with illustrative photographs in "Lumix GH3 Review Part 4, Single Shot Focus" on this blog. The user needs to make a conscious decision as to the best point of focus. The size and position of the active AF area need to be precisely specified.
Camera movement  There is nothing new here. However the lens is capable of very high sharpness if the camera is held perfectly still at the point of exposure or the shutter speed is high enough to negate the ill effects of camera shake. Some users  might think the lens' performance is nothing special when the problem is lack of attention to optimal technique. For more discussion about this please see "Lumix GH3 Review Part 9, Stop the Shakes" on this blog.
Summary  The Lumix 35-100 mm f2.8  and the  12-35 mm f2.8  are the best zooms available for the M43 system and in my experience two of the best zoom lenses I have ever used for any camera system. Used with care the 35-100 is capable of excellent results in a wide variety of photographic situations.     


Photoshop Replaces Tilt Shift Lenses

$
0
0

PHOTOSHOP REPLACES TILT SHIFT LENSES
New tech beats old tech, costs less and takes up zero space in a camera bag.
Author AndrewS
Introduction  My interest in writing this piece was stimulated by several threads on the  dpreview.com  Micro Four Thirds forum, asking about or lamenting the lack of tilt shift lenses for the M43 system.
Some History  Many years ago, way back when an imaging sensor was called "film", I spent considerable time with large format 4x5 inch cameras, used mainly for landscape photos. I became adept at managing tilt, shift and swing to move the plane of focus  in three dimensional space. Using large format was fun but the task of  hauling all that equipment to landscape photo opportunities was a complete pain in the back so I downsized to 35mm film SLR's with tilt shift lenses.  When I "went digital" all the film cameras and full frame lenses were sold off  in the quest for an even more compact, lightweight kit.
Film vs Digital sensor  These two light sensitive device types have some very different characteristics. Film can readily accept light coming from an acute angle. This regularly happens when a tilt shift lens is moved to full shift position. Digital sensors have a completely different arrangement of  light sensitive elements, each fronted by a microlens. Sensors of this type work best with light falling perpendicular to the surface of the sensor. They become increasingly inefficient as the incident light varies away from the perpendicular.  This is one reason that shift movement in a lens is not well suited to  digital imaging.
Digital sensors probably cope better with tilt which may explain the proliferation of third party tilt optics from makers such as LensBaby, which also makes tilt/shift versions. Many of these lenses fall into the "fun" category without serious pretension to being high grade landscape/architecture instruments.
About tilt shift lenses Serious tilt shift lenses intended for high quality photographs are large, heavy and very expensive. They are all manual focus single focal length types. Evaluating exposure with in camera meter systems can be difficult.  Judging correct focus with tilt and shift applied can be difficult. Strange as it may seem I found working with lens shift and tilt easier with 4x5" large format. One learned to use an external light meter. Fine focus was much easier to evaluate on all parts of the frame with a magnifying loupe placed directly on the focussing screen.
Photoshop  For many years Adobe Photoshop has provided some means for correcting vertical perspective in architectural photos taken with a standard lens pointed up or down. Increasingly sophisticated versions of this capability have now migrated to Adobe Camera Raw. This has made shift lens action unnecessary.
In more recent versions Photoshop has acquired a Focus Stacking feature. Initially this did not work terribly well but the version in Photoshop 13 [PsCS6]  is very good and easy to use.    Focus Stacking can do everything possible with tilt and in addition can achieve results which tilt cannot, making this technology now very useful.
Town Hall Original Photo
Town Hall after changes in Adobe Camera Raw

Perspective Correction in Adobe Camera Raw
Hints for Image Capture
* Always use RAW capture.
* Use a tripod where possible for accurate framing. Having said that I often hand hold the camera when perspective correction will be required later in ACR.
* Leave space all around the main subject especially at the top, assuming a lens pointed up. More correction means more cropping.
* Try to identify  a vertical line in the middle of the image and line this up with a vertical center guide line in the Monitor or EVF.
* If you are front on to a building and want to represent verticals and horizontals at right angles to each other, try to place the camera perpendicular to the center line of the planned final image.
 Hints for using Adobe Camera Raw
* In ACR 7.4 go to Lens Corrections>Manual>Transform....
Check the Show Grid box.
If you know from previous experience that the lens needs distortion correction apply this, then apply vertical correction. Nudge the Rotate angle as required to keep the centerline verticals upright. Sometimes the Horizontal slider is required to adjust horizontal lines until they have the desired alignment.
The process is very sophisticated, easy to use and gives excellent results.
This focus stack is a composite of five images
Focus Stacking in Photoshop
While the Lens Corrections feature in ACR is readily understandable as the  digital equivalent of shift in large format or a tilt shift lens, focus stacking is nothing like lens tilt at all.  If a tilt/shift lens is tilted forward far enough the focal plane can be rotated from vertical (assuming the camera to be level) to horizontal, lying parallel to the ground. In this situation depth of focus occupies the vertical dimension, increasing with distance from the camera. For those who have never used a large format camera this might be difficult to imagine but that is how it works.
Hints for Image Capture
* Before starting do some research into the depth of focus available with your chosen lens at each focal length and aperture. You can find this at  dofmaster.com   I find it useful to commit this data to a small printed card which goes in the camera bag.
* Always use RAW capture.
* Always use a tripod. The process requires several  photos of the subject each with exactly the same framing and exposure, changing only focus. Select a co-operative subject which needs to remain still during the multi exposure capture process.
* Use Manual Exposure. Use the same (low, there is no hurry) ISO, Aperture and Shutter Speed for each exposure. There is no need to stop down for depth of focus so use the lens at it's optimum aperture.
* Focus manually. This is essential for accurate control of the process.
* Make a series of exposures, starting with focus on the nearest part of the subject.  Focus a little deeper into the scene for the next frame, and so on until you reach the background.
* Leave space for some cropping later. 
Same location as the photo above, looking in the opposite direction. You can see here the focus stacking process has not delivered a perfect result.  Some of the leaves near the left edge of the frame and on the right mid section are not sharp although they were so in one of the component images.
Hints for using Photoshop 
* Load your 3 to 8  (or thereabouts)  images onto a separate folder so they are easy to manage. The number of frames is not critical but more frames will require more time and processing power to analyse.
* In  Adobe Bridge, select the frames you want, then go to  Tools>Photoshop>Photomerge.  
* Up comes the Photomerge window.  Select Layout, Auto. Uncheck the "Blend Images Together" box.  Click OK.  The program thinks for a while, message reads  "align selected layers based on content"  then an image appears on screen with the same number of layers as the number of frames selected.
* Select all layers.
* Go to Edit>Auto Blend Layers.  Blend Method = Stack Images. Check the "Seamless tones and colors" box. Click OK.  More computing takes place, after which the almost final composite image appears on screen.
* Inspect the image carefully at 100%, trim off any fuzzy edges, flatten layers and save the photo as a TIFF.
What just happened ?  Manifestly, a miracle. Photoshop selected the sharp bits from each frame and blended just those sharp parts into a composite image with  endless depth of focus in both the vertical and horizontal dimensions. This is impossible to achieve with a single exposure using large format or a tilt/shift lens.
For further information on focus stacking see
"Focus Stacking in Macro Photography" by Erez Marom, dpreview.com  11 April 2013, in Articles>Photo Techniques.


Ergonomic Logic of the Lumix GH3

$
0
0

ERGONOMIC LOGIC OF THE LUMIX GH3
Author AndrewS  April 2013
Introduction My interest in ergonomics was sparked several years ago by encounters with several cameras which featured truly awful holding, viewing and operating characteristics. Their user interface was ill conceived, clumsy and inefficient. It  seems to me that camera designers are struggling to make the transition from film based analogue cameras to the  much more complex electronic devices of the current era. To make life even more difficult for camera designers, the market for photo capture devices has undergone radical change over the last few years, with most snapshots being made by smart phones, not dedicated cameras.
Mirrorless interchangeable lens cameras [MILC] in general and the Micro Four Thirds System [M43]  in particular, were born in the midst of  this confusing mix of technological and market forces.
Regardless of technology, it seems to me that there are two basic types of photographer, the snapshooter and the controller. Snapshooters don't want to be bothered by the technical details of image capture. They just want to push the button to get the shot. Controllers, a.k.a. enthusiast, advanced, professional,  photographers want to take control of the image capture process in the quest for  better results.
The first round of  M43 camera designs appeared to be trying to appeal to both groups. But as the format has matured, the difference between model lines has become more distinct. So, the Lumix GF line is clearly aimed at the  snapshooter wanting to upgrade from a smart phone or compact camera but retain compact size and ease of use. At the other end of the M43 spectrum the  GH3  is clearly aimed at the advanced  user who would previously have bought a DSLR. 
By the way, I am well aware and obviously so are the manufacturers, that plenty of snapshooters buy DSLR's, perhaps in the belief that a DSLR will make better photos than a compact camera. In fact the GH3 has an iA Mode in which is ideal for snapshooters.  However the discussion which follows refers to use of the camera in the P,A,S,M modes.
Setup Phase    As requested by many users, the GH3 is a highly configurable device. This means that the operation of many user interface modules [UIM] can be user assigned. This is a wonderful thing but the inevitable consequence is a high level of complexity at the setup phase where you not only can but must make many decisions about the function of buttons, dials, menu presets...etc.
I think it is reasonable that the expert user would expect an advanced camera like the GH3 to have certain key performance capabilities. In Setup Phase these would include: A comprehensive, logical, clearly presented menu system, with excellent graphical qualities, and  user friendly navigation.
Over the years and successive models the Lumix team has improved Setup implementation. This includes menu content, layout and navigation. Compared to the GH2 the GH3 has clearer graphical presentation of items,  more intuitive navigation and an improved physical UIM.  Gone is the old  "5 little buttons"  type 4 way controller, which I never learned despite diligent practice to reliably operate by touch. The GH3 has the "Rocking saucer" type UIM.  It is larger and is surrounded by a knurled ring which is easy to locate and operate by feel.
Lumix cameras also have the "Menu Resume" feature. This remembers the last used item in each menu allowing the user to return directly to that item when the Menu is next opened.
There are really only two  items on  my wish list for the menu system.
First is the return of a My Menu tab, but better implemented next time round. Some previous model Lumix cameras such as the GH2 do have a My Menu tab which automatically places the last five menu items accessed onto  the My Menu  list. I find this unsatisfactory because if  I access an infrequently used menu item it automatically bumps a more frequently used item off  the My Menu list.  My Menu would be much more useful with user assignable content.
The second is about access to the  new and useful feature called "Shutter Delay" which unfortunately can only be reached from the Rec Menu.  I would appreciate being able to allocate this to the Q Menu.
Prepare Phase    This is the period of a few minutes just before making photos. The camera is not being held to the eye so the operator can look at the camera, not the subject, and make adjustments while looking at UIMs and the Monitor.
The expert user will expect to be able to adjust Main Mode [P,A,S,M] Drive Mode, Focus Mode, Autofocus Mode, OIS, Burst Mode, E-Shutter, preview screen appearance and  any of a range of other items determined by individual preference.
The GH3 manages Prepare Phase very well.  The On/Off switch, Main Mode, Drive Mode and Focus Mode are on  "set and see" modules.  On premium lenses, the OIS  On/Off switch is also a "set and see" type on the lens barrel. The  user configurable Q Menu is easily and quickly accessible. There are several Fn buttons each of which provides user assignable function.  In addition there are 5 Custom Modes each of which allows full user assignable function.  An expert can configure the camera so it does just what the user wants with a wide range of options available. The only downside to this is that the option for user assignment of UIM function is also an imperative. The user who wants to take control of camera operation must make many decisions in the quest for individualisation of camera function.
The physical arrangement of the UIMs  often used in Prepare phase is very good.  They are all well located and easy to operate.  
Capture Phase   This is the Phase of camera use when the user is in the process of capturing images.  It presents the greatest number of ergonomic challenges.  But every challenge is also an opportunity: to design well or design badly.  In the M43 system, I have bought, used and evaluated the Olympus EM-5, Lumix G1, G3, G5, GH2 and now the GH3.  I have published my ergonomic findings about the EM-5, G5 and GH2 on this blog.  The GH3 delivers a very substantial improvement in ergonomic capability over all those cameras. Over the last 50 years I have used many cameras from many makers. I rate the GH3 to have the best Capture Phase ergonomics of the lot. It's not quite perfect and in my view could be even better with some design modifications which I will describe in a future blog article.
The expert/controller type user is likely to have high expectations for a camera's capability in the Capture Phase. These relate to Holding, Viewing and Operating.
Holding  A camera like the GH3 which is expected to operate with wide aperture and telephoto lenses, must be designed so it can be held in a very stable yet comfortable grip. The GH3 designers have re-invented the shape of the entire right side of the camera in order to make this possible. The handle at the front, thumb rest on the back and the curved shape of the whole right side of the camera all work together to make for a comfortable, stable hold on the camera. The lower right corner of the body is gently rounded. The thumb does not press accidentally on a UIM in basic hold position. Size is in the "Goldilocks zone", large enough for large adult hands but small enough for those with small hands including women and children.
Viewing  An advanced modern camera is expected to provide  very comprehensive viewing arrangements.  The expert user wants to be able to view the subject on the Monitor or through an eye level Viewfinder.  That view needs to be clear and sharp, with 100% coverage of the actual frame and with seamless transition from one to the other. In addition  comprehensive and user selectable camera data needs  to be seen in both viewing places, presented in the same way. Ideally the Monitor will be of the fully articulated type for maximum versatility.
The GH3 meets all these criteria.  There has been much discussion in user forums about perceived faults with the GH3 EVF. I have discussed my findings about this matter in this blog. In short, some users see one or other problems, many users see no problems at all. The mystery continues................
Operating  The expert user might wish to carry out  any one or more of several actions  in the Capture Phase. The list of items which might require adjustment is quite long, posing a substantial ergonomic challenge for designers. 
These are:
* Framing: Zoom.
* Primary Exposure parameters: Shutter Speed, Aperture, ISO.
* Secondary exposure parameters: Exposure Compensation, White Balance.
* Primary Focus actions: Start/achieve Autofocus, Manual Focus.
* Secondary Focus actions: Change position/size of active AF/MF area.
In this discussion I will assume the user is viewing through the EVF.  This is not always the case, of course, but this viewing option does place the greatest demand on the camera's ergonomic design with particular emphasis on the location and function of UIM's so the camera can be operated smoothly with the eye to the viewfinder, with both hands continuously  holding the camera and without needing to interrupt the capture process to make an adjustment.
In the past, there has been a tendency for camera designers to locate control modules in a fashion which appears to have been inspired by the scatter of confetti at a wedding. In other words, all over the place without much evidence of coherent logic. Here are a few examples to illustrate the point:
* Several Fuji models locate the AF button on the left side of the monitor in a vertical row with several other buttons the same size and shape. This button activates the process by which the position of the AF area can be changed.  But to lay a finger on the button the camera has to be taken down from the eye, the left hand grip released completely, the button pressed then the right hand grip released to operate the cursor buttons to move the AF area.  On the X20 and and X100s  they moved the AF button over to the 4 way controller on the right side where it can be operated with the right thumb. But the X-E1 still has it on the left side, go figure.
* Many Canon DSLR's have a row of buttons behind the top front scroll wheel.  For instance the EOS 6D and 60D each  have 5 of them, with the ISO button [which is the one likely to be required in Capture Phase]  stuck in the middle of the row, distinguished only by a tiny little nipple on top.  In my time with the 60D I never, despite much practice, learned to reliably hit the ISO button without taking the camera down from my eye so I could see the top plate.  It would be so very easy to redesign these buttons so the ISO could be reliably found by touch, but they don't do it.  Strange........
* Many Nikon DSLR's  [eg 7000, 7100, 600] put the ISO button on the left side of the monitor, with the same problems as the Fuji example above. To make matters more confusing some models place the button second from the bottom, others right at the bottom. Other models [eg. 5200] have no dedicated ISO button at all but you can program a Fn button on the left side of the lens mount at the front of the camera to ISO.  There appears to be no recognition at Nikon, of all places, that
a) ISO is a primary exposure control variable, and
b) ISO control should be allocated to a dedicated UIM in a high priority location on the camera.......hint.......right near the shutter button.  Instead Nikon  puts other stuff  up  there, like "Info" which is a Setup or at most, Prepare Phase item. On the 5200 they also put close to the shutter button Exposure Compensation which is a secondary exposure variable, and Drive Mode which is a Prepare Phase setting.
It almost seems the designers at Nikon are stuck in the film era where ISO was determined  by the film in use and therefore required only a rudimentary level of control. 
* Lumix camera designers have also had their share of ergonomically wayward moments, some of which I have detailed in previous articles on this blog. By way of brief summary, the G1 had the mini projecting handle with shutter button top front, an arrangement which did not conform to any known human hand. Then they put the front dial where it is obstructed by the right middle finger, so to operate the dial the user had to change grip with the right hand then change back again to resume holding the camera. The G3 had no proper handle at all and it's rear dial was extremely awkward to operate, requiring acute flexion of the thumb leading to  complete disruption of the already tenuous right hand grip on the camera. Things improved with the GH2 which had lots of useful set and see dials. But the mini projecting handle was still present and incorrect, as was the "5 buttons" type 4 way controller, which required the user to look at the device [and therefore away from the subject] to be sure of hitting the right button. The G5 design and layout showed definite signs of increased ergonomic awareness. The handle has a much improved shape and the 4 way controller is of the "rocking saucer" type which is easier to locate and operate by feel. The G6, announced as I write this, appears to be a mild refresh of the G5.
The GH3 represents a big step up in all aspects of ergonomic operation.
Exposure  The main Capture Phase exposure controls are grouped together just behind the shutter button and front dial.  Auto Exposure is started by half press of the shutter button, as usual. Aperture in A-Prio Mode is controlled by the Front Dial [or the Rear Dial if you prefer]. White Balance, ISO and Exposure Compensation are controlled by the buttons behind the Front Dial.  This arrangement groups primary and secondary exposure controls together in a coherent fashion.
Focus  The Focus Mode Lever surrounds the AF/AEL button to which AF start can be allocated, separately from AF Start/Lock. This groups several of the principal focus controls where they are naturally operated by the right thumb without having to alter grip with the right hand.
Function of the [lower rear] Control Dial can  be allocated  exclusively to AF Area position/size control, [Direct AF Area] using the right thumb. This is not quite as convenient as a JOG lever would be but it does put focus operations onto the right thumb which can soon learn which actions are required to achieve what outcomes. With a little practice, these can be carried out by feel without having to look at any of the control modules.
User Interface Modules [UIM]  I use this term to encompass buttons, dials, levers and similar hard points of user input to camera operation. The GH3 does a good job with them all. The Front, Rear and Control Dials are well located and shaped for easy operation while maintaining grip on the camera. The set and seedials/lever are well placed for instant visual reference just by looking at the camera in Prepare Phase. The buttons are mostly well positioned and easy to find and operate by feel.  The WB, ISO and +/- buttons could usefully be a little closer to the Front Dial, but are workable as is. Some early reviewers complained that the Control Dial was a difficult to operate. I  found that a little practice soon resolved that issue. The Fn buttons work well enough as found but I would probably prefer them to have about 1 mm more diameter and to project about 0.5 mm more.
Some users have complained about several control points having moved from locations found on previous model G cams. The Playback button has moved to the top left.  Playback is a Review Phase function, carried out with the camera held, usually in both hands,  down and away from the eye. So the button does not need to be close to the right thumb. The only problem with the top left location of the Playback button comes when the Monitor is swung out, when the button is a bit awkward to reach. I would still not want it back on the right side however as it would displace a UIM required for Capture Phase operation. I notice that with the G6  the Lumix designers left Playback on the right side,  possibly in the belief that G5/6 users might be  less experienced than GH3 users and therefore more likely to review their images in camera. Another complaint I have read on user forums is that the UIMs for ISO, WB, AF Mode and Drive Mode have departed from the Control Dial/4Way Controller and been relocated elsewhere. In fact the new locations are  better ergonomically as they are up on or near the top of the camera for operation by the index finger and thumb and they free up the Control Dial for Direct Focus Area operation.  
Q Menu, Fn buttons  The physical and operational aspects of the Q Menu and Fn buttons are well designed and implemented. They are easy to use and with a little practice become second nature.
Review Phase  This is well designed, well executed and easy to use.  Press Playback button to start the review process.  Front Dial scrolls through images on the card, one by one. Rear Dial zooms in or out, then to multiple image view, with scrolling by the Control Dial. Control dial on a single image moves the zoomed in view around the frame.  With just a little practice this system is fast and friendly.  The only improvement I can think of would be to implement "Jump to active focus area" when the review image is zoomed in. The Olympus EM5  has this feature which is a nice way to speed up the image review process.
Other Things, which make camera use enjoyable  
* Battery:  The BLF19PP battery is much larger than any previously seen on a M43 camera. The 1860 mah power supply is good for about 1000 shots in my hands, using a mix of EVF and monitor view. The ergonomic benefit is that I rarely have to change battery during even the heaviest day's shooting.
* The tripod socket is 20 mm back from the front edge of the baseplate and on the lens axis. This makes it suitable for telephoto and other heavy lenses.
* The battery compartment is far enough from the tripod socket that a battery could be changed on tripod.
* The Memory Card slot is on the right side of the handle, separate from the battery compartment.
Quirks, Foibles, Glitches, Messups and Kludges.  The GH3 is blessed with remarkably few bad, annoying or dysfunctional characteristics. Overall it provides one of the most coherent  user interfaces I have ever encountered in a camera. 
My wishlist for firmware upgrades    My wish list is quite short. Some contributors to user forums have posted much longer lists, but I think most of the suggestions which I have read are in the service of highly specific and individual preferences which don't really lead to improved operation, just different.
1.  Add [Shutter Delay] to the list of items which can be assigned to either the Q Menu or a Fn Button.
2.  Enable Automatic  [Jump to AF Area] with zoom into the Playback image.
3. When changing position of  AF area,  allow [Re Center AF Area]  with Menu/Set Button.  As presently configured the user must press the Disp Button to recenter the active AF Area. This works but means that after activating [Direct Focus Area] and moving the AF Area with the Control Dial/Cursor Buttons  the right thumb has to go find a different button by feel in order to recenter the active AF Area. I have trained myself to do this however it would be faster if  the "recenter" action stayed on the Control Dial/Cursor.
MF Mode uses either the Menu/Set Buttton or the Fn3 Button to enlarge the preview image. This means the camera has two UIM's doing the same thing.    With MF you still need to hit the Disp Button to recenter the active MF Area.   
It seems to me there would be no impediment to assigning [Re Center AF Area] in AF or MF to the Menu/Set Button.
4. Bring back [My Menu] but this time make all items user selectable.


My Camera Must Have an Electronic Viewfinder

$
0
0

My Camera Must have an Electronic Viewfinder
Why I hate Optical Viewfinders
Author  Andrew S   May 2013
 
Abbreviations used in this article   ELV= Eye Level Viewfinder, BIELV= Built in Eye Level Viewfinder,  EVF= Electronic Viewfinder, OVF= Optical Viewfinder, MILC= Mirrorless Interchangeable Lens Camera, DSLR= Digital Single Lens Reflex Camera, SLT= Single Lens Translucent Camera [Sony only].
Introduction  I sometimes read expressions of opinion by bloggers and contributors to user forums that EVFs are inferior to OVFs.  I present here a case for the EVF.
The argument for a BIELV  Before we get to debating the OVF vs EVF question, I want to summarise the arguments for having a BIELV.  Most cameras, mainly compacts and MILC's, do not have an BIELV.  I think they should because:
1. Options  The camera with BIELV gives the user the option to use it or not. There are plenty of situations (see below) when a BIELV is desirable. If it's not there the option to use it is denied.
 
2. Differentiation  The biggest current threat to the camera as a species of useful device is the smart phone which takes photos which are good enough for most user's requirements. So why buy a camera ? Because it has better image quality ? Yes, but the concept of image quality might be a bit abstract for a potential buyer who thinks their smart phone pix are OK.  But smart phones do not have an ELV. So there is an ergonomic selling point for cameras with  BIELV which most manufacturers have not fully embraced.   Fuji has fitted it's X10/X20 compacts with a BIOVF.  The first compact [I think it is the first] with BIEVF will be the [Panasonic] Lumix LF1 which was announced in April 2013 for delivery in June 2013.  I think that camera makers need to provide and promote their products with features which smart phones do NOT have, like a BIELV. Instead the latest crop of cameras appears to be marketing features such as wireless communications, which smart phones already do better.
3. Steady Cam  With eye level viewing a camera is much steadier  than when it is held out in front for monitor viewing. This can make a big difference to image sharpness with long lenses or in low light with slow shutter speeds.
4. Sunblock  Even the latest and best monitors are difficult to use in full sun. The preview image itself is often washed out and the camera data may be impossible to read.
5. Distractions  There are times when the photographer wants to talk to the subject, in which case monitor viewing is desirable. But when the photographer wants cognitive separation from the surroundings to concentrate fully on the subject, then eye level viewing is very desirable.
6. Clip Ons are a nuisance  If the only option for eye level viewing is a clip on OVF or EFV it will invariably be somewhere in the bottom of the camera bag, or left at home when required. Then there is the nuisance of finding the thing and clipping it on, by which time the subject will likely have wandered away. If the accessory viewfinder is left on the camera it makes the camera very tall,  difficult to get in and out of a bag with increased risk of damage to the VF or it's attachment to camera body.
So, having established that the BIELV is a good idea, let us specify what tasks it might reasonably be expected to perform. Having done this we can investigate whether the OVF or EVF is more effective  for each task.
 
BIELV Task List
1. Framing  Most EVF's offer 100% accurate framing, which comes as no surprise as they take data directly from the imaging sensor. Some high end DSLRs do likewise, but most DSLRs offer a reduced view of the subject. All "rangefinder" style OVF's have at best, approximate framing with the added problem of parallax error. Many cameras allow different image aspect ratios, which are easily represented in an EVF but not an OVF.
Best: EVF
2. Preview The preview experience offered by an OVF is fundamentally different from that of an EVF.  A good quality OVF provides  a  representation of  the scene in front of the camera. But I can see that without a camera. I want the camera viewfinder to provide me with an accurate preview of the photo which is about to be taken. This includes brightness, the effect of exposure compensation, highlight and shadow detail, color balance and sharpness.  A DSLR OVF can tell me about sharpness [a rangefinder OVF cannot] but the other qualities can only be conveyed by an EVF.  That is not to say all existing EVFs actually achieve the level of preview accuracy that I want. In fact I would say most of those I have used are one or two development generations short of  an ideal viewing experience, but the potential is there with technological development.
Best: Close call. I give it to the better EVF's right now. In a year or two there will be no contest.
3. Information/Data Displays  An  OVF cannot convey much in the way of information in addition to the framed scene. Manufacturers have used various strategies to improve the information visible on or near an OVF view. These include camera data beneath the image and various types of information projected onto the image frame.  An  EVF can be configured to give the user choice of  "DSLR" view or "Monitor" view with camera data beneath or superimposed on the image preview. A choice of grid lines can be displayed. Many other items can be displayed, or switched off by user choice. These might include highlight/shadow clip warning, focus peaking, electronic two way level gauge, histogram, camera shake warning  and any of a host of information icons which can be switched to display or not display by user choice.
Best: EVF
 
4.  Responsiveness/RefreshRate   This is an issue when panning especially in low light, and is a major factor in following action with high frame rates and continuous AF.  An OVF refreshes at the speed of light [literally] so has the initial advantage. The limiting factor for a DSLR is the flipping mirror. With an EVF the limiting factors are the sensor read rate and EVF  refresh rate expressed as frames per second.  With present technology the flipping mirror can move faster than electronic processing. So for high frame rates the OVF is currently ahead. However DSLR/OVF technology reached it's full potential several years ago, but electronic processing speed is increasing every year.
Best: OVF  [for now]
5. Monitor/ELV segue  A fully electronic monitor/EVF system can be configured to provide the same information presented the same way in both the monitor and EVF.  This facility is not available with OVF.
Best: EVF
6. Focus operations
Autofocus:  An EVF can display the active AF area position and size, with AF confirmation. OVF's can provide a similar facility by means of projection/overlay. The EVF  arguably  provides a more integrated user interface.
Manual focus  An EVF enables automatic [or user selected] enlargement of the center or other part of the frame to aid MF accuracy. Other technical features such as focus peaking can be offered.
Best: EVF
7. View without switching on  OVF can, EVF can't.
Best: OVF
8. Size  The size of a DSLR  OVF is related to the sensor size. The apparent size of an EVF  preview image is unrelated to the capture sensor. This means DSLR's with 43 mm (diagonal) sensors provide big bright OVFs, but DSLRs with smaller sensors have smaller and less appealing OVFs. Micro Four Thirds camera with even smaller sensors can provide a  big bright EVF view just like a large DSLR.
Best: EVF 
9. Clarity/Sharpness  With present technology, the best and biggest DSLRs  and the best rangefinders have OVFs  providing the best clarity and sharpness. Budget  DSLRs are considerably less impressive. EVFs vary from excellent at the top end to awful at the budget end of the market. EVFs are improving but are not quite at the level of the best OVFs yet.
Best: OVF   
Conclusion  I don't really hate optical viewfinders, I just think they are last century's technology. The best ones still have an edge over good EVFs in some aspects of performance, particularly in the areas of responsiveness and refresh rate. I would also like to see better highlight/shadow detail in the EVFs which I have used recently, mostly in M43 cameras. In other respects the EVF  already provides many advantages. EVF technology continues to evolve while the OVF in it's various manifestations reached a development limit many years ago.   


Nostalgic Camera Review Pentax Spotmatic

$
0
0

Pentax Spotmatic SLR Camera  Nostalgic Review
Are our modern cameras really better ?
Author  AndrewS  May 2013
 
Introduction  In the late 1960's and through the 1970's all my photos were made with a Pentax Spotmatic  SLR film camera. For much of that time I had only one lens, a Takumar 50 mm f1.7.  There was no such thing as a zoom lens for consumer cameras.
That was the heyday of street photography, an activity all but banned in these anxious times.  I made some of my all time favourite photos with that camera. You can see a few of them with this article.

Why review an (almost) 50 year old camera ?  This blog is about camera ergonomics.  Some modern cameras which I have used are dreadful kludges, with truly awful ergonomics. Others are not bad at all. I thought it might be interesting to compare the old with the new to get some sense of progress (or lack of it) in camera design over the last 50 years or so.
 
Description and Features  The Spotmatic is (you can still buy an old one on eBay) a mechanical single lens reflex camera which takes 35 mm perforated film in preloaded cassettes. Image size is 24 x 36 mm. Lenses are interchangeable, using the 42 mm screw mount which was popular with several makers in the 1970's. The really big deal which the Spotmatic brought to consumer photography in 1964  was Through the Lens Metering.  At first this required the lens aperture to be stopped down, which made metering a deliberative business. Open aperture metering arrived with the Spotmatic SP-F in 1973. Batteries are required for the exposure meter but everything else works manually. Despite the name, the meter is of center weighted averaging type, not a spot meter, although I believe an early prototype may have featured spot metering.
The camera body and lenses are very compact. Body dimensions are Width 143 mm, Height 92 mm, Depth 49 mm. The box volume is 645 cc. No current model "full frame" DSLR comes anywhere near this compact size. In fact no DSLR using the APS-C sensor size, which is less than half the area of 24 x 36 "full frame", is as small as the Spotmatic. Even the recently released Canon EOS 100D has a box volume of 735 cc.
You can still buy new cameras like the Spotmatic. For instance the FM10 is still in Nikon's current catalogue. This is an all manual camera made by Cosina for Nikon, having a list of specifications and features almost identical to the Spotmatic.
 
Image Quality  Most of the Takumar lenses were of excellent quality. Like many others, I mostly used Kodak TRI-X film, which gave decent resolution and  good sharpness. The film had excellent dynamic range and exposure latitude, which it needed, as exposure metering was not as accurate as one gets from a modern camera. Overall I like the appearance of prints made from my Spotmatic negatives.  They lack the absolute resolution of modern cameras, but have good tonal gradation and are plenty sharp enough for most purposes.
Performance  With no autofocus, no motor drive and no auto exposure system, you might be excused for expecting the Spotmatic to perform poorly.  But that is not the case. With a good understanding of the principles of camera operation and plenty of practice, the experienced user can in fact extract very good performance from this camera. One learned to preset focus and exposure when moving into a situation.  I would commonly use an understanding of hyperfocal distance to pre set focus distance and aperture.  With these presets, shot to shot times were determined by the speed with which one could operate the film wind lever. I found one shot every two seconds to be quite realistic.
 
Ergonomics 
Setup Phase  There being nothing remotely resembling a menu, Setup consists of reading the instruction manual and getting plenty of practice using the device.
Prepare Phase   This involves loading film and setting the film speed.  In many situations it would also involve presetting focus distance, aperture and shutter speed. These settings would normally be considered part of Capture Phasewith a modern camera. But they take a little longer with the Spotmatic.  This in turn means more anticipation is needed  so when the "decisive moment" appears, one only has to press the shutter button.
 
Capture Phase
Holding  The Spotmatic and many cameras like it have the "no handle" design which actually works decently well because there is no monitor (or anything else) taking up space on the back of the camera. This means the right thumb can be angled across the back, allowing the index finger to fall naturally onto the shutter button.
Viewing  The camera has a proper glass pentaprism and decent viewfinder optics giving a clear view of the subject.
 
Operating   The keyword here is simplicity. Focus is controlled by turning a ring on the lens with the left hand.  Aperture is changed with another ring on the lens barrel, also using the left hand. Shutter speed is changed via a dial on the top plate. To do this the right thumb and index finger have to move up a little from their basic positions, which disrupts grip with the right hand while shutter speed is being adjusted.  The exposure meter is activated and lens stopped down by pushing a little lever on the upper left (as viewed by the user) side of the lens mount. Film wind on to the next frame is achieved by swinging the rewind crank using the right thumb. 
All these actions are simple, direct and specific.  They just take a little longer to perform than the equivalent actions with a well designed modern electronic camera. This could be considered a disadvantage but with practice the camera is actually quite easy to use and quick to operate. The art of anticipation is an essential operating requirement.
Metering is perhaps the least endearing  part of this camera's operation.  It involves stopping down the lens then changing aperture and/or shutter speed  to move a needle (visible in the viewfinder) up or down. The process is a bit slow and in my experience the results not as accurate as a modern camera.
Review Phase  This involves finishing a roll of film, rewinding it into the cassette, developing the film then making prints. There is of course, no chance to review photos immediately after capture.
What did I yearn for  in the years I was using the Spotmatic ? Mostly I wanted to be able to change film speed in mid roll.  Some other capabilities came to mind at the time. Faster, more reliable exposure metering was one. Another was for some kind of film resistant to airport X Rays. That's about it, really. I never wished and still don't care much for the great majority of features found on modern cameras.
 
Comparison with modern cameras
What have we gained ?
Auto Exposure  Auto Exposure arrangements on modern cameras are a marked improvement on the clunky system employed by the Spotmatic.  Exposure is calculated then Aperture, Shutter Speed and ISO set in the millisecond between half and full press of the shutter button.  Now we have Exposure Modes, with P,A,S and M available on a Main Mode Dial. We have one (or two, or three)  control dials for immediate adjustment to Aperture and Shutter Speed.  
These features greatly streamline exposure metering and setting of primary exposure parameters.  The curious thing is that some makers of recent model cameras do not seem to understand the ergonomic benefits of these technologies.  For instance most Sony NEX cameras have no Mode Dial, including the top of the range NEX7.  Fujifilm's (FujiFilm ???) X100/100s, X-Pro1 and  X-E1 have no Mode Dial and retain the same basic control layout for Aperture and Shutter Speed as that found in the Spotmatic and film era Leica M cameras. I struggle to comprehend why camera makers fit their products with an odd or antiquated user interface which prevents the user from fully enjoying the benefits of the  modern technology which they posess.
Autofocus  Any camera maker which failed to develop AF in the late 1980's and early 1990's was doomed to failure. For the snapshooter, AF is an imperative technology. However, for the expert user I think the  benefits of AF have been somewhat oversold.  I used manual focus cameras of one kind or another for 55 years and rarely in that time felt a pressing need for autofocus. However since the advent of autofocus I  have many times been frustrated and disappointed by the failure of a camera's AF to focus correctly or by the way AF reduced my options to preset focus manually by scale.
Ability to set active AF/MF area anywhere in the frame   This is something mirrorless cameras can do well and I regard it as a really useful feature.
Change ISO anytime  This is so obviously useful, no more need be said.
Video  Most cameras now do competent video. Some are capable of broadcast quality motion picture output.
Image preview/review  The benefits of image review immediately after making the exposure are obvious. However modern EVF's also allow a preview of the image which is about to be captured, with display of the effect of exposure compensation, white balance, etc.
Configurability I include this as a benefit but it could equally be seen as a curse. Modern cameras are so complex and have so many features and options that they must be user configurable. There is no option to avoid the options, so to speak.
 
What have we lost ?
Simplicity  Like innocence, once lost, simplicity cannot be regained.  Modern cameras have literally billions of possible combinations of menu items and user interface options. They are drowning in a welter of complexity.  The Spotmatic has  five user interface modules controlling camera operation, each with just one function.  This spartan interface is enough to get the job done.
Compact size, body and lenses   The Spotmatic is smaller than any DSLR on the market today, even those with the smaller than half frame APS-C sensor size. The lenses are also compact with no need for autofocus function.
Ability to pre set focus distance and aperture by depth of field scale  Some modern lenses especially primes for the 43 mm diagonal "full frame" imager size do have this facility. But most lenses these days are varifocals which by nature cannot use a focus distance scale. Even primes often lack a distance scale.
So, are modern cameras better than old ones like the Pentax Spotmatic ?   In my view, they are better in some ways, not so good in other ways. The Spotmatic and cameras like it, engage the user in a way which the modern electronic camera cannot match.  The Spotmatic does nothing automatically. In order to use the camera effectively one must learn about the principles of photography, understand the relationships between film speed, aperture, shutter speed, camera movement and depth of focus. The user must practice anticipating photo opportunities, preparing the camera ahead of time as the environment alters, anticipating subject behaviour and working the controls efficiently.
Could a digital version of the Spotmatic be viable ?  Technically, I guess it could be made but it would tick so few of the marketing boxes which camera makers and possibly buyers seem to regard as essential these days that I doubt it would sell.  
 

Mockup Lumix GH4 Camera

$
0
0

CONCEPT  LUMIX  GH4  CAMERA  [MOCKUP]
Ergonomic evolution of the Lumix GH3
Proof of concept by mockup
Author  AndrewS  May 2013
Introduction  Last month I wrote a piece titled "Ergonomic Logic of the Lumix GH3" on this blog. I rated the GH3 as having the best ergonomics of any camera which I have used in the last 50 years, but said that it could be even better with some further development. Since then I have been busy working on this project. The result of my labours is the mockup proof of concept "GH4" described in this article. This mockup incorporates just two features which significantly differ from the layout of the GH3. These are:
1.  The Parallel Handle  and
2.  The JOG lever.
There are some secondary changes which are consequential to the inclusion of these two features.
About Mockups  Over the last three years I have designed and built five mockup cameras to test my ideas about ergonomics at a physical hands-on level. I make the mockups from scrap plywood, shaped and glued. This method of construction allows me to test many versions of form, handle shape, layout and detailed location of user interface modules [UIM].
"GH4" Mockup Specification All my previous mockups have used the "Flat-top-EVF-on-the-left" type of design.  However the Lumix GH series cameras have all had the "Hump-top-small-DSLR-style" design so I used that for this project. The hump top does have significant  advantages. It allows the inbuilt flash to be in line with the optical axis in landscape orientation, the flash can be higher and the flash, hotshoe and eyepiece all occupy the same fore and aft space  which frees up width on the top deck for Set and See dials.
The mockup described here takes the already good  Lumix GH3 as starting point and tries to improve it's ergonomics, particularly in the Capture Phase of camera work.
I based the design on the "Parallel Handle" concept which allows the camera depth to be reduced and permits a different, more ergonomically effective layout of UIM's on the top right of the camera.  There is an all ways  (you can move it in any direction) JOG Lever accessible to the right thumb and an AF start back button.  Width has increased 5 mm over the GH3 to create more space on the right side of the monitor but depth has decreased 8 mm making the box volume of the mockup smaller. The fully articulated monitor is 92.5 mm wide,  the same width  as that on the GH2, 1 mm less than that on the GH3 and 2.5 mm more than the monitor on the G5. The height allowed for the EVF eyepiece is slightly less than that of the GH3, with an assumption that the eye sensor will be on the right side of the eyepiece, as found in the GH2. This allows a slight reduction in the height.
The shoulders have been lifted up so the upper part of the camera is "flat-top-with-hump-and-set-n-see-dials". Lifting the shoulders creates more vertical space above and to the right of the monitor. This has several benefits. There is more space for the JOG Lever. The shutter release button is higher, which allows the handle to be higher to fit a full five finger grip even with larger men's hands. The shape of the upper part of the handle is completely different with less gap between the right index and middle fingers. This has two benefits. It allows the right index finger to move more freely around the UIMs on the camera top and it helps with sculpting a full five finger grip.
All of these arrangements are entirely about form following function and function following fingers. The resulting shape does not conform to any preconceived style but has it's own conceptual and stylistic integrity based on functional efficiency. I showed it to a family member recently who pronounced it to be "the ugliest camera I have ever seen".  Oh well, I guess you can't win them all. She was unaware of the ergonomic mission of the mockup.
I have trialled the completed mockup on a wide range of actual or potential camera users, from 10 year old grandchildren through ladies with and without long fingernails, to men with large hands.  All declared themselves able to find a comfortable and secure grip on the camera with easy access to the key UIM's in Capture Phase without disrupting grip on the camera. Even the lady who didn't care for the appearance of the camera was able to hold it comfortably and securely, without strain.
This is possible because the design allows small hands to move up and large hands to move down on the handle providing each with a comfortable grip.
The OverviewPhotos  appear above. These are  general views of the Mockup showing it's overall shape. It is quite close in dimensions and user interface to the GH3, with improvements. The dimensions are below:
Camera

Width mm

Height mm

Depth mm

Box Volume cc

GH3

133

93.5

80

995

Mockup GH4

138

92

72

914


The Mockup GH4  box volume is 8% less than that of the GH3.
Buttons on the GH3 measure 5.5 - 6.5 mm in diameter with approximately 0.75 mm projection. Buttons on the Mockup are 8 mm in diameter with 2.5 mm projection. Buttons on the GH3 have a smoothly rounded surface. Those on the mockup have a rough criss/cross surface. They are actually phillips head screws which have just the kind of prominence and surface feel which I want in a button. All the mockup buttons are positioned so they can be located and operated by feel but will not be pressed accidentally.  There are three set-n-see dials on the top deck. On the left is the Drive Mode Dial and to the right of the hump is the Main Capture Mode Dial, both the same as the GH3.
The JOG Lever and Recenter Button of the Mockup have replaced the AF/AE Lock button and Focus Mode Lever of the GH3 so the Mockup has a Focus Mode Dial top right and an AF Start/AF/AE/Lock button just where the thumb can easily find and press it but not so prominent that it will be pressed accidentally.
The hot ginger color was chosen to allow the contour shapes of the camera and handle to be seen easily in photographs and to provide a contrast with the black UIMs. Also I got bored with black and silver cameras.
The Layout Diagram Photo  is above.  There are 7 numbered buttons plus 4 positions on the Control Dial/4Way Controller Module. The function of each of these 11 control points can be user selected from a comprehensive list of options. I think this is the best approach. It allows each individual photographer to set up the camera to personal preference, then change it when experience and usage lead to a different approach.
One of the buttons can be allocated as access to a Q Menu. Or not, if preferred. One could be Motion Picture Start. Or not, if preferred.
The JOG Lever's primary function is to directly move the active AF (or MF) Area in Capture Phase of operation. It could also be used to navigate menus in Setup Phase or navigate around the playback image in Review Phase.
The Recenter  Button's  primary role is to return the active focus area to the center in Capture Phase with the AF(MF) Area highlighted, but it could also be used as a reset or return  button in Setup or Review Phases.
Primary function of the AF Back Button is to activate and hold (AFS) or continue (AFC) autofocus. It could also be configured for AF/AE Lock.
The Next Two Photos  show the Mockup beside a GH3, front and back views.   The Mockup has a parallel type handle which is wider than it is deep.  This encourages the layout of UIMs found on top of the handle.  You can see the hump on the mockup is a bit flatter on top and has more vertical sides than that on the GH3. This is to make room for the three  Set-and-See dials on the camera top. The hump could be spread out more to make it more streamlined, like that on the Lumix G6, but that would make it very difficult to fit three Set-and-See  Dials, so the Focus Mode setting would have to move to the Q Menu or a button.  This would work but I regard it as desirable for a flagship camera to have the Focus Mode always visible on a Set-and-See module.
The mockup lens shown is the same length and diameter as the lumix 12-35 mm f2.8.
Index Finger Shutter Button
Index Finger Button 1
Index Finger Front Dial
Index Finger Button 2
Front UIM group operation [Parallel Handle]  The four photos above show how the right index finger operates the four modules under it's control.  Notice the the number and layout of UIMs on the Mockup and compare this with  arrangements on the GH3. The distance between the center of the shutter release button on the GH3 and the ISO button is 24 mm.  For most people with merely normal finger flexibility, the right index finger has to stretch to it's maximum to reach back for the ISO button. It's not a bad arrangement but it can be improved.
The layout on the Mockup is quite different.  There are 4 instead of 5 UIMs and they are arranged in quad formation. The center of the shutter button is only 12 mm from the Front Dial. This is just far enough to prevent accidental activation of the wrong button. Buttons 1 and 2 sit to the right where they are easily located by feel and operated with slight flexion of the index finger.  They are also lower than the Shutter Button and Front Dial so they will not be accidentally activated.
 It is difficult to adequately convey a sense of the ergonomic difference between these two arrangements with words and pictures alone. That is why I make mockups which reveal the superiority of the parallel handle system.  Note also that the Shutter Button is raised 4 mm above the camera body surface and it has a squared off,  not-quite-sharp edge which makes it easy to find by feel and is obviously different from either the Front Dial or the buttons.  The Front Dial also has a not-quite-sharp edge with strong, sharp serrations which are easy to identify by feel. Both the Shutter Button and Front Dial are positioned and angled in three dimensions so the index finger finds them in just the right place.  Most camera makers set their buttons and other control modules more deeply into the camera body and shape them more smoothly. I assume this is done for styling reasons but the ergonomic effectiveness of these smooth, barely protruding buttons is not optimal. They work, but could be improved.
I would allocate ISO and Exposure Compensation to Buttons 1 and 2, so the four modules together act to adjust primary and secondary exposure parameters, but others will have their own ideas.  Of course AF can be activated with half press of the Shutter Button as usual.
Thumb Rest Position/AF start
Thumb JOG Lever
Thumb Recenter Button
Thumb Rear Dial
Rear UIM group operation [JOG Lever]  Above  is another set of four photos showing how the right thumb operates the JOG Lever, AF Back Button start, Recenter Button and Rear Dial, all without releasing grip on the lower part of the handle with the base of the palm. This set of UIMs, together with the Focus Mode Dial,  are allocated to primary and secondary focus parameters.
In rest position the interphalangeal joint of the right thumb lies against the thumb rest, just below the Rear Dial. This provides a very stable grip on the camera with little effort because the right hand is in natural half closed position. The camera just rests in the hand. The user does not have to squeeze the hand in order to attain a stable hold on the camera.
On the GH3 and many other cameras. mirrorless and DSLR, active AF area is moved with the Control Dial/4Way Controller. This works but requires the right thumb to be dropped down nearly to the bottom of the right side of the camera. This in turn completely disrupts the right hand's hold on the camera.  The JOG Lever is a much more ergonomically elegant approach to the task of moving active AF area. It maintains grip with the right hand, is fast and requires minimal movement of the thumb.
So most exposure adjustments are made with the index finger. Most on camera focus adjustments  are allocated to the right thumb.  Manual focus is operated by the left hand as usual.
Handle  Above  are photos of the Mockup and GH3 handles. On the GH3 photo there are two arrows pointing at the top section of the handle. The distance between them is 9 mm. On the Mockup handle there is no flat section at the top of the handle. Therefore the middle finger rests closer to the index finger. This in turn allows the UIMs to be reached by the index finger with less lateral stretching movement being required.
Height of the center of the shutter button from the base is 80 mm on the Mockup, 73 mm on the GH3.
Control Dial/4 Way Controller  I have left this in place using the same location and diameter as that on the GH3.  As there is more body width in this area I have been able to open up access to the dial so it is easier to operate. I would  leave access to the Main Menu System allocated to this dial as is the case with the GH3.  Using Menus is a Setup or occasionally Prepare Phase function so the Control Dial is an appropriate access and control module.
Other UIMs.  The Disp Button on the GH3 is located right in the middle of the rear section of the handle. This is a distinctly suboptimal place for a button. Disp can be allocated to one of the positions on the 4 Way controller, as this Module is no longer required for moving AF area.
Summary  The GH3 embodies significant improvements in ergonomics compared to previous models in the Lumix line of cameras.  But even good design can be improved. The "GH4" Mockup described here brings two features  to the design of  mirrorless interchangeable lens cameras, the Parallel Handle and the JOG Lever, with their associated suite of UIMs.
All I have to do now is persuade someone who makes real cameras to adopt my ideas.


Viewing all 824 articles
Browse latest View live


Latest Images